Invite team members to your tailnet
If your Tailscale network (tailnet) uses a custom domain, you can send a team invite to one or more email addresses simultaneously.
Your Tailscale billing includes invited users who join and transfer data in your tailnet. This includes invited users who are paid users in other tailnets. Tailscale bills for every active user on every tailnet.
Prerequisites
- You need to be an Owner, Admin, or IT admin to send invites.
- Your tailnet must use a custom domain. If your tailnet uses shared domains (such as
example@gmail.com) you can send invites using a URL link instead. - Your custom domain must use one of the following identity providers:
Send a team invite
-
Open the Users page of the admin console.
-
Select Send welcome email.
-
Add the email address for each user that you want to add to the tailnet. Any email address in an invite must match the custom domain name for your tailnet.
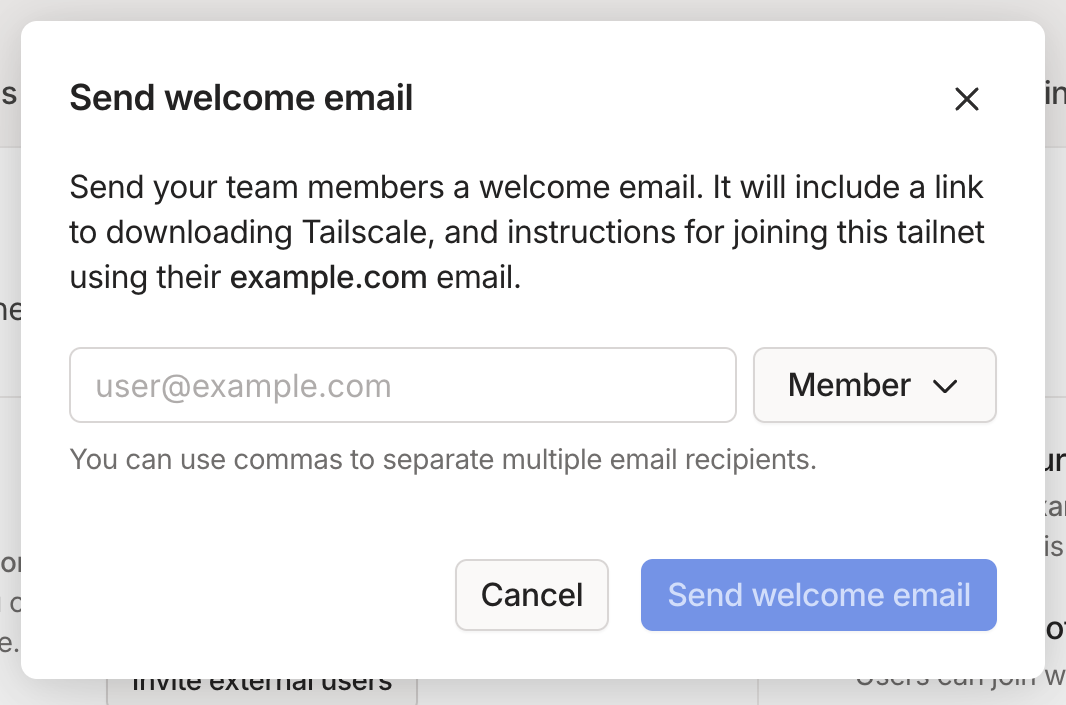
Multiple email addresses must be comma-separated with an optional space after each comma. The acceptable formats are:
user1@example.com,user2@example.com,user3@example.comuser1@example.com, user2@example.com, user3@example.com -
Select the user role you want to automatically assign for each user in the invite. Only one role can be assigned for all email addresses in a single invite.

-
Select Send emails.
Accept a team invite
Users will receive an email inviting them to join your organization's tailnet by downloading the Tailscale client and signing in with an identity provider or a passkey.
Approve a team invite
If your tailnet has user approval enabled, you must approve invited users before they can join the tailnet.
View team invites
To view all of the current invites:
- Open the Users page of the admin console.
- Select the Status drop-down and filter by Invited.
Resend a team invite
To resend an invite:
-
Open the Users page of the admin console.
-
Locate the invited user by typing their email address in the search bar or filter users by Invited.
-
Select the
 menu next to the user's name, then select Resend user invite.
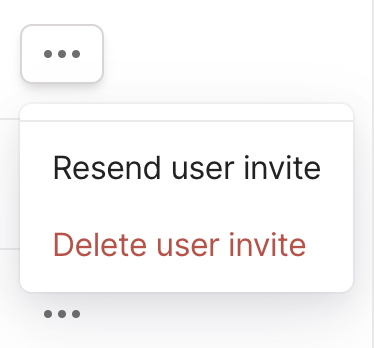
Delete a team invite
You can delete invites if you accidentally share a user invite or want to revoke it for another reason.
To delete an invite:
-
Open the Users page of the admin console.
-
Locate the invited user by either typing their email address in the search bar or filter users by Invited.
-
Select the
menu next to the user's name, then select Delete user invite.
Monitor team invites
You can track user invite activity in the Configuration logs page of the admin console.
Limitations
- You can only invite users in the same domain.
- GitHub user accounts don't have email addresses, so you cannot send an invite to GitHub accounts.
- A single team invite can only grant the invited users one role.