Database Connectors
Last validated:
Database Connectors let you securely connect self-hosted and cloud-hosted databases to your Tailscale network (known as a tailnet). You get the benefits of Tailscale's Zero Trust Network Architecture and identity-based access control for your databases. You can also use Query Logging with Database Connectors. Query Logging lets you log database access and queries locally, to a security information and event management (SIEM) system, and to Amazon S3 or similar storage buckets.
Use cases
Database Connectors are useful for extending Tailscale access control to self-hosted or cloud-hosted databases. You manage the access to the database using your tailnet policy file.
Common use cases include:
-
Access control: Provide database access control through your tailnet policy file, same as you do for other resources in your tailnet. Access control in Tailscale uses various targets and selectors to identify resources. You can set database access control based on autogroups, custom groups, tags, IP addresses, and individual users.
-
Query logging: Stream logs of database queries to another node in your tailnet. You can use the logs for audit purposes. The recordings are encrypted end-to-end just like all other Tailscale traffic, and not visible to Tailscale.
How it works
A database connector acts as a gateway so users and devices in your tailnet can access a database. A database connector runs the tsdb binary, which lets Tailscale identities authenticate to and access databases, without needing long-lived database passwords. The tsdb binary enables policy-driven and fine-grained access based on your tailnet policy file.
A grant that has the tailscale.com/cap/databases application capability defines which protocols, ports, databases, and database engines are allowed, and which database roles a caller may impersonate. When a client connects, the connector checks this grant to ensure correct access. If access is allowed, the connector dynamically provisions ephemeral database credentials, one ephemeral user per session, and uses those credentials to authenticate to the database.
The connector relays the protocol traffic between client and database, and records client queries if tsrecorder is configured.
When a session ends, the connector revokes the ephemeral credentials.
Traffic between the client and the connector is always encrypted using WireGuard, with optional Transport Layer Security (TLS) for compatibility. Traffic between the connector and the database is always encrypted using TLS with mandatory certificate verification, including Certificate Authority (CA) validation. Together, these mechanisms ensure that database traffic is encrypted end-to-end while remaining compatible with standard database clients and tooling.
If you choose to run the tsrecorder binary (which is a standalone recorder binary that is not part of the tsdb binary), you can enable query-level session recording/auditing for your database connectors. The recorder will connect to your tailnet and receive end-to-end-encrypted recordings using WireGuard.
Compatible database engines
Database Connectors works with the following database engines:
cockroachdb(CockroachDB)mongodb(MongoDB)postgres(PostgreSQL)
Prerequisites
Before you can use the Database Connectors feature, ensure you meet the minimum requirements:
-
A Tailscale account with Owner, Admin, or Network admin permissions, so you can perform the following tasks on the tailnet where you want to set up Database Connectors:
- Add a device to your tailnet. You will add and configure the device so it can connect your tailnet to your database. For purposes of this documentation, this is your Database Connectors device.
- Edit the tailnet policy file.
- (Optional) Create an authentication key (auth key), an OAuth client, or a workload identity token.
-
Ability to create a configuration file and start Docker so you can run the
tsdbbinary on your Database Connectors device. -
The
database-capabilityfeature flag enabled on your tailnet. This is required only while Database Connectors is a private alpha release. -
A self-hosted or cloud-hosted database, and the ability to make any configuration changes for the database. Any such configuration is database-specific. Refer to the database-specific instructions documented separately in this topic.
Connect to Amazon RDS
To use Database Connectors to connect your tailnet to an Amazon RDS database, ensure you meet the following requirements:
- An RDS database cluster running a compatible database engine.
- Permissions on the database cluster to create and delete users for the roles the database connector can impersonate.
- Ability to create and configure a compute instance that can connect to the RDS cluster and can host the
tsdbprocess. The compute instance can be an Amazon Elastic Compute Cloud (EC2) instance, a container on Amazon Elastic Container Service (ECS), a pod on Amazon Elastic Kubernetes Service (EKS), or other Amazon Web Services (AWS) service that is able to function as a compute instance and hosttsdb. - Ability to SSH into the compute instance, either using regular SSH or Tailscale SSH.
- Ability to create a database service account for your Database Connectors device.
- Ability to modify security groups.
- Familiarity with AWS. Some of the AWS steps in this topic are described at a high level and not fully detailed.
Step 1: Update your tailnet policy file
Configure your tailnet policy file to securely route tailnet traffic to your database. You need to make the following updates to your tailnet policy file:
- Create a tag to identify your Database Connectors devices, which will connect your tailnet users to your database.
- Create a grant that lets your tailnet users access the database through a Database Connectors device.
You need to be an Owner, Admin, or Network admin to edit a tailnet policy file.
Create a tag for your Database Connectors device
Tailscale tags let you authenticate and identify non-user devices. A tag consists of an identifier and the users and groups that can apply the tag. Create a tag:database-connector tag so that you apply the tag to the device you want to use for Database Connectors.
-
Go to the Access controls page of the admin console.
-
If you don't already have a
tagOwnersfield in your tailnet policy file, create it.{"tagOwners": {},} -
Within the
tagOwnersfield, create atagnameddatabase-connectorand assignautogroup:memberas the tag owner.{ "tagOwners": {"tag:database-connector": ["autogroup:member"],}, }This lets any member of your tailnet assign this
database-connectortag to devices. Being the tag owner by itself does not let you access the databases, because access is defined by grants.
Create a grant for your Database Connectors device
-
If you don't already have a
grantsfield in your tailnet policy file, create it.{ "tagOwners": { "tag:database-connector": ["autogroup:member"], },"grants": {},} -
Within the
grantsfield, create a grant that specifies the appropriate access and Database Connectors information for your database.{ "tagOwners": { "tag:database-connector": ["autogroup:member"] }, "grants": [{"src": ["*"],"dst": ["*"],"ip": ["tcp:*"],"app": {"tailscale.com/cap/databases": [{"my_postgres_1": {"access": [{"databases": ["<TARGET-DATABASE-NAME>"],"roles": ["<TARGET-DATABASE-ROLE>"]}],"engine": "postgres"}}]}}] }In the example above:
srcis the set of sources that you permit to access your database.dstis the set of destination endpoints that the source can access.ipis the set of network layer capabilities that specifies the allowed protocols and ports on the destinations.appis the set of application layer capabilities to grant.tailscale.com/cap/databasesis the application capability to use when you set up Database Connectors.my_postgres_1is the ID of a database configuration. You use this value when you configure the Database Connectors device.accessis the set of parameters that define access formy_postgres_1.databasesis the set ofmy_postgres_1databases for which you are providing access. Replace"<TARGET-DATABASE-NAME>"with the literal name of your target database, for example,"inventory". Each value must be an exact database name; pattern matching and wildcards are not supported.rolesis the set ofmy_postgres_1roles for which you are providing access. Replace<TARGET-DATABASE-ROLE>with the names of your target database roles (for example,["viewer", "writer"]). Each value must be an exact database role; pattern matching and wildcards are not supported.engineis the database engine formy_postgres_1.
For more information about grants syntax, refer to Grants syntax.
-
Select Save to save your tailnet policy file changes.
Step 2: (Optional) Create an auth key
For the Database Connectors device, you can bypass interactive login when the device joins your tailnet.
-
Open the Keys page of the admin console.
-
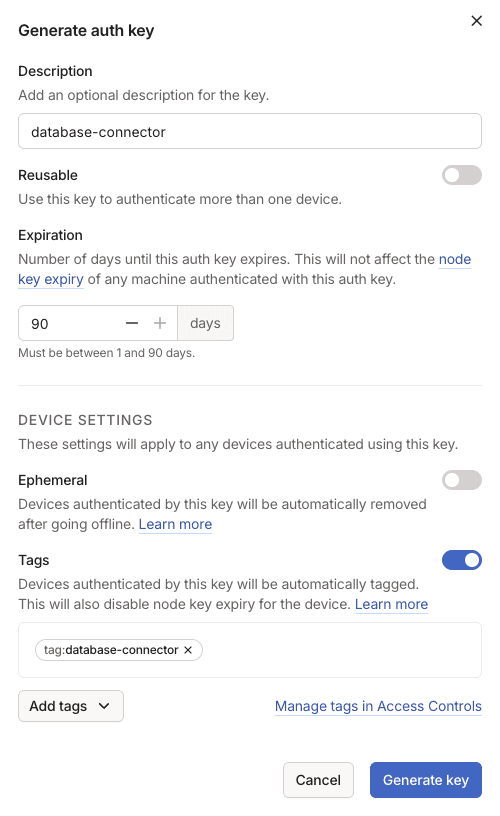
Select Generate auth key.
-
For Description, enter
database-connectoror another name that you want. This value is used only for organizing your auth keys. -
Enable Tags, and select the
tag:database-connectortag that you created when you updated your tailnet policy file. -
(Optional) Configure other settings for the auth key. For information about auth key settings, refer to Auth keys.
-
Select Generate key.
-
Copy the auth key value and keep it secure. It won't be shown in full again. You need the auth key value later, if you want to bypass interactive login for the Database Connectors device.
-
Select Done.
Step 3: Configure your AWS settings
Create a compute instance to use as the Database Connectors device. This device will connect traffic between your tailnet and your database, and it will host the tsdb binary that facilitates secure connections.
For purposes of this documentation, the compute instance is an EC2 instance, but it can be any AWS compute instance that is able to host tsdb.
-
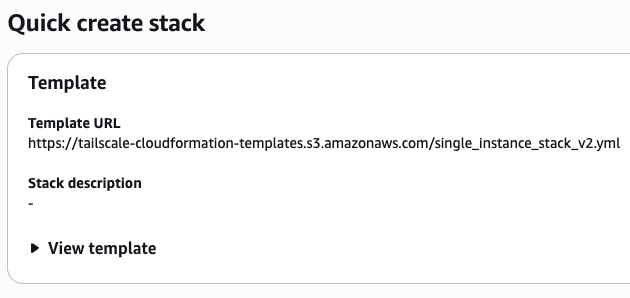
Using the AWS web interface, create an EC2 instance to use as the host for the
tsdb.-
You can optionally use the Tailscale cloud formation stack to create an EC2 instance connected to your tailnet.
-
-
Set up connectivity between the compute instance and the RDS cluster. You have two options for connecting the compute instance to the RDS cluster.
Configure a security group to allow inbound access from the compute instance to the RDS cluster.
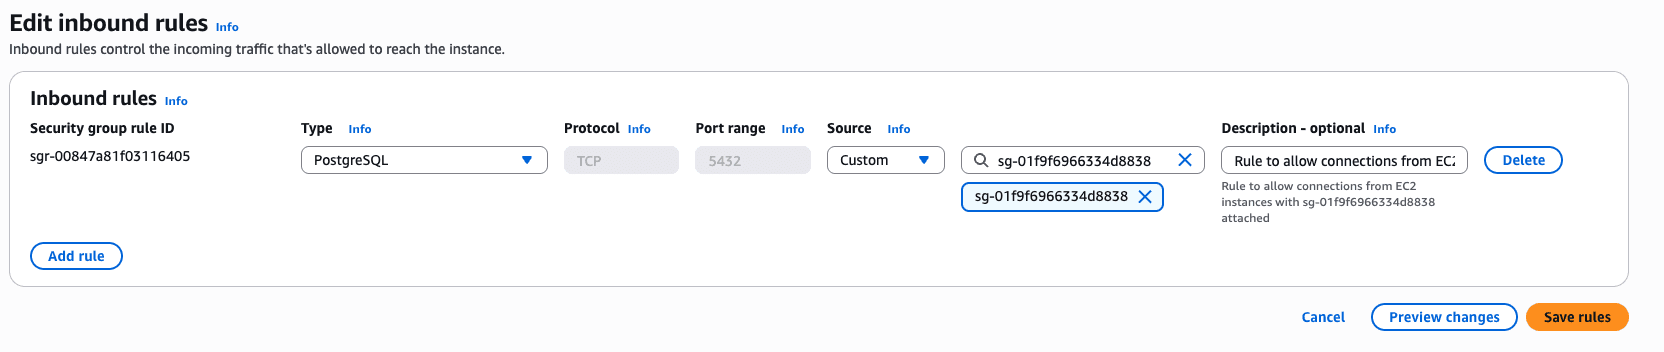
For more information about AWS resource security groups, refer to Control traffic to your AWS resources using security groups.
-
Connect to the database as a user with sufficient privileges to provision a service account for the database connector.
psql -h <RDS-CLUSTER>.<REGION>.rds.amazonaws.com -p <PORT> -U <USERNAME>

Password for user <USERNAME>: ***
Replace
<RDS-CLUSTER>and<REGION>with your RDS cluster and region. Replace<PORT>with the appropriate port for your database. By default, Postgres uses5432as the port. Replace<USERNAME>with a user that has the sufficient privileges to provision a service account. -
Create a service account user for the database connector. Without a service account and the granted roles defined in the next step, the database connector will not have permission to let clients impersonate the database role.
CREATE ROLE <USERNAME> WITH LOGIN CREATEROLE PASSWORD '<PASSWORD>';Replace
<USERNAME>and<PASSWORD>with your database admin user and password. -
For each role listed in
"roles"in yourtailscale.com/cap/databasescapability, grant that database role to the service account. Without a service account and the granted roles, the database connector will not have permission to let clients impersonate the database role.GRANT <TARGET-DATABASE-ROLE> TO <USERNAME> WITH ADMIN OPTION; ...Replace
<USERNAME>with the database admin user that you defined in the previous step.Replace
<TARGET-DATABASE-ROLE>with one of the roles you defined in the"roles"field of yourtailscale.com/cap/databasescapability.For example, if the
"roles"field assignment in yourtailscale.com/cap/databasescapability is["viewer", "writer"], then grant bothviewerandwriterto your service account user.GRANT viewer TO <USERNAME> WITH ADMIN OPTION; GRANT writer TO <USERNAME> WITH ADMIN OPTION;
Step 4: Configure your Database Connectors device
-
From a machine on your tailnet, use SSH to connect to the EC2 instance. You have these choices for using SSH:
-
Regular SSH, if you created an SSH key pair.
-
Tailscale SSH, if you set it up.
-
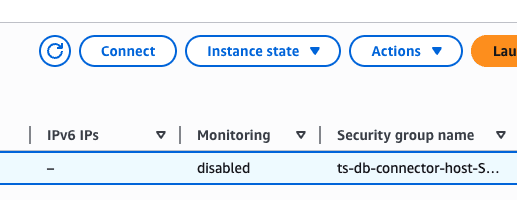
A browser-based SSH session, by selecting Connect in the Amazon EC2 console.
-
-
In the SSH session, create a
database-connectorfolder and make it the active working directory. You will use this folder to host thetsdbbinary.mkdir database-connector && cd database-connector -
Download the AWS RDS Certificate Authority (CA) certificate bundle.
curl -o rds-combined-ca-bundle.pem https://truststore.pki.rds.amazonaws.com/global/global-bundle.pem -
Create a
.config.hujsonfile. You can use the following commands to create the initial file.# Minimal config, see docs for available options cat > .config.hujson <<EOF { "databases": { "my_postgres_1": { // database key must match with the tailnet policy file "engine": "postgres", "host": "<RDS-CLUSTER>.<REGION>.rds.amazonaws.com", "ca_file": "/rds-combined-ca-bundle.pem", } } } EOFReplace
<RDS-CLUSTER>and<REGION>with your RDS cluster and region. This example configuration shows only thedatabasessection. Thetailscaleandconnectorsections are omitted here because the Tailscale auth key is passed through theTS_AUTHKEYenvironment variable in the next step. For a complete set of configuration settings, refer totsdbpackage reference. -
With the
database-connectorfolder still set as the active folder, pull in thetsdbimage.docker pull ghcr.io/tailscale/tsdb:latest -
Start the container.
docker run \
-e TSDB_DB_my_postgres_1_ADMIN_USER=<USERNAME> \
-e TSDB_DB_my_postgres_1_ADMIN_PASSWORD=<PASSWORD> \
-e TS_AUTHKEY=<TAILSCALE-AUTH-KEY> \

-v ./.config.hujson:/config.hujson:ro \
-v ./rds-combined-ca-bundle.pem:/rds-combined-ca-bundle.pem:ro \

ghcr.io/tailscale/tsdb:latest --config=/config.hujson
Replace
<USERNAME>and<PASSWORD>with the database admin name and password that you created earlier.If you previously created an auth key, replace
<TAILSCALE-AUTH-KEY>with your auth key, so you can bypass the interactive Tailscale login for the EC2 instance. If you did not create an auth key, remove the entireexport TS_AUTHKEY=...line.The
-varguments mount volumes for the configuration file that you created and the RDS CA certificate bundle that you downloaded.
Step 5: Access the database
Using a tool of your choice, connect to your database from a device in your tailnet (it doesn't need to be the Database Connectors device). The connection is encrypted end-to-end but you can access it without friction of typing in credentials.
This example uses psql. At a command prompt on one of your tailnet's devices, connect to the database:
psql -h my_postgres_1 -p <PORT> -U <TARGET-DATABASE-ROLE> -d <TARGET-DATABASE-NAME>
Replace <PORT> with the appropriate port for your database. Replace <TARGET-DATABASE-ROLE> and <TARGET-DATABASE-NAME> with the values you created earlier. For example:
psql -h my_postgres_1 -p 5432 -U viewer -d inventory
Database access and query logging
You can use configuration audit logs, network flow logs, and query logging to explore logs associated with your tailnet's database access and queries.
Configuration audit logs contain activity such as updates to grants, including updates for the just-in-time (JIT) access enabled by Database Connectors. You can view configuration audit logs in the Configuration logs page of the Tailscale admin console. For more information, refer to Configuration audit logging.
Network flow logs contain activity about which tailnet node connected to which database through an instance of tsdb. The data captured is the flow of network traffic, not the contents of the network traffic. Tailscale does not and cannot inspect your traffic. Depending on your pricing plan, you can view network flow logs in the Network flow logs page of the admin console. For more information, refer to Network flow logs.
Query logging contains the text queries processed by an instance of tsdb. Database Connectors query logging is built upon the tsrecorder package. If you are running Database Connectors, you can deploy a tsrecorder node in your tailnet to enable query logging.
Database Connectors query logging does not provide filtering or masking options to catch and remove personally identifiable information (PII) or other sensitive information.
Set up query logging
To use query logging, set up a device on your tailnet that is hosting tsrecorder. You need to create a tag, create an auth key, and modify your tailnet policy file to allow access between your tsdb instances and the tsrecorder device.
Create a tag for your recorder device
Within the tagOwners field, create a tag named database-recorder and assign autogroup:admin as the tag owner.
"tagOwners": {
   "tag:database-connector": ["autogroup:member"],
   "tag:database-recorder": ["autogroup:admin"],
},
This lets any of your tailnet admins apply the tag tag:database-recorder to a device. Consider using a different tag owner if you need to restrict this tag to a different set of users.
Create an auth key for your recorder device
Create an auth key for the device that will host tsrecorder.
-
Open the Keys page of the admin console.
-
Select Generate auth key.
-
For Description, enter
database-recorderor another name that you want. This value is used only for organizing your auth keys. -
Enable Tags, and select the
tag:database-recordertag that you created when you updated your tailnet policy file. -
(Optional) Configure other settings for the auth key. For information about auth key settings, refer to Auth keys.
-
Select Generate key.
-
Copy the auth key value and keep it secure. It won't be shown in full again. You need the auth key value later, when you start the
tsrecorderdevice. -
Select Done.
-
Within the
"tailscale.com/cap/databases"section of theappfield, add arecorderentry and assign it["tag:database-recorder"]."app": { "tailscale.com/cap/databases": [ { "my_postgres_1": { "access": [ { "databases": ["<TARGET-DATABASE-NAME>"], "roles": ["<TARGET-DATABASE-ROLE>"] } ], "engine": "postgres","recorder": ["tag:database-recorder"]} } ] }Replace
<TARGET-DATABASE-NAME>and<TARGET-DATABASE-ROLE>with the database name and role that you defined earlier.
Deploy tsrecorder
You can deploy tsrecorder as a Docker container, and you can find it at the Tailscale tsrecorder DockerHub page. If you use Tailscale's Kubernetes operator, you can alternatively deploy the recorder using the Recorder Custom Resource.
For more information about both of these options, refer to Deploy a recorder node.
When you use tsrecorder, you are not required to host tsrecorder on the same device as tsdb. However, to reduce network latency cost, we encourage you to run tsrecorder and tsdb on the same host.
Query logging output
A database connector creates one stream of query logs for each database connection and logs queries and session-specific metadata as new-line-delimited JSON. The recorder stores the logs as one file per stream in a directory named after the stable ID of the connector node.
The logs are primarily intended to be ingested into third-party visualization and exploration tools like Kibana or Datadog. The logs currently can't be viewed or searched with the tsrecorder internal UI.
Session-specific metadata
The session-specific metadata currently includes:
- destination node host name, such as
"my_postgres_1.tail1234.ts.net". - destination node stable node ID, such as
"abcdefCNTRL". - source node host name, such as
"amelie-desktop.tail1234.ts.net". - source node stable node ID, such as
"zxywvuDEVEL". - source node user login name, such as
"amelie@example.com". - target database, such as
"my_postgres_1". - target database user, such as
"viewer". - timestamp, such as
"2026-02-06T18:07:34.539615Z". - per connection trace ID, same as the one included in the connector application logs.
The following shows example log output:
{
  "timestamp": "2026-02-06T14:06:26.240876Z",
  "query": "select * from users;",
  "target_database": "my_postgres_1",
  "target_user": "viewer",
  "src_node": "amelie-desktop.tail1234.ts.net",
  "src_node_id": "zxywvuDEVEL",
  "src_node_user": "amelie@example.com",
  "connection_id": "e01aaf2f-764a-404e-897b-0123456789ab"
}
{
  "timestamp": "2026-02-06T14:06:30.494326Z",
  "query": "select 1+1;",
  "target_database": "my_postgres_1",
  "target_user": "viewer",
  "src_node": "amelie-desktop.tail1234.ts.net",
  "src_node_id": "zxywvuDEVEL",
  "src_node_user": "amelie@example.com",
  "connection_id": "e01aaf2f-764a-404e-897b-0123456789ab"
}
{
  "timestamp": "2026-02-06T14:06:48.550817Z",
  "query": "select * from stores;",
  "target_database": "my_postgres_1",
  "target_user": "viewer",
  "src_node": "amelie-desktop.tail1234.ts.net",
  "src_node_id": "zxywvuDEVEL",
  "src_node_user": "amelie@example.com",
  "connection_id": "e01aaf2f-764a-404e-897b-0123456789ab"
}
tsdb package reference
tsdb is a package that lets Tailscale nodes access databases from anywhere using their Tailscale identity to authenticate. tsdb is built on top of the tsnet package. tsdb registers multiple Tailscale nodes on your tailnet: one main node for admin endpoints and a separate node for each configured database instance.
Configuration
Configuration is stored in HuJSON format (JSON with comments) and loaded by using the --config flag. If no configuration file path is provided, tsdb tries to find a valid configuration file in well-known locations such as the current directory.
You can set configuration for Tailscale, the server functioning as a database connector instance, and the database. The configuration file uses three top-level sections: tailscale, connector, and databases. All configuration fields can also be set through environment variables, which are merged with the file configuration during initialization.
Tailscale configuration
| Field | Purpose | Default | Well-known environment variable |
|---|---|---|---|
control_url | Tailscale control server URL (must be http/https without trailing slash) | https://login.tailscale.com | TS_CONTROL_URL |
state_dir | Directory for persistent Tailscale state | ./data/tsdb | TS_STATE_DIR |
hostname | Hostname for the admin node (1-63 chars, letters/numbers/hyphens) | tsdb | TS_HOSTNAME |
tags | List of tags for the Tailscale node (must be prefixed with "tag:") | (empty) | TS_TAGS (comma-separated values) |
authkey | Tailscale auth key for joining the tailnet | (empty) | TS_AUTHKEY |
client_id | OAuth/workload identity client ID | (empty) | TS_CLIENT_ID |
client_secret | OAuth client secret | (empty) | TS_CLIENT_SECRET |
id_token | workload identity ID token | (empty) | TS_ID_TOKEN |
Unless the device is already connected to the tailnet, at least one authentication method (auth key, OAuth client secret, or a workload identity token credential) should be provided. When using OAuth or workload identity federation, the tag, such as tag:tsdb, must be set explicitly.
When using OAuth credentials (client_id and client_secret), you should provide them in the configuration file rather than only through environment variables. The connector creates a separate tsnet node for each configured database, and OAuth credentials in the configuration file ensure that the specified tags propagate correctly to all per-database nodes.
Server configuration
| Field | Purpose | Default | Well-known environment variable |
|---|---|---|---|
admin_port | HTTP port for admin API and debug endpoints | 8080 | TSDB_ADMIN_PORT |
log_level | Verbosity level for application logs (one of: debug, info, warn, error) | info | TSDB_LOG_LEVEL |
log_level | Enable tsnet.Server debug-level logging for troubleshooting | false | TSDB_TAILSCALE_LOGS_ENABLED |
Database configuration
| Field | Purpose | Default | Well-known environment variable |
|---|---|---|---|
engine | Database type | (required) | TSDB_DB_<KEY>_ENGINE |
host | Database server hostname or IP | Engine-specific. For example, Postgres uses 5432, MongoDB uses 27017. | TSDB_DB_<KEY>_HOST |
port | Database server port (0-65535) | Engine-specific. For example, Postgres uses 5432, MongoDB uses 27017. | TSDB_DB_<KEY>_PORT |
listening_port | Port where connector listens for Tailscale connections | Same as port | TSDB_DB_<KEY>_LISTENING_PORT |
ca_file | Path to database TLS CA certificate | (required) | TSDB_DB_<KEY>_CA_FILE |
admin_user | Database admin user for managing session credentials | (required) | TSDB_DB_<KEY>_ADMIN_USER |
admin_password | Database admin password for managing session credentials | (required) | TSDB_DB_<KEY>_ADMIN_PASSWORD |
In the tables above, <KEY> is the database identifier, used as the Tailscale hostname and as the database key in the database policy file capability schema. For example, my_postgres_1.
When configuring databases by using environment variables, keys must contain only characters that are valid in POSIX environment variable names: letters (A-Za-z), digits (0-9), and underscores (_).
You can mix configuration values from a file and from the environment. They are merged during initialization. Fields from the configuration file have precedence.
Example configurations
The following examples show configuration settings for common scenarios.
Environment variables example
The following shows an example of environmental usage for a PostgreSQL database with key my_postgres_1.
export TSDB_DB_my_postgres_1_ENGINE=postgres
export TSDB_DB_my_postgres_1_HOST=localhost
export TSDB_DB_my_postgres_1_PORT=5432
export TSDB_DB_my_postgres_1_CA_FILE=/etc/certs/pg-ca.crt
export TSDB_DB_my_postgres_1_ADMIN_USER=<USERNAME>
export TSDB_DB_my_postgres_1_ADMIN_PASSWORD=<PASSWORD>
Replace <USERNAME> and <PASSWORD> with your database admin user and password. Modify other values as needed for your configuration.
Full Configuration File Example
The following shows a full configuration file example.
{
  // Comments are allowed in HuJSON format
  "tailscale": {
    "control_url": "https://login.tailscale.com",
    "hostname": "my-db-connector",
    "authkey": "<TAILSCALE-AUTH-KEY>"
  },
  "connector": {
    "admin_port": 8080,
    "log_level": "info",
    "tailscale_logs_enabled": false
  },
  "databases": {
    "production-pg": {
      "engine": "postgres",
      "host": "pg.internal.example.com",
      "port": 5432,
      "ca_file": "./certs/pg-ca.crt",
      "admin_user": "<USERNAME>",
      "admin_password": "<PASSWORD>"
    },
    "analytics-crdb": {
      "engine": "cockroachdb",
      "host": "crdb.internal.example.com",
      "port": 26257,
      "ca_file": "./certs/crdb-ca.crt",
      "admin_user": "<USERNAME>",
      "admin_password": "<PASSWORD>"
    }
  }
}
Replace <TAILSCALE-AUTH-KEY> with your auth key. Replace <USERNAME> and <PASSWORD> with your database admin user and password. Modify other values as needed for your configuration.
Minimal configuration file example
The following shows a minimal configuration file example. This example omits the tailscale and connector sections. If you use this minimal configuration, you must provide the Tailscale authentication credentials (such as TS_AUTHKEY or TS_CLIENT_ID and TS_CLIENT_SECRET) through environment variables.
{
  "databases": {
    "production-pg": {
      "engine": "postgres",
      "ca_file": "./certs/pg-ca.crt",
      "admin_user": "<USERNAME>",
      "admin_password": "<PASSWORD>"
    }
  }
}
Replace <USERNAME> and <PASSWORD> with your database admin user and password. Modify other values as needed for your configuration.
Full configuration file with environment variables only
You can configure the database connector entirely through environment variables without a configuration file. When no --config flag is provided and no default configuration file is found, the connector starts with an empty configuration and relies on environment variables.
# Tailscale configuration
export TS_CONTROL_URL="https://login.tailscale.com"
export TS_HOSTNAME="my-db-connector"
export TS_AUTHKEY="<TAILSCALE-AUTH-KEY>"
export TS_TAGS="tag:database-connector"

# Connector configuration
export TSDB_ADMIN_PORT="8080"
export TSDB_LOG_LEVEL="info"

# PostgreSQL database (key: my_postgres_1)
export TSDB_DB_my_postgres_1_ENGINE="postgres"
export TSDB_DB_my_postgres_1_HOST="pg.internal.example.com"
export TSDB_DB_my_postgres_1_PORT="5432"
export TSDB_DB_my_postgres_1_CA_FILE="/etc/certs/pg-ca.crt"
export TSDB_DB_my_postgres_1_ADMIN_USER="<USERNAME>"
export TSDB_DB_my_postgres_1_ADMIN_PASSWORD="<PASSWORD>"

# MongoDB database (key: my_mongodb)
export TSDB_DB_my_mongodb_ENGINE="mongodb"
export TSDB_DB_my_mongodb_HOST="mongo.internal.example.com"
export TSDB_DB_my_mongodb_PORT="27017"
export TSDB_DB_my_mongodb_CA_FILE="/etc/certs/mongo-ca.crt"
export TSDB_DB_my_mongodb_ADMIN_USER="<USERNAME>"
export TSDB_DB_my_mongodb_ADMIN_PASSWORD="<PASSWORD>"
Replace <TAILSCALE-AUTH-KEY> with your auth key. Replace <USERNAME> and <PASSWORD> with your database admin user and password. Modify other values as needed for your configuration.
Additional information
You can refine the database capability access beyond what was shown in this topic's tailnet policy file example. For more information, refer to Device posture management and Use device posture for just-in-time access.