Access Google Compute Engine VMs privately using Tailscale
Last validated:
Google Cloud provides Linux virtual machines and you can use Tailscale to provide secure connectivity.
Prerequisites
Before you begin this guide, you'll need a Tailscale network (known as a tailnet) set up and configured with at least one existing device. Read our getting started guide if you need help with this.
Step 1: Set up the Tailscale client for the VM
First, create a Virtual Machine in the GCE Console.
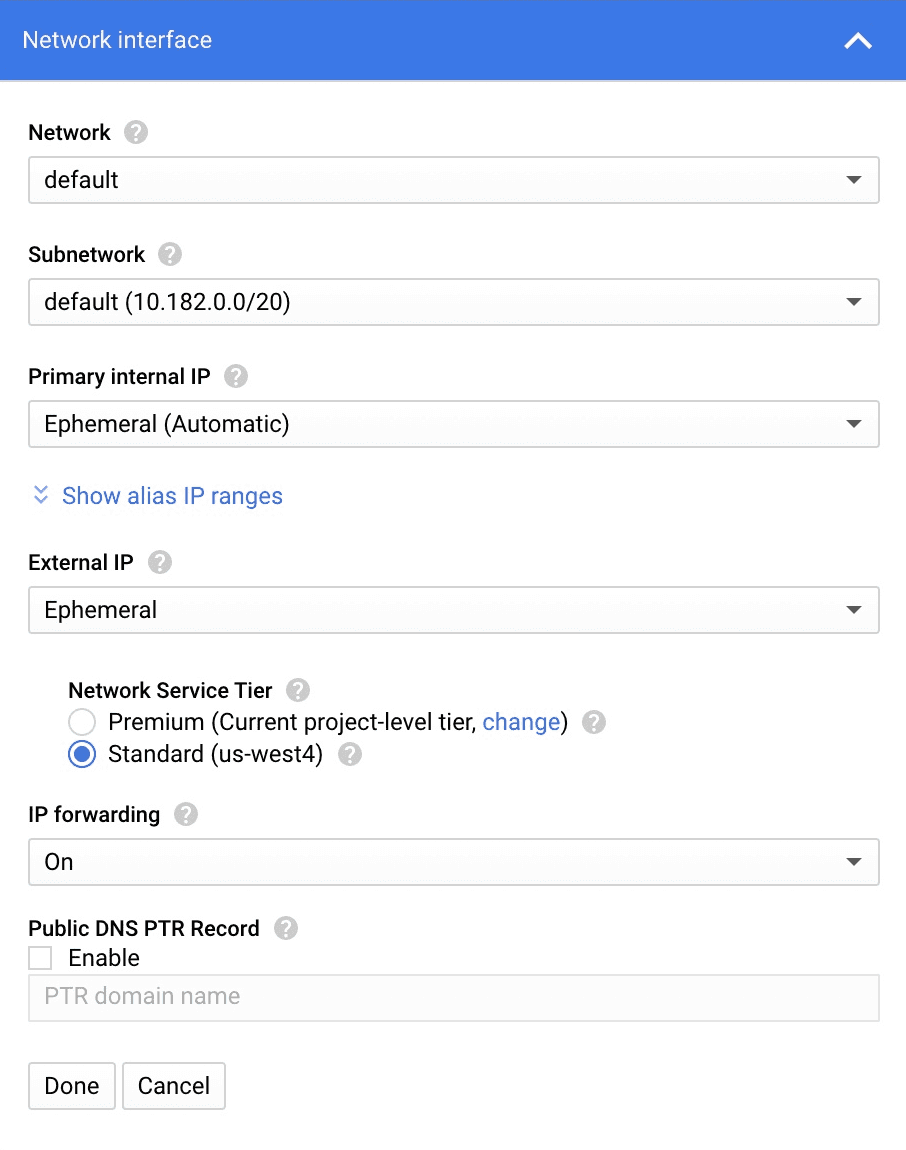
When creating the instance select Management, security, disks, networking, sole tenancy, select Networking, and select the Network Interface. Because we're later going to enable subnet routing on this VM, we want to set IP forwarding to On.
Once you create the VM, SSH to the system and follow the steps to install Tailscale on Linux.
Step 2: Allow UDP port 41641
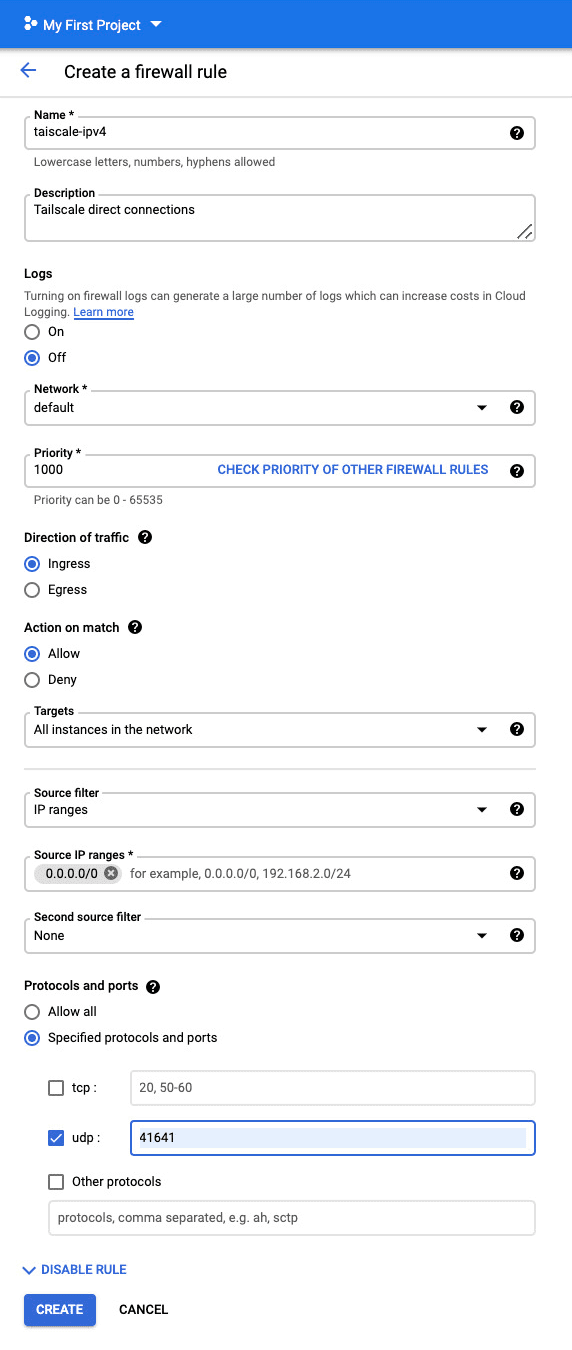
If at least one side of a tunnel has "easy NAT," where Tailscale can determine the UDP port number on the far side of the NAT device, then it will make direct connections to minimize latency.. We ensure that GCE nodes can make direct connections by allowing UDP port 41641 to ingress through the firewall.
In VPC Network > Firewall we add two rules:
- An ingress rule to allow
0.0.0.0/0for UDP port41641to all instances. - An ingress rule to allow
::/0for UDP port41641to all instances.
Step 3: Advertise routes from the VM
To enable connections from your tailnet to the GCP subnet, configure the VM to act as a subnet router.
First, enable IP forwarding on the VM.
If your Linux system has a /etc/sysctl.d directory, use:
echo 'net.ipv4.ip_forward = 1' | sudo tee -a /etc/sysctl.d/99-tailscale.conf
echo 'net.ipv6.conf.all.forwarding = 1' | sudo tee -a /etc/sysctl.d/99-tailscale.conf
sudo sysctl -p /etc/sysctl.d/99-tailscale.conf
Otherwise, use:
echo 'net.ipv4.ip_forward = 1' | sudo tee -a /etc/sysctl.conf
echo 'net.ipv6.conf.all.forwarding = 1' | sudo tee -a /etc/sysctl.conf
sudo sysctl -p /etc/sysctl.conf
After enabling IP forwarding, configure the VM to advertise routes for the subnet it sits on. For example, if the subnet address range is 10.182.0.0/24, the command would be:
tailscale set --advertise-routes=10.182.0.0/24 --accept-dns=false
For GCE VMs it is generally best to let Google handle the DNS configuration, not have Tailscale override it, so we added --accept-dns=false.
Step 4: Add GCE DNS for your tailnet
For the benefit of the other nodes in the tailnet we'll set up split DNS to allow use of the same DNS names as the ones that are inside of GCE.
The hostnames inside of GCE are of the form:
<vm-name>.<gce-project-name>.internal
Use the Google Cloud CLI command gcloud dns policies create to create a new Cloud DNS policy that lets inbound forwarding for your tailnet:
gcloud dns policies create inbound-dns \
  --project="YOUR_VPC_PROJECT" \
  --description="Expose DNS endpoints per subnet" \
  --networks="YOUR_VPC" \
  --enable-inbound-forwarding
where:
YOUR_VPC_PROJECTis your Google Cloud project ID.YOUR_VPCis the comma separated list of network names to associate with the policy.
Use the gcloud compute addresses list to verify that your tailnet recognizes the DNS resolver for your tailnet subnet:
gcloud compute addresses list \
  --project="YOUR_VPC_PROJECT" \
  --filter='purpose="DNS_RESOLVER"' \
  --format='csv(address, region, subnetwork)' \
  | grep YOUR_TAILNET_SUBNET
where:
YOUR_VPC_PROJECTis your Google Cloud project ID.YOUR_TAILNET_SUBNETis your subnet machine name.
Use the IP address returned from this command as a DNS resolver for your tailnet:
-
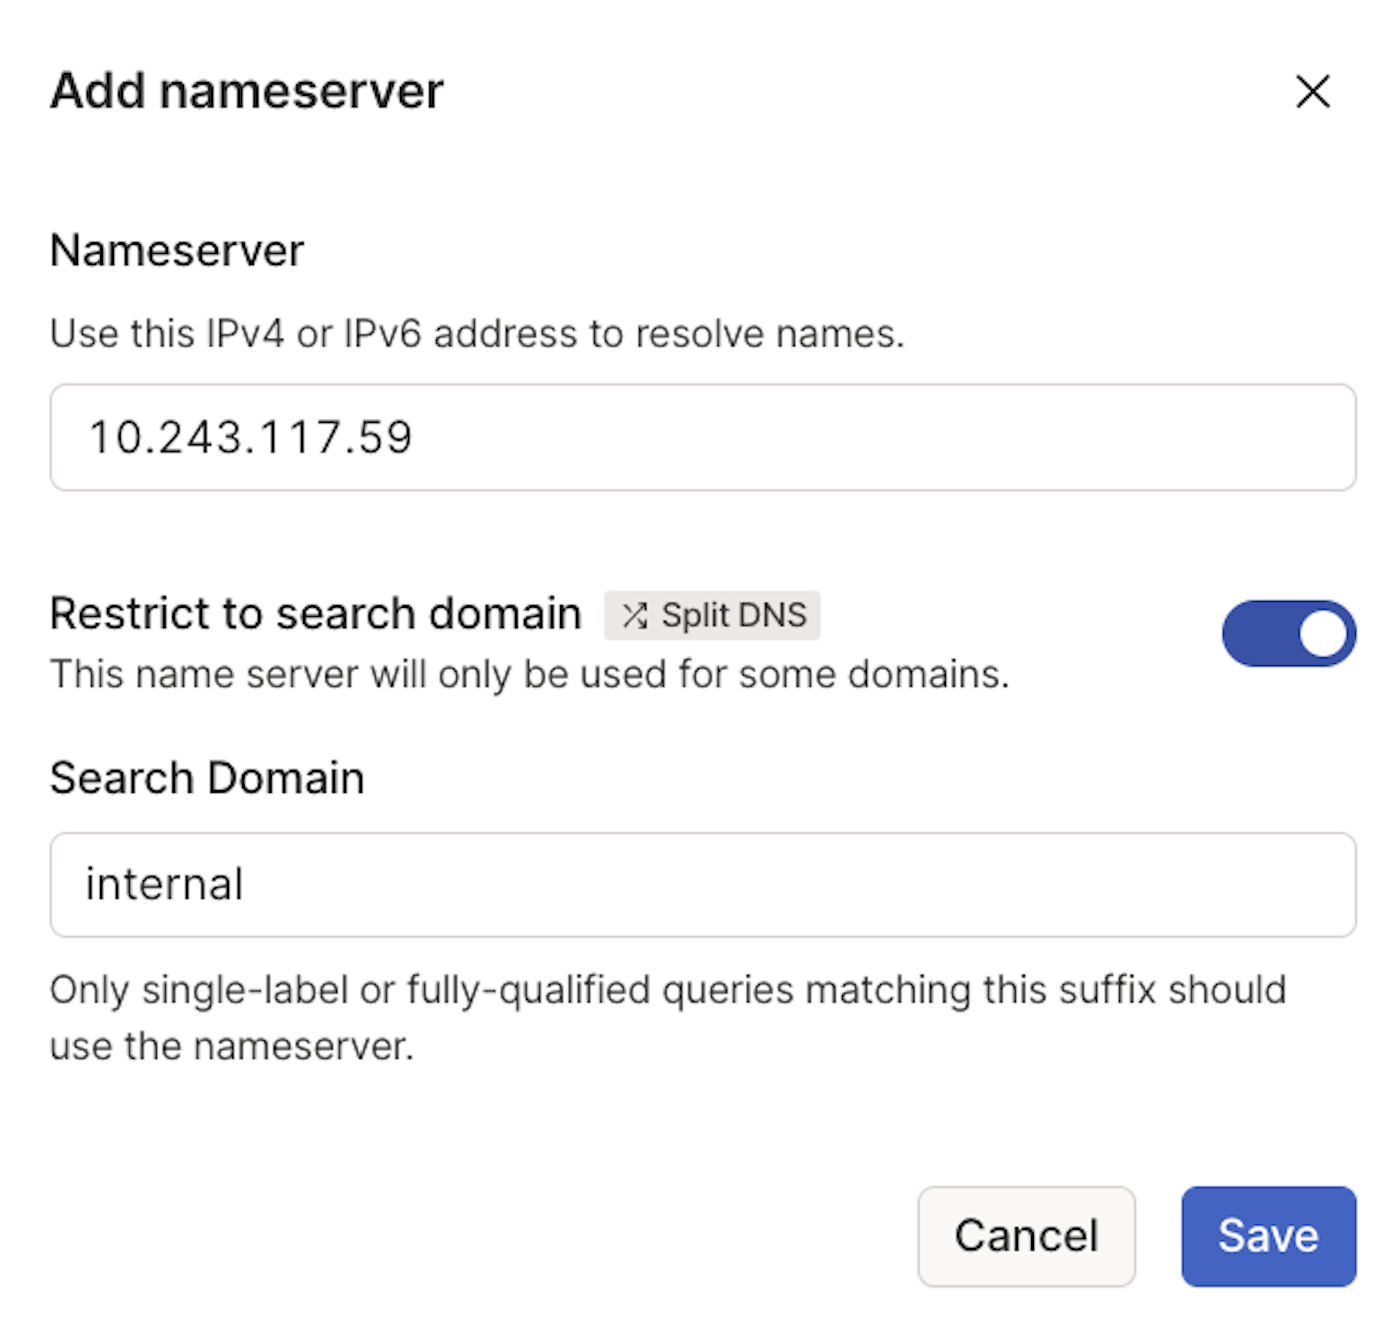
Open the DNS page in the admin console.
-
Select Add name server.
-
Select Custom.
-
For Nameserver, enter the IP address from the
gcloud compute addresses listcommand that you ran above. In this example, we use10.243.117.59. -
Ensure Restrict to search domain is checked.
-
For Search Domain, enter internal.
-
Select Save.
Now the same hostnames which work between nodes running within GCE will also be available to all nodes in your tailnet.
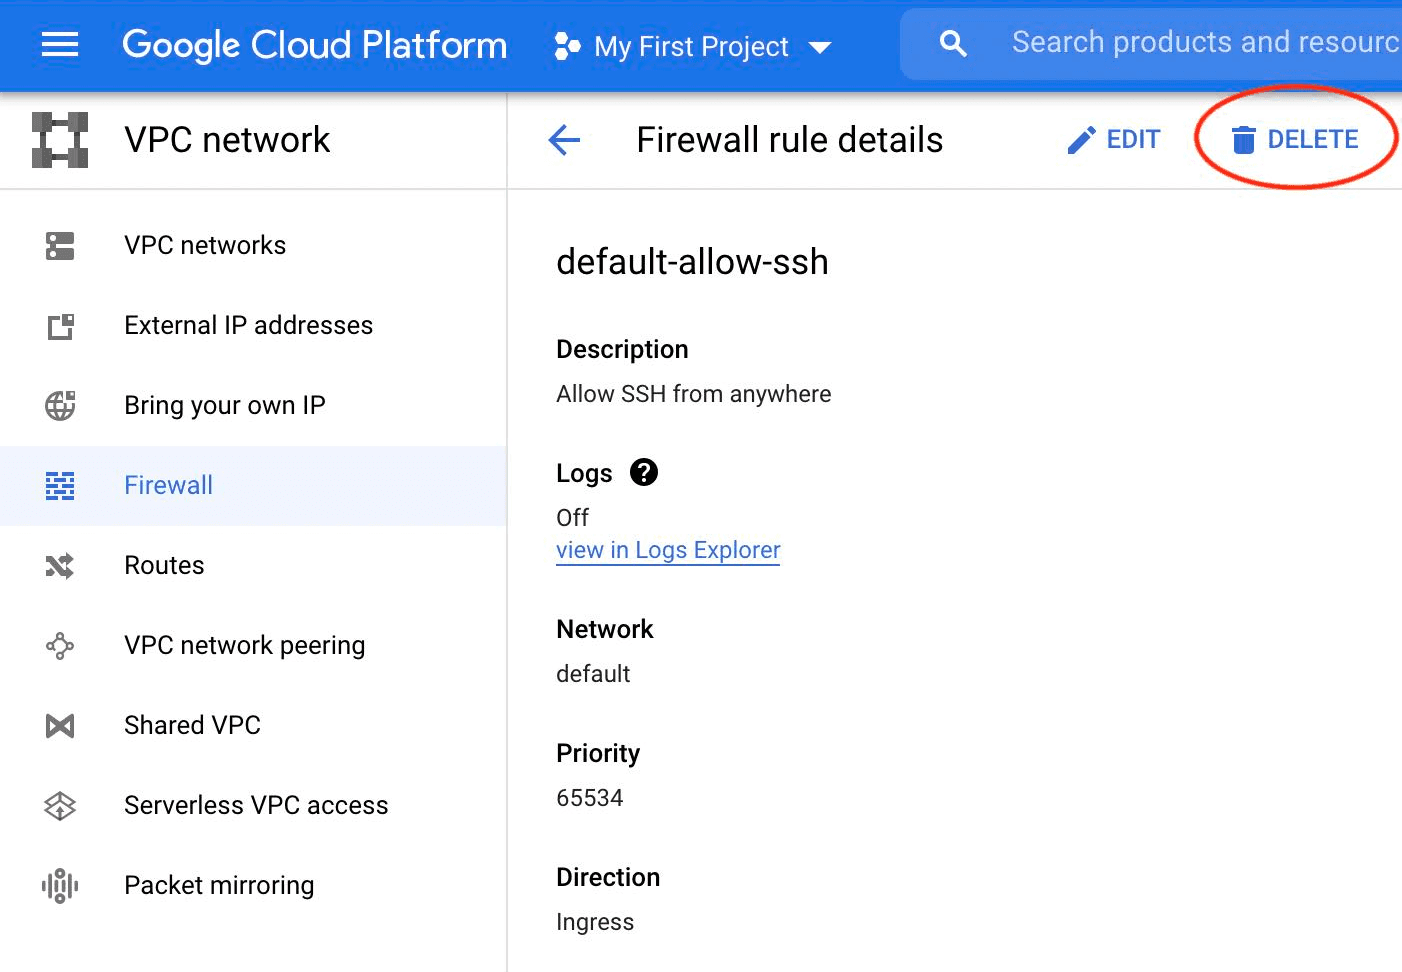
Step 5: Remove public SSH access
As we can now SSH to the system over the private Tailscale network, there is no reason to leave the SSH port open on a public IP address. You can delete the default-allow-ssh rule from VPC network > Firewall.