Setting up a server on your Tailscale network
Last validated:
If you're setting up servers on Tailscale, we recommend you use an auth key to provision the server, and a tag to restrict its access. You can also set up Tailscale SSH to access your servers.
Here's how to set up a server in Tailscale:
-
Create a new tag in your tailnet for the type of shared resource you are managing. For example, you can use the tag
serverfor your servers,prodortestfor your environments, andfront-endfor grouping of other resources that you maintain.To create a tag, modify the tailnet policy file to specify the owner of the tag, which is the team or user who can use that tag. You can use an existing tag for all servers. If you're also setting up Tailscale SSH, we recommend using a new tag.
{
  "tagOwners": {
    "tag:server": ["alice@example.com"]
  }
}
You can use the visual policy editor to manage your tailnet policy file. Refer to the visual editor reference for guidance on using the visual editor.
-
Write access rules in the tailnet policy file which:
- Allow the desired sources to reach the tagged resources
- If you're also setting up Tailscale SSH, allow the desired sources to reach the tagged resources using Tailscale SSH
{
  "grants": [
    {
      "src": ["group:sre"],
      "dst": ["tag:server"],
      "ip": ["*"]
    }
  ],
  "ssh": [
    {
      "action": "accept",
      "src": ["group:sre"],
      "dst": ["tag:server"],
      "users": ["ubuntu", "root"]
    }
  ]
}
You can use the visual policy editor to manage your tailnet policy file. Refer to the visual editor reference for guidance on using the visual editor.
-
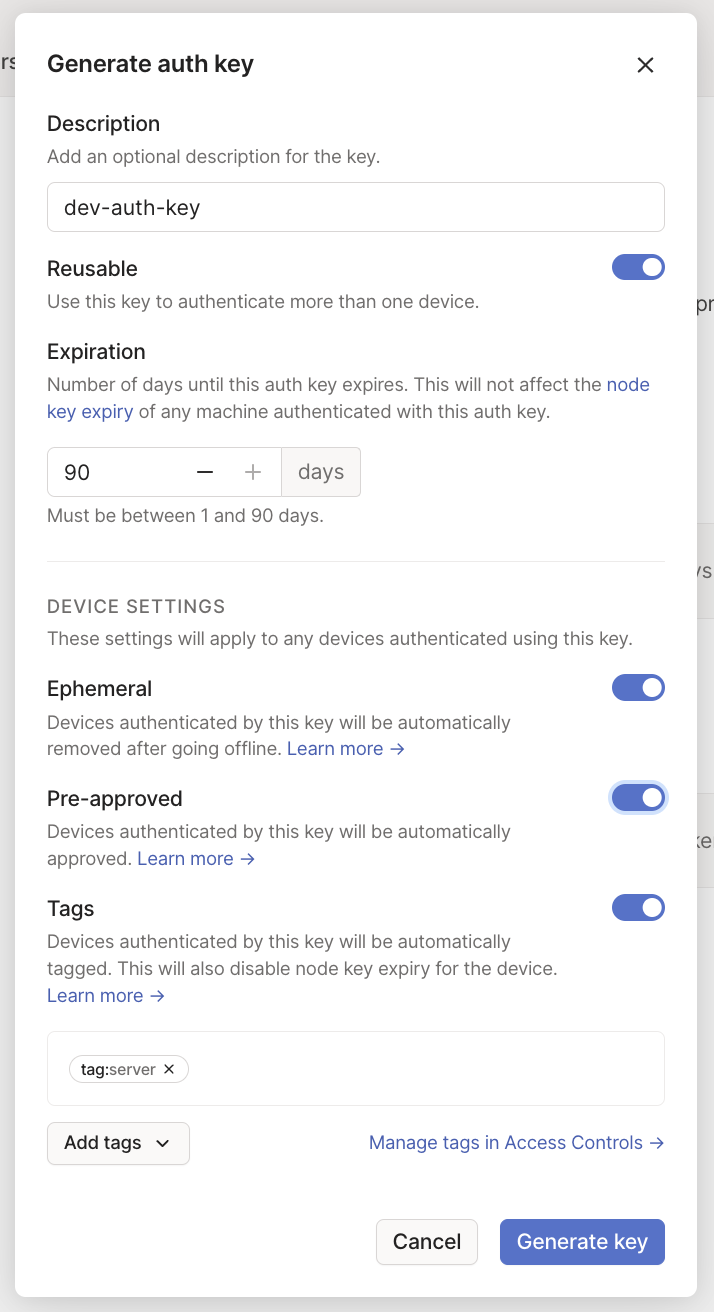
Generate an authentication key to automatically connect servers to your network. Select the tag or tags you wish to use for your servers as part of this auth key.
- If you're authenticating more than one server, use a reusable auth key. Or, for long-lived auth keys, set up an OAuth client with the scope
auth_keys. - If you're authenticating ephemeral workloads like containers or functions, use an ephemeral key.
- If your tailnet has device approval enabled, and you only intend to use that to approve end-user devices, use a pre-authorized auth key.

- If you're authenticating more than one server, use a reusable auth key. Or, for long-lived auth keys, set up an OAuth client with the scope
The Pre-approved option will only display in the dialog if device approval is enabled in your Tailscale network.
Currently, if your client node is provisioned with an authentication key, you cannot use check mode when establishing a Tailscale SSH connection using the node as a source.
-
When you provision a new server, install and connect to Tailscale manually or as part of your automation tooling. Make sure to specify the auth key including the tags you want, and to enable Tailscale SSH.
tailscale up --auth-key=$TS_AUTHKEYIf you want to specify a particular machine name for your server to use with MagicDNS, then also specify
--hostname:tailscale up --auth-key=$TS_AUTHKEY --hostname=$TS_HOSTNAMEIf the auth key was not generated with tags, then also specify
--advertise-tags:tailscale up --auth-key=$TS_AUTHKEY --advertise-tags=<tags>If you want to enable Tailscale SSH, then also specify
--ssh:tailscale up --auth-key=$TS_AUTHKEY --ssh -
To access your servers over Tailscale, you can connect to them like any other device in your tailnet.
If you have Tailscale SSH set up, you can connect to your severs using Tailscale SSH or Tailscale SSH Console.
