Visual policy editor reference
Last validated:
The Tailscale visual policy editor gives you an interactive graphical interface for managing access control policies in a Tailscale network (known as a tailnet). This reference documents all interface elements, forms, controls, and their associated help information to help you effectively use the visual editor. For a comprehensive understanding of the underlying policy syntax, refer to Tailscale's policy syntax documentation.
Refer to the targets documentation for detailed information about available targets for sources, destinations, and other fields.
General access rules
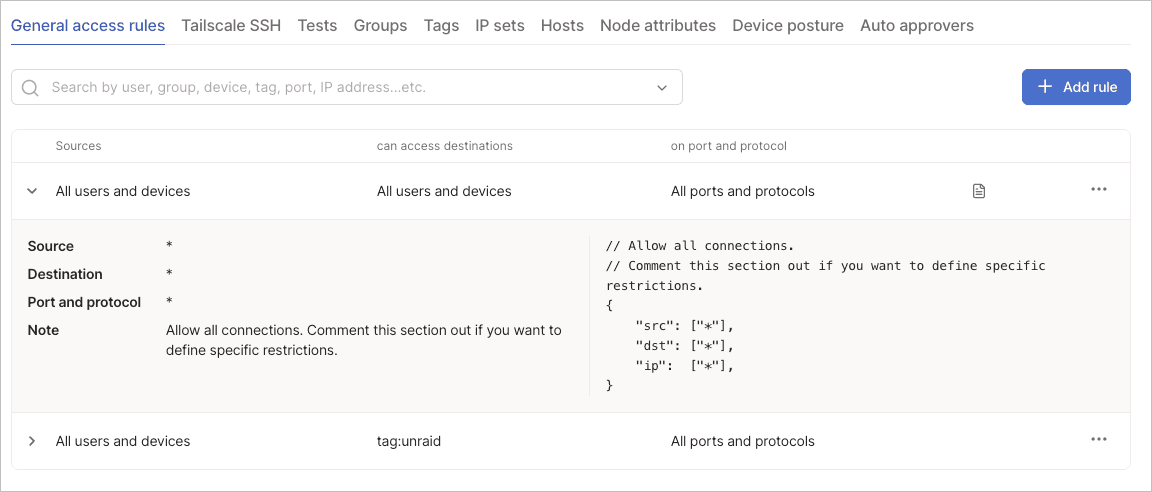
General access rules control network-level and application-level access between devices in your tailnet using grants syntax. These rules determine which sources can connect to which destinations on specified ports and protocols. The visual editor translates these rules into the underlying grant structure in your tailnet policy file.
The visual editor uses grants syntax on the backend. This means that if you create an access control policy using the ACL syntax in the JSON editor, it automatically converts to grants syntax when you edit the policy using the visual editor. Grants syntax supports all the same capabilities as ACL syntax with additional features like route filtering and app capabilities. Refer to grants versus ACLs for more information.
Each general access rule uses grants syntax, which consists of three main components: sources, destinations, and network restrictions. Grants also support additional components like the via field and app capabilities for more advanced access control scenarios. For a complete overview of grants syntax, refer to the grants syntax reference.
The rules table displays all configured access rules with their sources, destinations, and network restrictions. The ![]() menu for each rule lets you edit and delete operations. For examples of common access patterns, refer to the grant examples.
menu for each rule lets you edit and delete operations. For examples of common access patterns, refer to the grant examples.
Add a general access rule
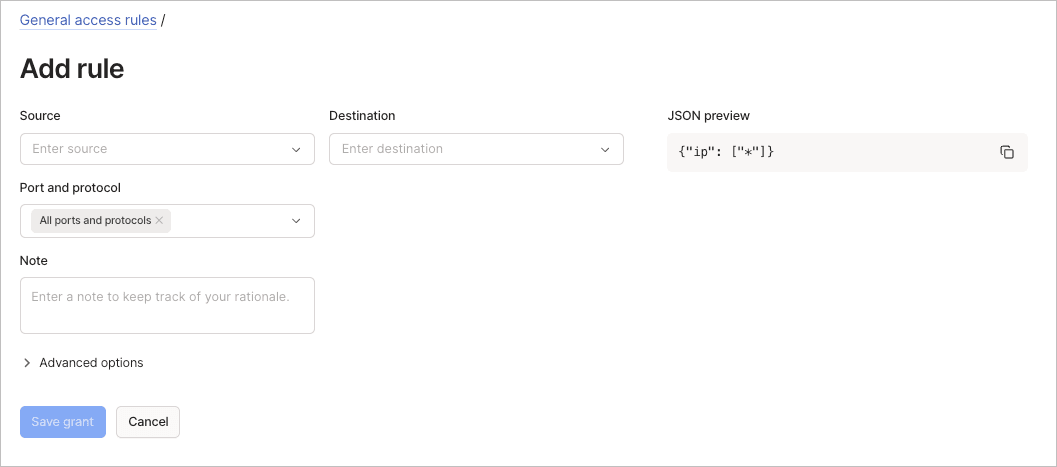
To add a general access rule using the visual editor:
- Go to the Access controls page of the admin console.
- Select Add rule from the General access rules tab.
- Configure the basic fields:
- Source: Define who can connect. Select users, groups, devices, or tags that start connections.
- Destination: Define what the source can connect to. Select the devices, services, or resources that receive connections.
- Port and protocol: Choose specific ports and protocols or select All ports and protocols.
- (Optional) Use the Note field to document your rationale for the rule.
- (Optional) Expand Advanced options to configure additional settings:
- Device posture: Specify device posture rules that must be true to let these connections through.
- Via: Specify exit nodes, subnet routers, or app connectors that should route the source to the destination.
- App capabilities: Define permissions that applications can act on when accessed over the tailnet.
- Review the JSON preview panel to understand the underlying grant syntax.
- Select Save grant to apply the rule.
Edit a general access rule
To edit a general access rule using the visual editor:
- Go to the Access controls page of the admin console.
- Select the
 menu of the rule to edit, then select Edit.
 - Update the rule fields and settings.
- Select Save grant to apply the updated rule.
Delete a general access rule
To delete a general access rule using the visual editor:
- Go to the Access controls page of the admin console.
- Select the menu of the rule to edit.
- Select Delete.
There is no confirmation required, but you have a brief moment to undo the deletion.
Tailscale SSH
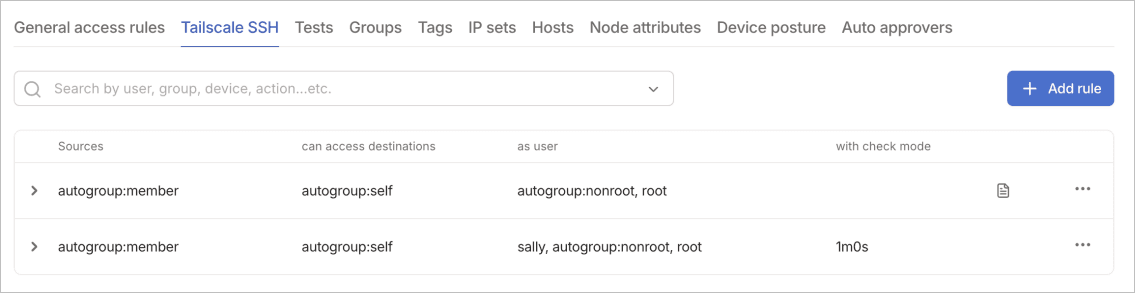
Tailscale SSH rules control SSH access to devices in your tailnet. These rules work alongside general access rules to provide secure SSH connectivity without managing SSH keys. The SSH implementation leverages your existing identity provider for authentication, eliminating the traditional complexity of SSH key distribution and rotation.
SSH rules extend basic network access with SSH-specific controls that enhance security and ease of management. Understanding these components helps you create SSH policies that balance security with usability.
The Source field identifies who can start SSH connections. These typically include users or groups from your identity provider. The Destination field specifies which devices accept SSH connections, often identified by tags like tag:server or tag:bastion.
Destination users define which user accounts are accessible on the destination. You might specify autogroup:nonroot to prevent root access or use email-based matching to map identity provider users to local accounts. Check mode determines whether to require periodic re-authentication, adding an extra security layer for sensitive connections.
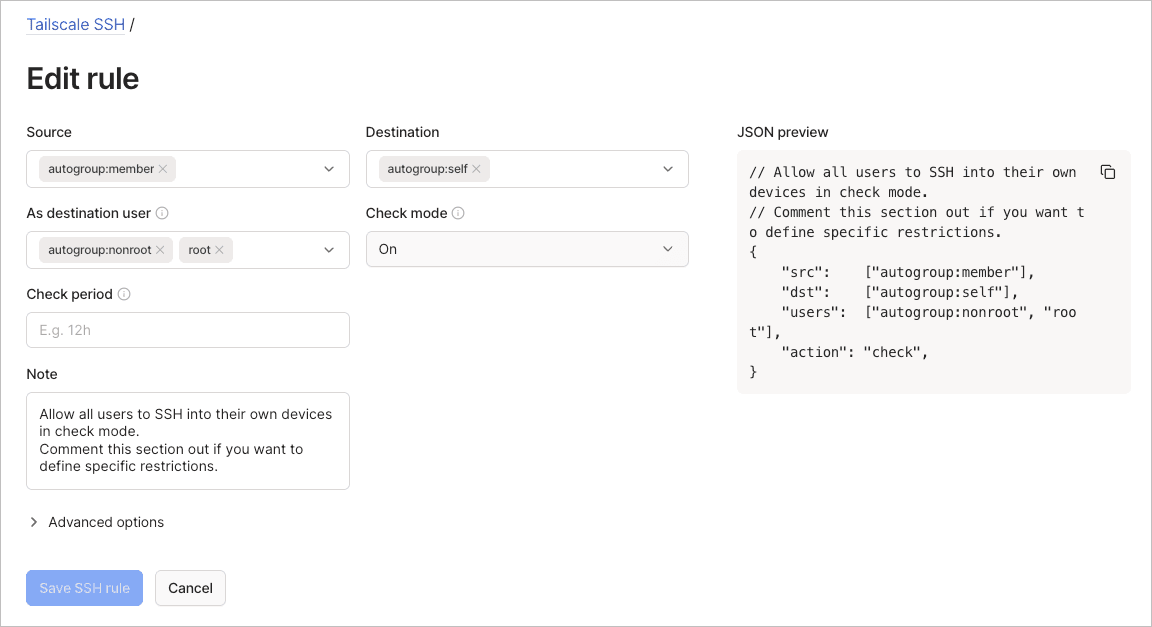
Add an SSH rule
To add a Tailscale SSH rule using the visual editor:
- Go to the Access controls page of the admin console.
- Select Add rule from the Tailscale SSH tab.
- Configure the SSH connection:
- Source: Select users or groups who can start SSH connections.
- Destination: Choose destination devices or tags.
- As destination user: Specify usernames on the host. Options include
autogroup:nonroot,root, or matching local users with email. - Check mode: Enable to require authentication checks before letting connections through. Recommended for user-initiated SSH connections.
- Check period: When check mode is enabled, specify the duration (for example,
12h). - (Optional) Use the Note field to document the purpose of the SSH rule.
- (Optional) Configure advanced options if needed:
- Recorder: Specify the recorder node tag to receive SSH session recordings. Leave empty to disable recordings.
- Enforce recorder: Require session recording for connections.
- Device posture: Apply device requirements for SSH access.
- Review the JSON preview and select Save SSH rule.
Check mode best practices
Enable Check mode for rules that let humans start SSH connections. This adds an authentication layer that verifies user identity before granting access. The Check period determines how long connections remain authorized before requiring re-authentication. Setting appropriate Check period values balances security with user convenience.
For automated processes or service accounts, you might disable Check mode to prevent interruptions. However, these connections should have tightly scoped permissions and use tag-based identities rather than personal credentials.
Edit an SSH rule
To edit a Tailscale SSH rule using the visual editor:
- Go to the Access controls page of the admin console.
- Select the Tailscale SSH tab.
- Select the menu of the SSH rule to edit, then select Edit.
- Update the rule fields.
- (Optional) Expand Advanced options to update Recorder, Enforce recorder, or Device posture settings.
- Select Save SSH rule to apply the updated rule.
Delete an SSH rule
To delete a Tailscale SSH rule using the visual editor:
- Go to the Access controls page of the admin console.
- Select the Tailscale SSH tab.
- Select the menu of the SSH rule to delete.
- Select Delete.
Groups
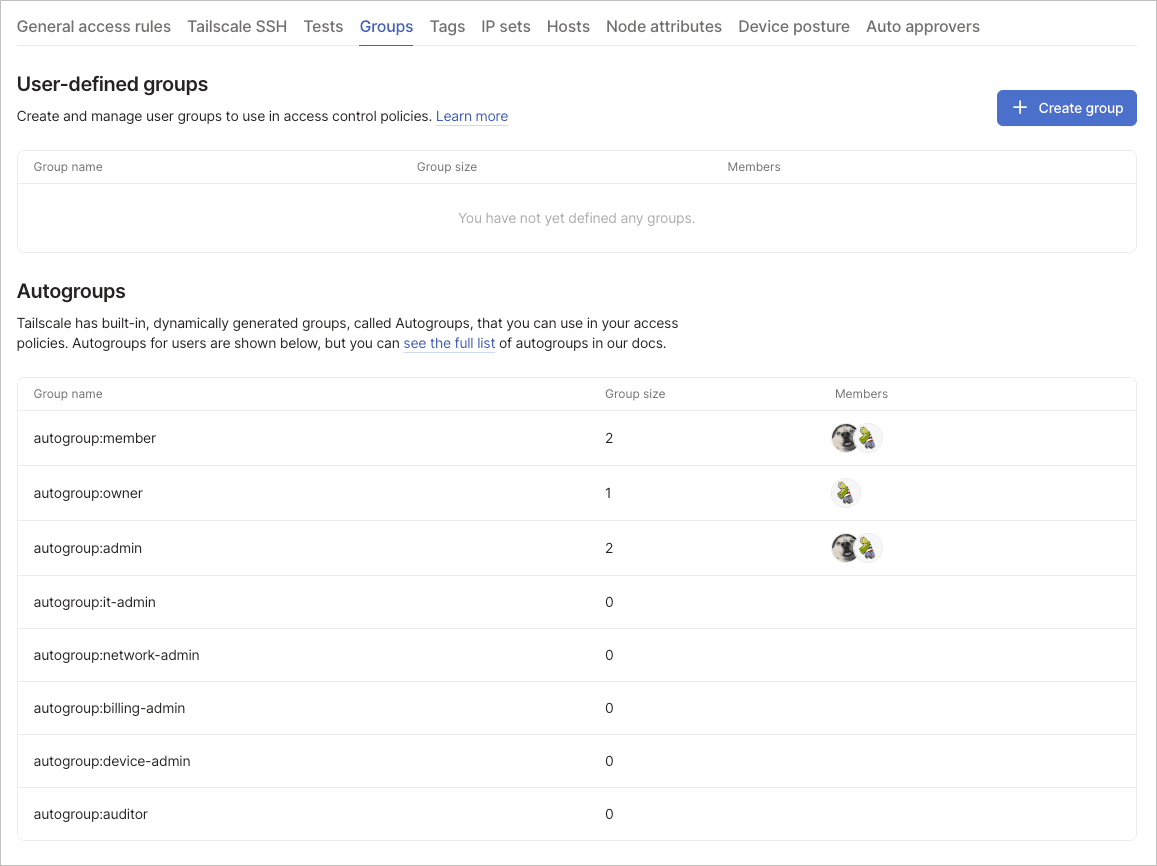
Groups organize users for simplified access control management. The Groups tab contains sections for user-defined groups, synced groups from identity providers, and built-in autogroups. Groups reduce policy complexity by letting you manage collections of users rather than individuals, making your policies more maintainable as your organization grows. For detailed information about group types and usage, refer to the targets documentation.
User-defined groups
Create and manage custom user groups to use in access control policies. Groups improve policy management by letting you reference collections of users rather than individuals. This abstraction makes policies more readable and reduces the maintenance burden when team membership changes.
Changes to group membership immediately affect all policies referencing that group.
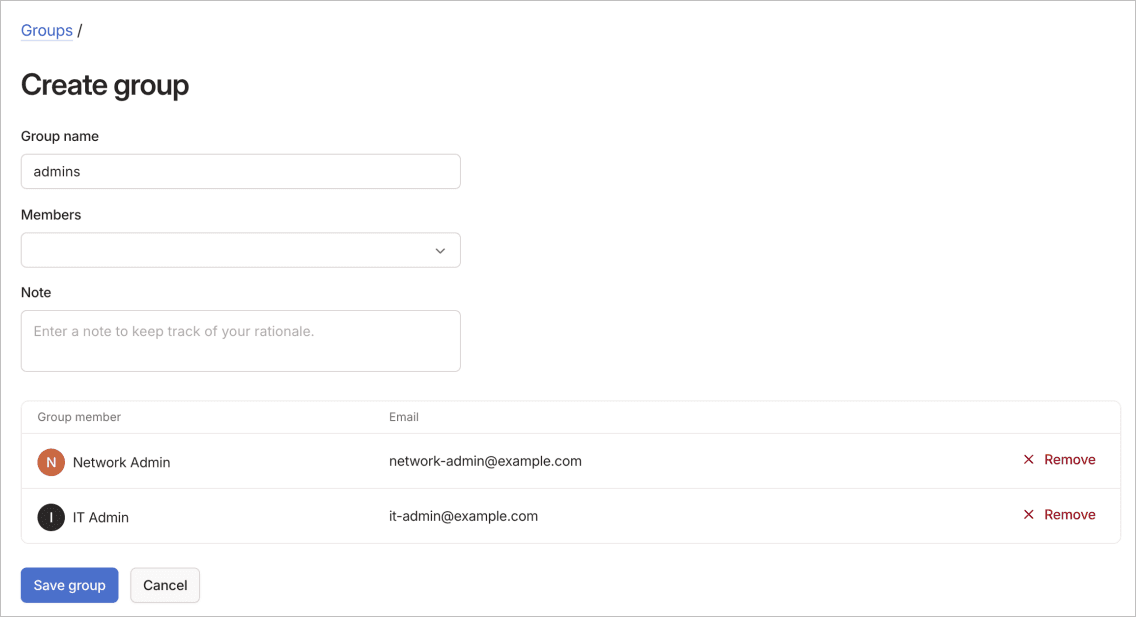
Add a user-defined group
To add a user-defined group using the visual editor:
- Go to the Access controls page of the admin console.
- Select Create group from the Groups tab.
- Configure the group settings:
- Group name: Enter a descriptive name (such as "dev" or "design").
- Members: Search and select users by name or email address.
- (Optional) Use the Note field to document the group's purpose.
- View the members table to confirm selections.
- Select Save group to create the group.
Edit a user-defined group
To edit a user-defined group using the visual editor:
- Go to the Access controls page of the admin console.
- Select the Groups tab.
- In the User-defined groups section, select the menu of the group to edit, then select Edit.
- Update the group name, members, or note.
- Select Save group to apply the updated group configuration.
Delete a user-defined group
To delete a user-defined group using the visual editor:
- Go to the Access controls page of the admin console.
- Select the Groups tab.
- In the User-defined groups section, select the menu of the group to delete.
- Select Delete.
Synced groups
Synced groups automatically populate from your identity provider through SCIM integration. These groups are read-only in the visual editor. Membership changes must occur in your identity provider and syncs to Tailscale automatically. This integration ensures that your tailnet access control aligns with your organization's identity management processes. You can configure synced groups with your identity provider, including Google SSO integration.
The synchronization typically occurs within minutes of changes in your identity provider. You can reference synced groups in policies using the group: prefix followed by the group name from your identity provider.
Autogroups
Tailscale offers built-in, dynamically generated groups called autogroups. These groups automatically include users with specific roles or properties. Autogroups remove the need to manually maintain groups for role-based access control.
Tags
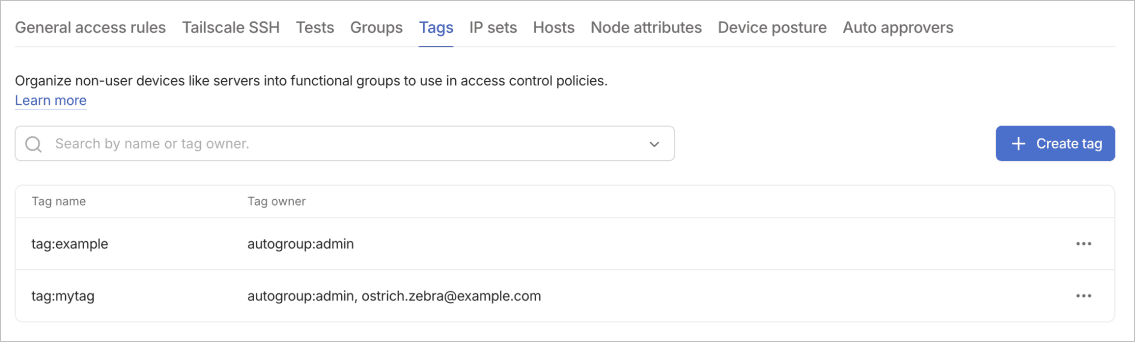
Tags organize non-user devices like servers into functional groups for use in access control policies. Tags let you group devices by function, environment, or any other logical categorization. Unlike user-based groups, tags apply to devices and persist across authentication sessions.
The tags table displays all defined tags with their owners. You can use the search field above the table to filter the results by tag name or owner.
By default Owners, Admins, and Network admins are tag owners for all tags.properties.
Add a tag
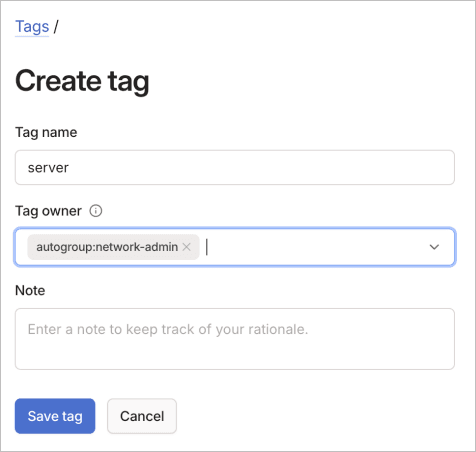
To add a tag using the visual editor:
- Go to the Access controls page of the admin console.
- Select Create tag from the Tags tab.
- Configure the tag settings:
- Tag name: Enter a name without the "tag:" prefix (for example, "prod", "server").
- Tag owner: Select users or groups who can apply this tag (if none specified, implicitly owned by owners, admins, and network admins).
- (Optional) Use the Note field to document the tag's purpose.
- Select Save tag to create the tag.
Edit a tag
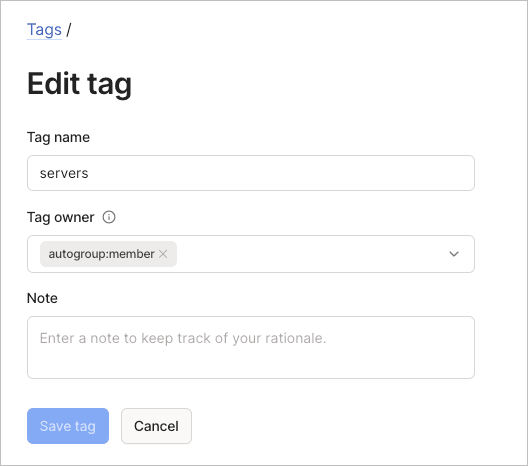
To edit a tag using the visual editor:
- Go to the Access controls page of the admin console.
- Select the Tags tab.
- Select the menu of the tag to edit, then select Edit.
- Update the tag settings.
- Select Save tag to apply the updated tag configuration.
Delete a tag
To delete a tag using the visual editor:
- Go to the Access controls page of the admin console.
- Select the Tags tab.
- Select the menu of the tag to delete.
- Select Delete.
Deleting a tag removes it from all devices, potentially affecting access control rules that reference it.
IP sets
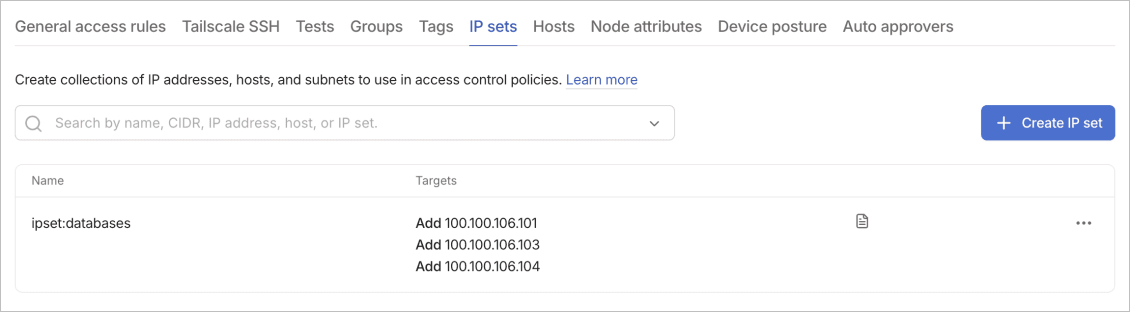
IP sets are collections of IP addresses, hosts, and subnets to use in access control policies. They improve policy management by letting you reference groups of network addresses with a single identifier. IP sets support composition, letting you build complex network definitions from simpler components.
IP sets support composition through Add and Remove operations. Start with broad inclusions using Add, then refine the set using Remove to exclude specific ranges. This approach lets you create flexible network segmentation without duplicating IP definitions.
For example, you might add 10.0.0.0/8 to include your entire private network, then remove 10.0.1.0/24 to exclude a specific subnet. This composition model helps maintain complex policies as your infrastructure evolves.
Add an IP set
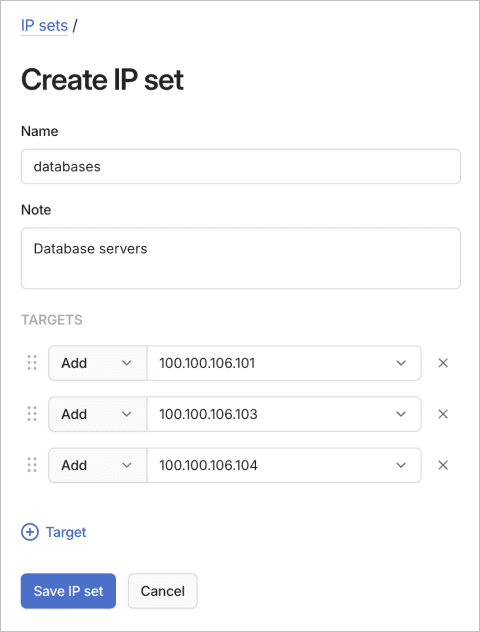
To add an IP set using the visual editor:
- Go to the Access controls page of the admin console.
- Select Create IP set from the IP sets tab.
- Configure the IP set:
- Name: Enter a descriptive name for the IP set.
- (Optional) Use the Note field to document the set's purpose.
- (Optional) Configure targets in the TARGETS section:
- Select Add or Remove from the dropdown list.
- Enter CIDRs, IP addresses, hosts, or other IP sets.
- Select X to remove target rows.
- Select the plus icon to add more rows.
- Select Save IP set to create the IP set.
Edit an IP set
To edit an IP set using the visual editor:
- Go to the Access controls page of the admin console.
- Select the IP sets tab.
- Select the menu of the IP set to edit, then select Edit.
- Update the IP set configuration.
- Select Save IP set to apply the updated IP set configuration.
Delete an IP set
To delete an IP set using the visual editor:
- Go to the Access controls page of the admin console.
- Select the IP sets tab.
- Select the menu of the IP set to delete.
- Select Delete.
Hosts
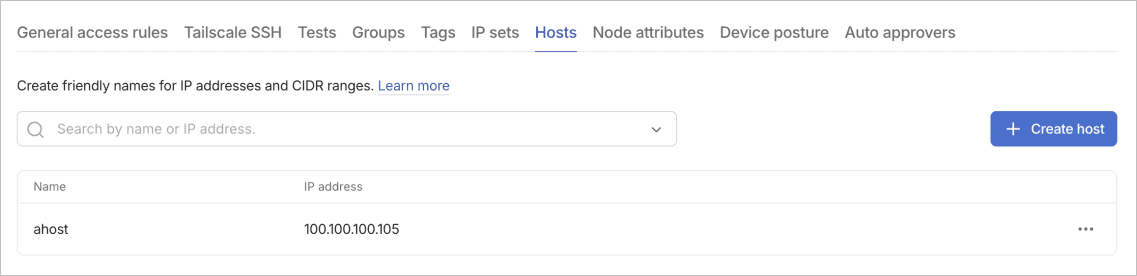
Hosts create friendly names for IP addresses and CIDR ranges. This improves policy readability by replacing numeric addresses with meaningful identifiers. Instead of remembering that 192.168.1.100 is your database server, you can reference it as database-primary throughout your policies.
You can use host definitions in access rules, IP sets, and other policy components that accept IP addresses. The hosts table displays all defined hosts with their associated IP addresses for quick reference. Host names make your policies self-documenting and reduce errors from mistyped IP addresses.
Add a host
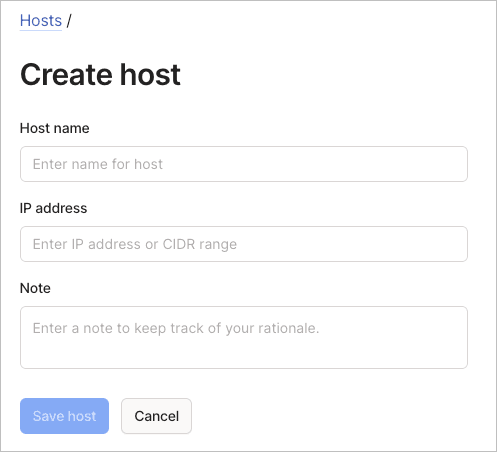
To add a host using the visual editor:
- Go to the Access controls page of the admin console.
- Select Create host from the Hosts tab.
- Configure the host settings:
- Host name: Enter a descriptive name for the host.
- IP address: Enter an IP address or CIDR range.
- (Optional) Use the Note field to document the host's purpose.
- Select Save host to create the host entry.
Edit a host
To edit a host using the visual editor:
- Go to the Access controls page of the admin console.
- Select the Hosts tab.
- Select the menu of the host to edit, then select Edit.
- Update the host name, IP address, or note.
- Select Save host to apply the updated host configuration.
Delete a host
To delete a host using the visual editor:
- Go to the Access controls page of the admin console.
- Select the Hosts tab.
- Select the menu of the host to delete.
- Select Delete.
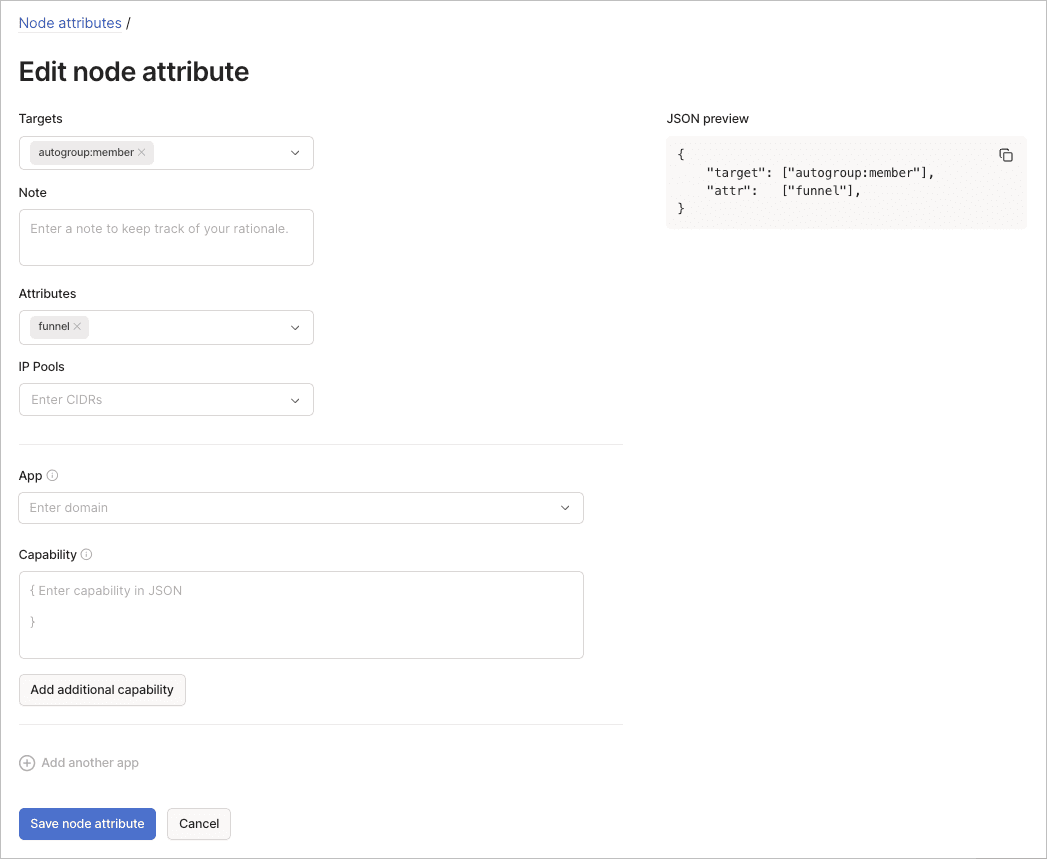
Node attributes
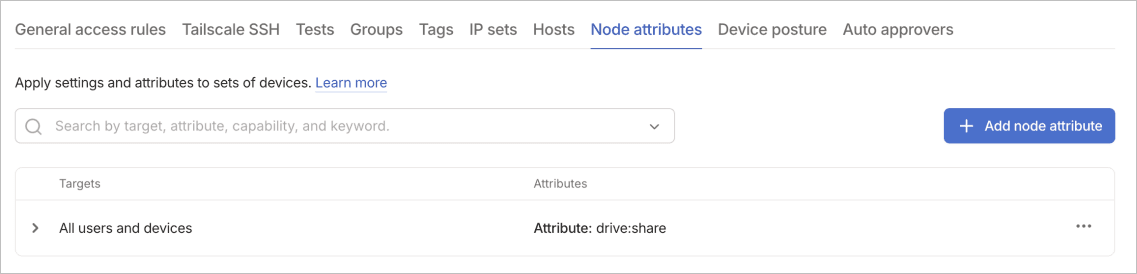
Node attributes are device attributes and settings that you can use do things like control feature availability and device behavior across your tailnet. For example, you can use an attribute to enable Tailscale Funnel or configure specialized behaviors without modifying individual device configurations.
Node attributes commonly enable features that extend device capabilities. Understanding these common patterns helps you implement similar configurations for your specific needs.
The funnel attribute lets devices use Tailscale Funnel for public access. The mullvad attribute grants access to Mullvad exit nodes for enhanced privacy. The drive:share and drive:access attributes enable Taildrive file sharing capabilities. The disable-ipv4 attribute disables IPv4 addressing for IPv6-only deployments.
Each attribute applies immediately to matching devices without requiring device reconfiguration or restart.
Add a node attribute
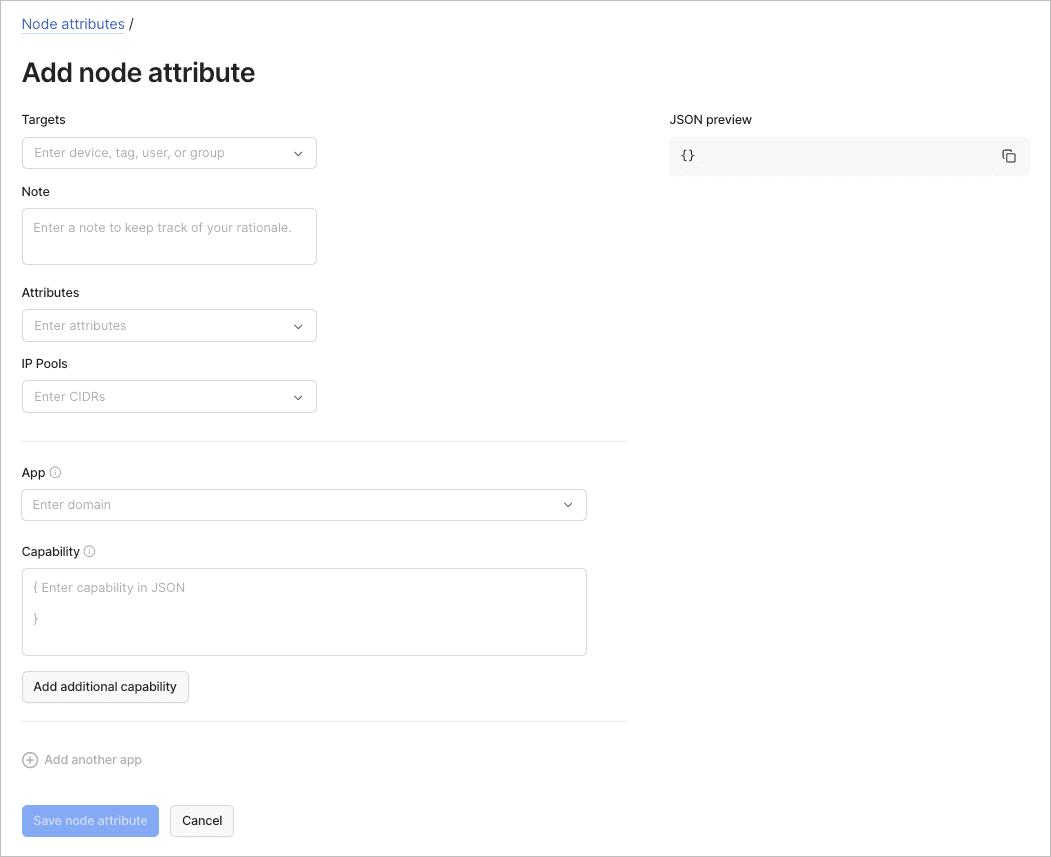
To add a node attribute using the visual editor:
- Go to the Access controls page of the admin console.
- Select Add node attribute from the Node attributes tab.
- Configure the basic settings:
- Targets: Select devices, tags, users, or groups.
- (Optional) Use the Note field to document the attribute's purpose.
- Attributes: Select attributes to apply (for example, "funnel").
- (Optional) IP Pools: Enter CIDRs if the attribute requires IP assignments.
- (Optional) Configure application capabilities:
- App: Enter the domain identifier.
- Capability: Enter capability configuration in JSON format.
- Select Add additional capability for multiple capabilities per app.
- Select Add another app for multiple applications.
- Review the JSON preview panel.
- Select Save node attribute to apply the configuration.
Edit a node attribute
To edit a node attribute using the visual editor:
- Go to the Access controls page of the admin console.
- Select the Node attributes tab.
- Select the menu of the node attribute to edit, then select Edit.
- Update the targets, attributes, IP pools, or app capabilities.
- Select Save node attribute to apply the updated configuration.
Delete a node attribute
To delete a node attribute using the visual editor:
- Go to the Access controls page of the admin console.
- Select the Node attributes tab.
- Select the menu of the node attribute to delete.
- Select Delete.
Device posture
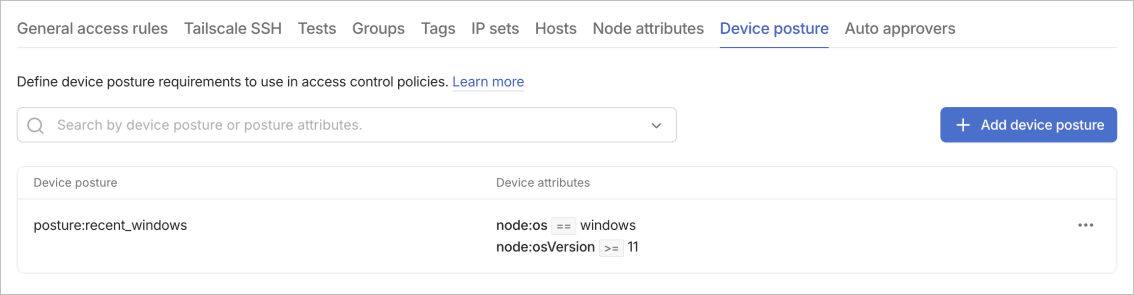
Device posture rules define the requirements a device must meet for access control policies to prevent non-compliant devices from accessing sensitive resources. Posture rules can check for conditions like OS version, disk encryption status, and the presence of specific security software. You can create custom posture checks to enforce your organization's security policies.
Posture checks run continuously, revoking access if devices fall out of compliance.
You can reference posture rules in the srcPosture field of access rules to enforce device compliance. Devices must meet all specified posture requirements to establish connections. Update posture definitions as security requirements evolve.
Posture enforcement happens at connection time and periodically during active connections. If a device falls out of compliance, existing connections end and new connections fail until the device meets requirements again.
Add a posture rule
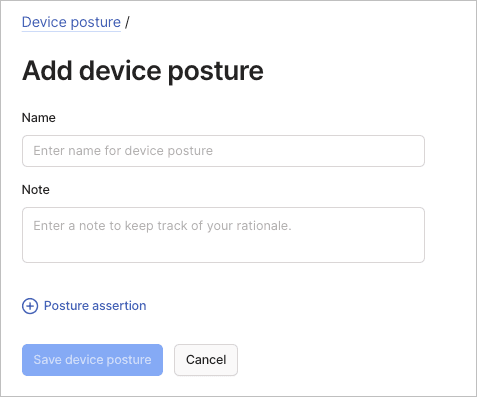
To add a device posture rule using the visual editor:
- Go to the Access controls page of the admin console.
- Select Add device posture from the Device posture tab.
- Configure the posture rule:
- Name: Enter a name for the device posture rule.
- (Optional) Use the Note field to document the requirements.
- Configure posture assertions:
- Select Posture assertion to expand options.
- Choose from HOST INFO attributes (
node:os,node:osVersion,node:tsAutoUpdate,node:tsReleaseTrack,node:tsStateEncrypted,node:tsVersion). - Configure comparison operators and values.
- Select Save device posture to create the rule.
For integration with enterprise device management systems, refer to the documentation for Intune, Jamf Pro, Iru (formerly Kandji), 1Password XAM (Kolide), and SentinelOne.
Edit a device posture rule
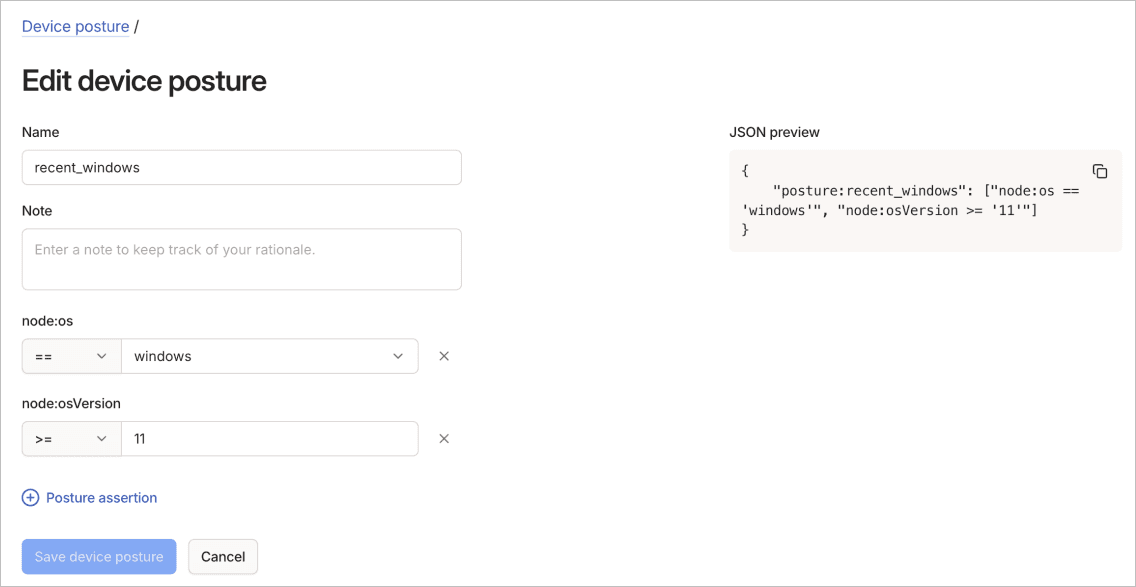
To edit a device posture rule using the visual editor:
- Go to the Access controls page of the admin console.
- Select the Device posture tab.
- Select the menu of the device posture rule to edit, then select Edit.
- Update the name, posture assertions, or note.
- Select Save device posture to apply the updated rule.
Delete device posture rules
To delete a device posture rule using the visual editor:
- Go to the Access controls page of the admin console.
- Select the Device posture tab.
- Select the menu of the device posture rule to delete.
- Select Delete.
Auto approvers
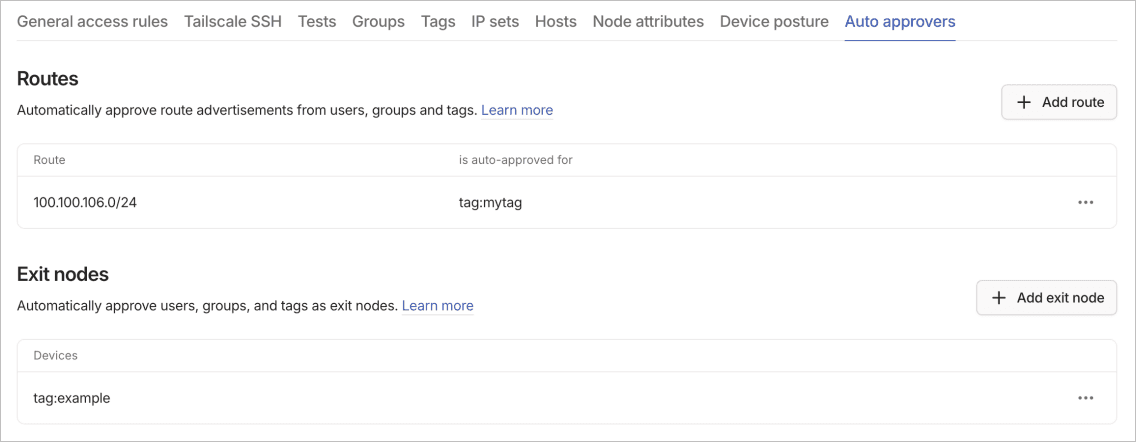
Auto approvers are policies that let you automatically approve specific operations, such as advertising subnet routes or exit nodes, without manual intervention.
Routes
Automatically approve subnet route advertisements from users, groups, and tags. This removes manual approval for subnet routers. Route auto approval lets you scale without administrative bottlenecks.
Add a route auto approver
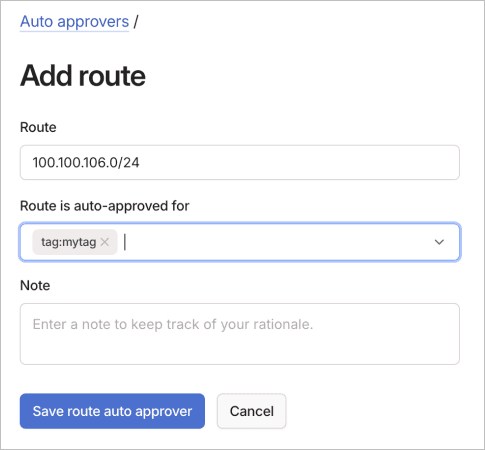
To add a route auto approver using the visual editor:
- Go to the Access controls page of the admin console.
- Select Add route from the Routes section of the Auto approvers tab.
- Configure the auto approver:
- Route: Enter the route to auto approve (for example,
192.0.2.0/24). - Route is auto approved for: Select users, groups, or tags.
- (Optional) Use the Note field to document the approval rationale.
- Route: Enter the route to auto approve (for example,
- Select Save route auto approver to create the rule.
Edit a route auto approver
To edit a subnet route auto approver using the visual editor:
- Go to the Access controls page of the admin console.
- Select the Auto approvers tab.
- In the Routes section, select the menu of the subnet route approval to edit, then select Edit.
- Update the route fields.
- Select Save route auto approver to apply the updated configuration.
Delete a route auto approver
To delete a subnet route auto approver using the visual editor:
- Go to the Access controls page of the admin console.
- Select the Auto approvers tab.
- In the Routes section, select the menu of the subnet route approval to delete.
- Select Delete.
Exit nodes
Automatically approve users, groups, and tags as exit nodes. This lets designated devices route internet traffic without manual approval. Exit node auto approval supports use cases like regional exit nodes or dedicated privacy infrastructure.
Add an exit node auto approver
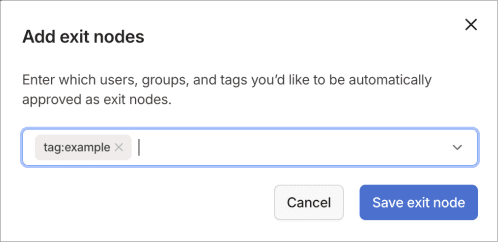
To add an exit node auto approver using the visual editor:
- Go to the Access controls page of the admin console.
- Select Add exit node from the Exit nodes section of the Auto approvers tab.
- Configure the auto approver by selecting users, groups, or tags to be automatically approved as exit nodes.
- Select Save exit node to create the auto approval rule.
Edit an exit node auto approver
To edit an exit node auto approver using the visual editor:
- Go to the Access controls page of the admin console.
- Select the Auto approvers tab.
- In the Exit nodes section, select the menu of the exit node to edit, then select Edit.
- Update the users, groups, or tags that are automatically approved as exit nodes.
- Select Save exit node to apply the updated configuration.
Delete an exit node auto approver
To delete an exit node auto approver using the visual editor:
- Go to the Access controls page of the admin console.
- Select the Auto approvers tab.
- In the Exit nodes section, select the menu of the exit node to delete.
- Select Delete.
Tests
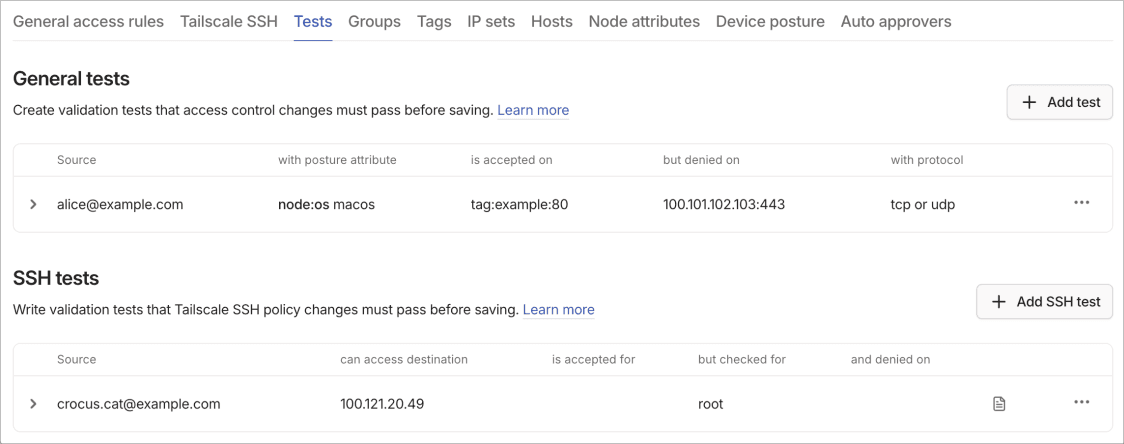
For an overview of tests and how they work in the visual policy editor, refer to the tests section in the visual policy editor documentation. This reference documents the UI controls and procedures for managing tests.
The Tests tab contains sections for general access tests and SSH-specific tests. Tests act as regression protection, ensuring that policy modifications don't accidentally break existing access patterns.
General tests
Create validation tests that access control changes must pass before saving. These tests ensure policy modifications don't accidentally revoke important permissions or expose critical systems. Well-designed tests catch configuration errors before they affect production access.
Add a general test
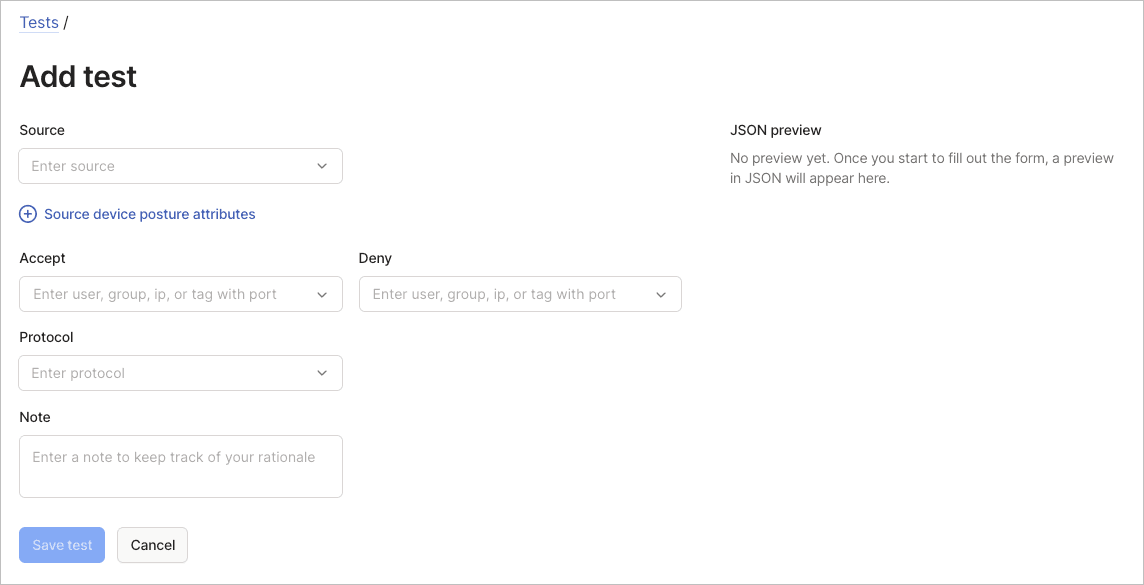
To add a general test using the visual editor:
- Go to the Access controls page of the admin console.
- Select Add test in the General tests section.
- Configure test parameters:
- Source: Specify the test source identity.
- Source device posture attributes: Add device conditions if posture rules apply.
- Accept: List destinations that should be accessible.
- Deny: List destinations that should be blocked.
- Protocol: Select the protocol to test.
- (Optional) Use the Note field to document the test's purpose.
- Review the JSON preview and select Save test.
Edit a general test
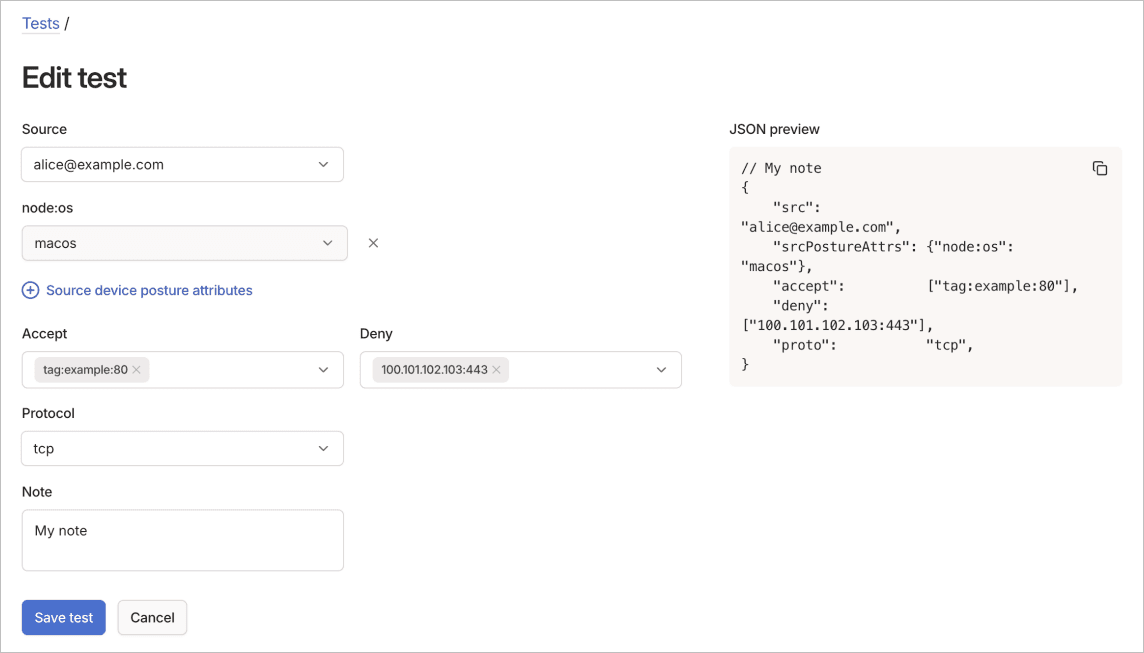
To edit a general test using the visual editor:
- Go to the Access controls page of the admin console.
- Select the Tests tab.
- In the General tests section, select the menu of the test to edit, then select Edit.
- Update the test parameters.
- Select Save test to apply the updated test.
Delete a general test
To delete a general test using the visual editor:
- Go to the Access controls page of the admin console.
- Select the Tests tab.
- In the General tests section, select the menu of the test.
- Select Delete.
SSH tests
SSH tests let you write validation tests that Tailscale SSH policy changes must pass before you can save them. These tests verify SSH access rules work as intended. SSH tests validate both access permissions and authentication requirements. Tests run automatically when you save policy changes. Failed tests prevent the policy from saving and display error messages indicating which assertions failed.
Add a SSH test
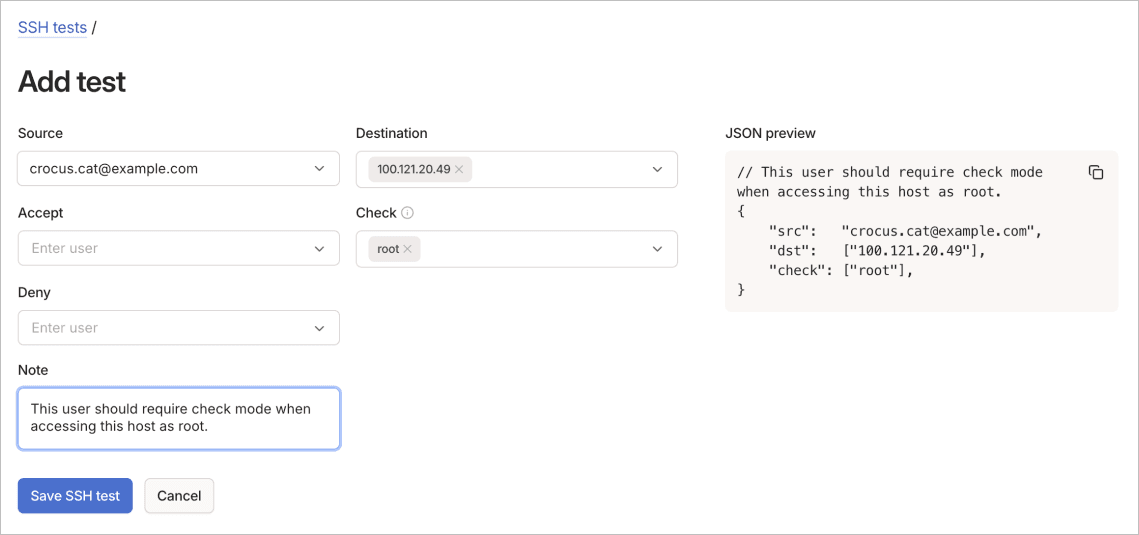
To add an SSH test using the visual editor:
- Go to the Access controls page of the admin console.
- Select Add SSH test from the SSH tests section of the Tests tab.
- Configure the SSH test parameters:
- Source: Specify the SSH connection source.
- Destination: Define the SSH target.
- Accept: Select users that should be allowed (options: autogroup:nonroot, root, Match local user with email).
- Check: Select users requiring check mode.
- Deny: Select users that should be denied.
- (Optional) Use the Note field to document the test scenario.
- Select Save SSH test to create the test.
Edit a SSH test
To edit an SSH test using the visual editor:
- Go to the Access controls page of the admin console.
- Select the Tests tab.
- In the SSH tests section, select the menu of the test to edit, then select Edit.
- Update the test parameters (Source, Destination, Accept, Check, Deny, and Note fields).
- Select Save SSH test to apply the updated test.
Delete a SSH test
To delete an SSH test using the visual editor:
- Go to the Access controls page of the admin console.
- Select the Tests tab.
- In the SSH tests section, select the menu of the test to delete.
- Select Delete.