Update Tailscale
Last validated:
Our team regularly releases updates for the Tailscale client, and we recommend always being on the latest version of the Tailscale client. To explore all the latest features, changes, and fixes, including release versions of the Tailscale client, refer to our Changelog page.
There are 3 ways to keep your Tailscale client up-to-date:
- Auto-updates (recommended)
- Manual updates
- MDM-managed updates
Check for updates
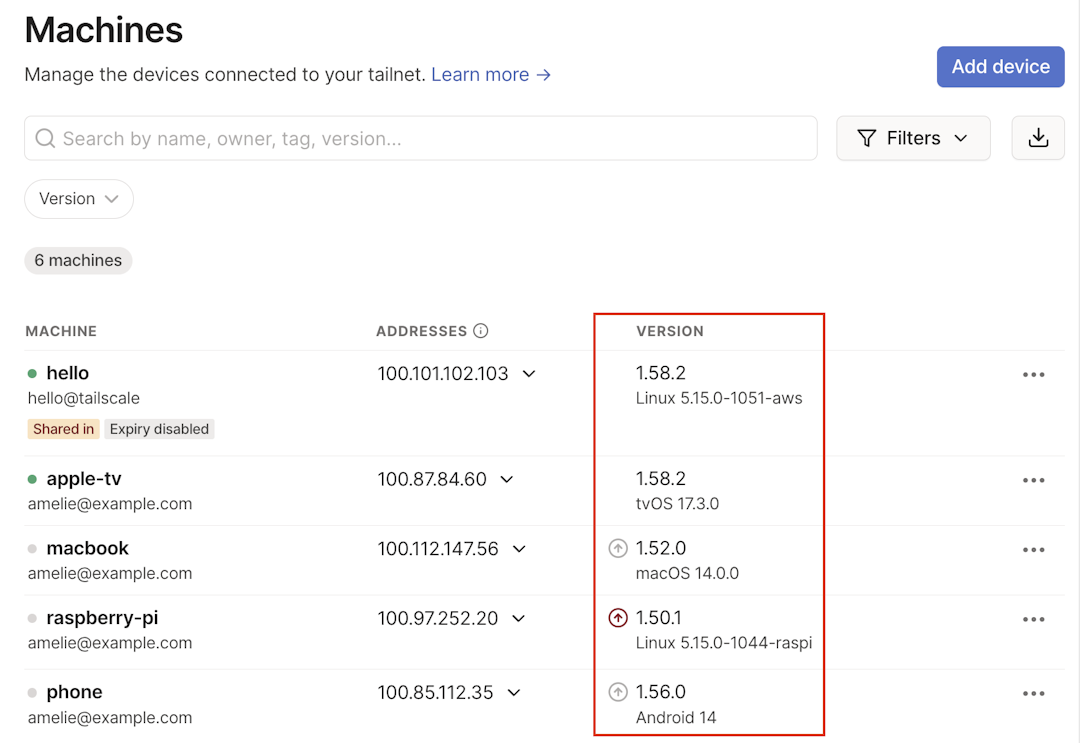
To find the version of the Tailscale client installed on every device in your Tailscale network (known as a tailnet), open the Machines page of the admin console and refer to the Version column. A gray arrow indicates that a standard update is available, a red arrow indicates that a security update is available, and no arrow indicates that the device is up-to-date.
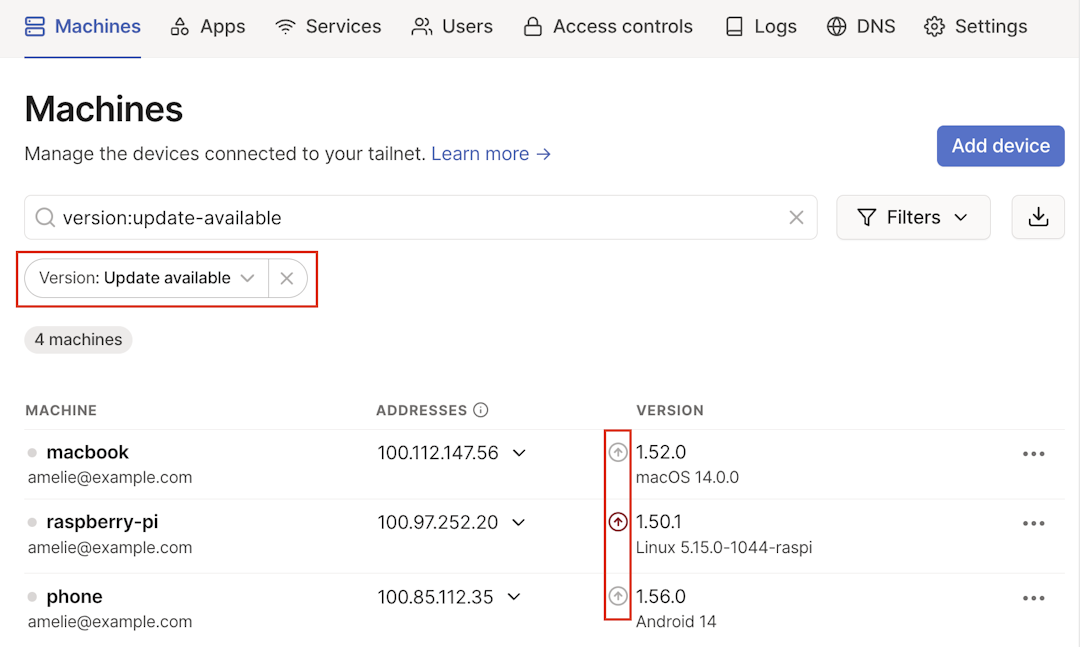
To display only the devices where an update is available, select the Version filter and select Update available.
Auto-updates
Tailscale can automatically apply client updates as they are released. To apply the update, the same mechanism is used during the initial client installation. For example, if the client was installed using a Linux package manager, that package manager will be used to upgrade the installed package.
Auto-updates are optional, and individual devices can be opted in or out of them anytime.
Devices using the iOS, macOS (App Store version), and Android (Google Play Store version) operating systems might not have automatic updates configured by default. We recommend verifying that this setting is enabled in the App Store and Google Play Store to ensure these devices are updated per with your tailnet settings.
If you use system policies to enforce your tailnet updates, auto-updates will occur based on the system policies that you set.
Auto-updates apply even if the client is disconnected from Tailscale.
Configure auto-updates in your tailnet
You must be the Owner, Admin, or IT admin to enable or disable auto-updates for a tailnet.
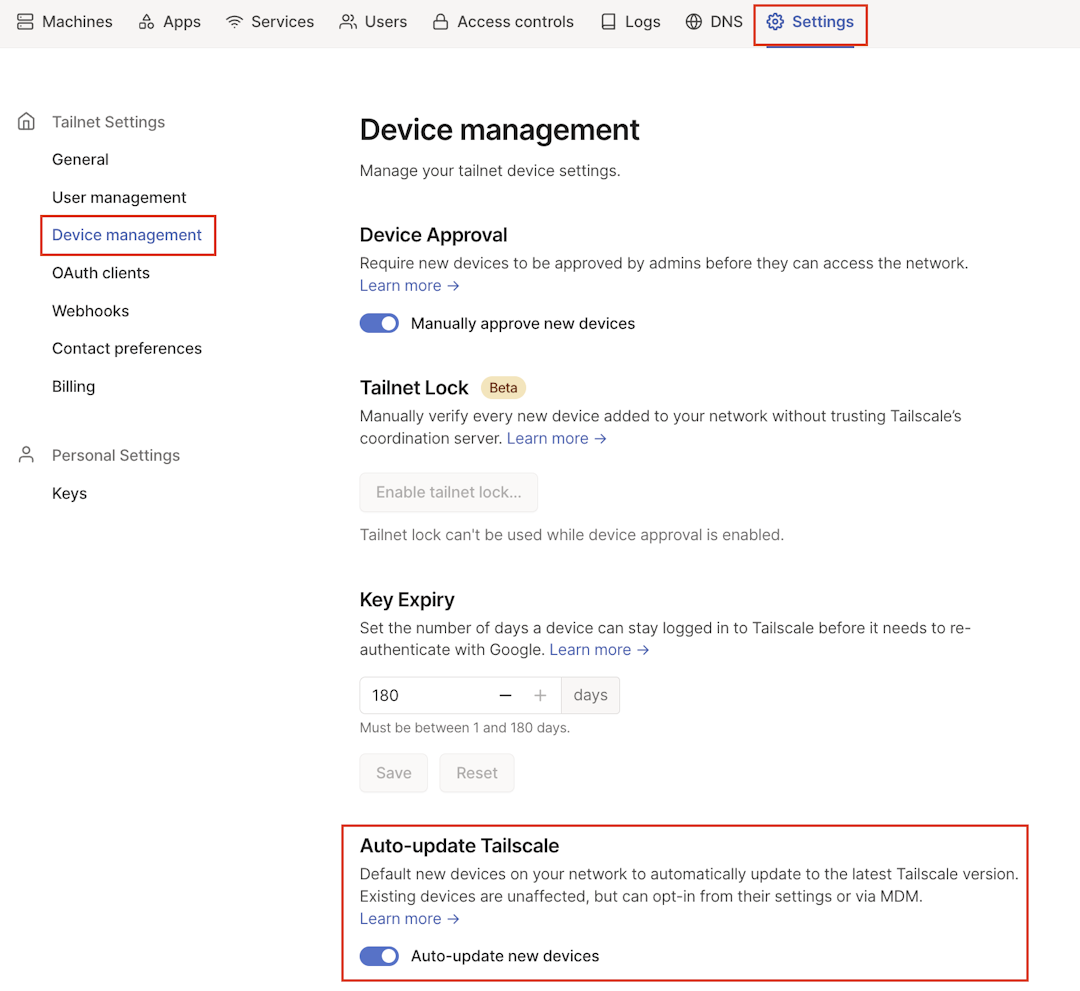
To enable auto-updates for your entire tailnet, open the Device management page of the admin console. Under Auto-update Tailscale, enable the Auto-update new devices toggle.
Changing the auto-update setting in the admin console will not change the Tailscale client settings for existing devices. The setting only affects new devices. Existing device owners must manually enable or disable auto-updates.
Auto-updates for new tailnets
All newly created tailnets have auto-updates enabled by default in the Device management page of the admin console. When a new device is added to the tailnet, the Tailscale client will be configured to automatically update by default.
Auto-updates for existing tailnets
If your tailnet was created prior to February 2024, you must manually enable auto-updates in the Device management page of the admin console, and for each of the existing devices. When auto-updates are enabled in the admin console, new devices added to your tailnet will be configured to automatically update by default.
Auto-updates for Docker containers
Docker containers are designed to be immutable, meaning they are not meant to change over time. Therefore, we recommend using the stable tag (image: tailscale/tailscale:stable) in your Docker configuration to ensure containers are updated to the latest stable version of the Tailscale client every time they are deployed.
It is common for Docker to also use the latest tag. In the context of Tailscale, the latest and stable tags accomplish the same thing, however, we recommend that you use the stable tag.
Although you can enable auto-updates within the Tailscale container by setting the Tailscale CLI command tailscale set --auto-update, be aware of the following limitations:
- Auto-updates inside a container do not persist between restarts. Therefore, you must reissue the command whenever a container is re-deployed or restarted.
- We recommend setting the version to
stableand not setting theauto-updateflag to on. This ensures that each time you deploy or restart the container, it will run with our latest stable version of Tailscale. - If you have both the
auto-updateflag set for the container and your configuration specifies a version such astailscale/tailscale:v1.76.0, the version of the Tailscale client will revert to this version upon re-deploy or restart and then eventually update to the latest stable version. - Auto-updates inside a container will ignore the tailnet-wide settings for auto-updates.
Enable auto-updates on devices
You may need to configure auto-update settings for the Tailscale clients on a device if auto-updates were not previously configured or if you need to disable auto-updates for the device.
Here's how to change auto-update device settings on different platforms:
Select the Tailscale tray icon and toggle Automatically install updates under the Preferences menu.
Auto-updates for devices on multiple tailnets
If a device has automatic updates enabled and belongs to multiple tailnets where the Auto-update new devices setting in the admin console varies, the client will be updated when connected to a tailnet with auto-updates enabled.
Auto-update limitations
Auto-updates are currently not supported on Synology and Linux distributions based on Arch Linux.
Auto-updates do not happen immediately when a new version of Tailscale is released. We monitor stability and issue reports for several days before enabling a release for auto-updates. It typically takes around a week after a release before your machines start to update, and it can take longer. Important security updates may be applied faster.
If machines with auto-updates enabled are not updated several weeks after a release, contact support.
Scheduling of auto-updates is not currently supported. Auto-updates are automatically scheduled around each node's activity to minimize disruption.
Manual updates
Here's how to manually upgrade on different platforms:
Upgrade Tailscale by downloading our Windows installer and running it. This will update your existing installation to the latest version.
Alternatively, you can update Windows clients by running the Tailscale CLI command tailscale update.
MDM-managed updates
To manage the installed version of Tailscale using MDM, refer to your MDM software documentation. You can also configure the installed Tailscale client using MDM policies.