Connect to an AWS VPC using subnet routes
Last validated:
Overview
This guide describes steps to deploy a Tailscale subnet router to an Amazon Virtual Private Cloud (Amazon VPC) to enable direct access to Amazon Elastic Compute Cloud (Amazon EC2) instances running Tailscale. The subnet router enables access to additional Amazon EC2 instances in the Amazon VPC. The deployment takes approximately 15 minutes and is supported in all AWS regions.
In the steps below, we'll set up a fresh Amazon VPC with Amazon Managed NAT Gateway, then configure a Tailscale relay to offer secure access to that Amazon VPC. We'll create a new Amazon VPC from scratch, but once you're comfortable, you can adapt these instructions to set up Tailscale on an existing Amazon VPC.
The steps in this guide deploy a single subnet router to a single availability zone. Multiple subnet routers can be deployed across multiple availability zones and configured to advertise the same routes to achieve high availability failover.
Prerequisites
Technical requirements
Tailscale works seamlessly with Linux, Windows, macOS, and more. No database is required and the only storage needed is for the Tailscale node key and node state. You can configure where node state is stored.
Specialized knowledge
This guide assumes familiarity with Amazon VPC, Amazon EC2, Linux, and SSH.
Tailscale account
If you don't already have a Tailscale account, create one at https://login.tailscale.com/start/.
AWS account
If you don't already have an AWS account, create one at https://aws.amazon.com.
Architecture
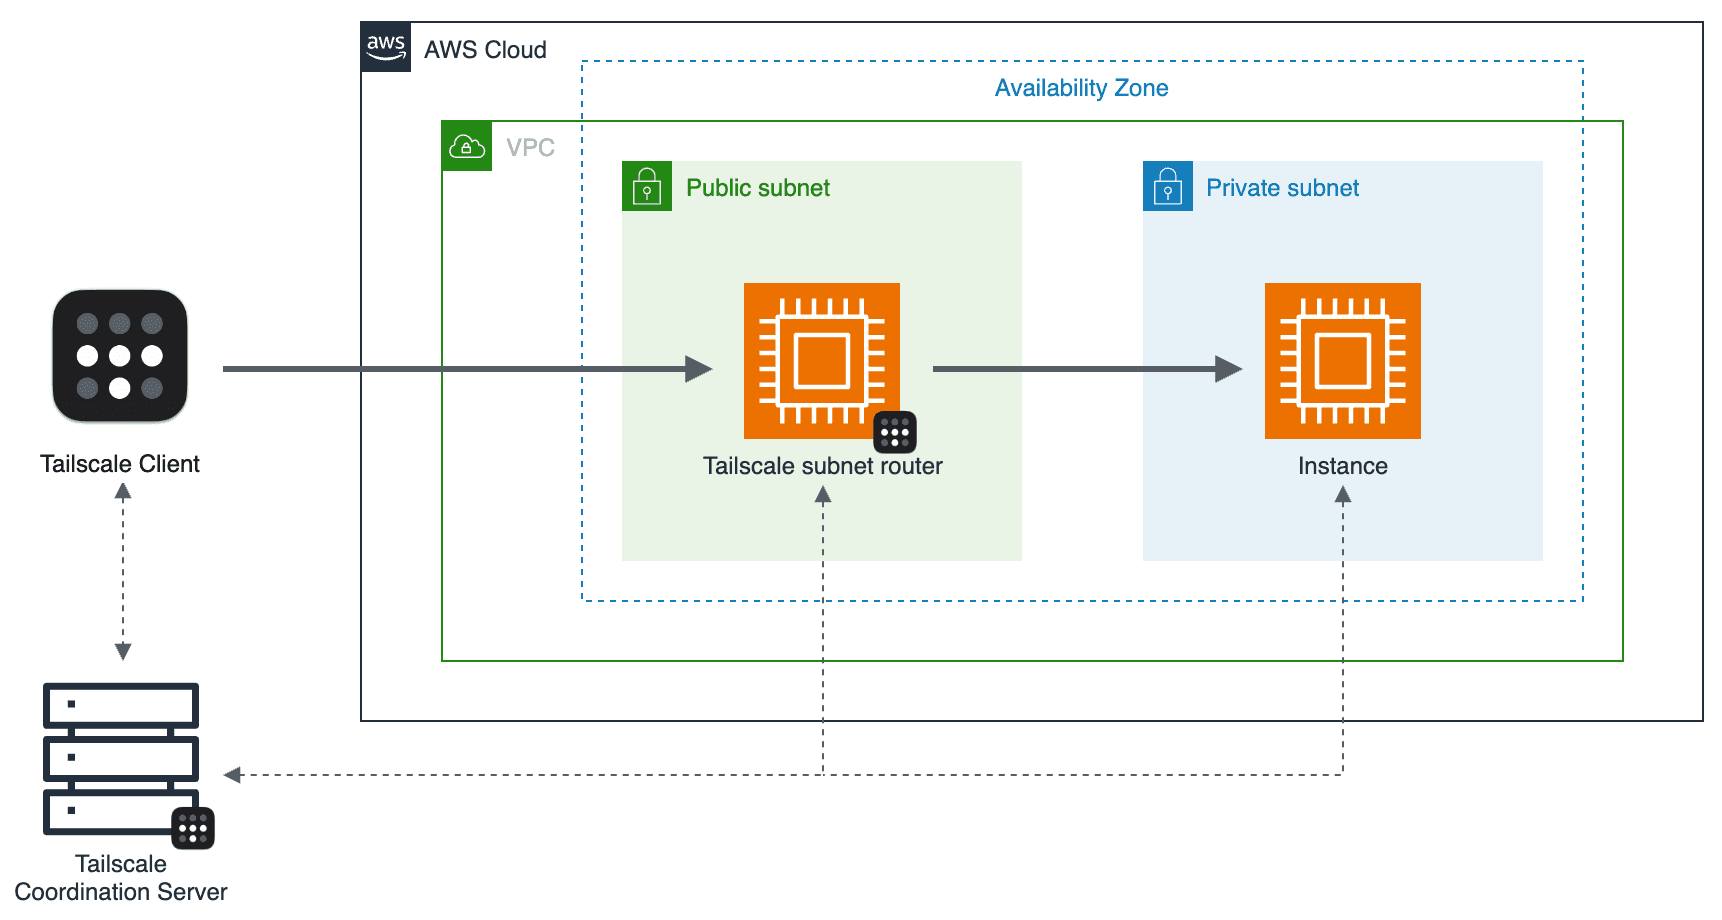
As shown in the diagram above, the deployment steps set up the following:
- An Amazon VPC with public and private subnets, configured with the Amazon VPC Wizard
- In a public subnet, an Amazon EC2 instance running Tailscale as a subnet router
- In a private subnet, an Amazon EC2 instance
All devices in a tailnet maintain a connection with the Tailscale coordination server to exchange metadata such as encryption keys, network topology changes, and access policy changes. The coordination server is part of the control plane only, not the data plane—it is not responsible for relaying traffic between devices.
Costs and licenses
You will be billed for any AWS services or resources deployed in the steps below. The estimated AWS costs are $100 USD per month.
Tailscale services or resources deployed in the steps below are available in all Tailscale plans, including Personal. For an overview of Tailscale's pricing plans, including paid plans, refer to Pricing.
AWS service limits
If necessary, request service quota increases for the following resources:
| Resource | This deployment uses |
| VPCs | 1 |
| NAT Gateway | 1 |
| Security groups | 2 |
| EC2 Instances | 2 |
Security considerations
EC2 key pairs
Make sure that at least one Amazon EC2 key pair exists in your AWS account in the region where you plan to deploy Tailscale. Make note of the key pair name to use in the deployment steps below. To create a key pair, refer to Amazon EC2 key pairs and Linux instances. This key will be used to connect to Amazon EC2 instances to install and configure Tailscale.
IAM permissions
You must sign in to the AWS Management Console with IAM permissions to deploy the resources included in this guide. The AdministratorAccess managed policy within IAM provides sufficient permissions, although your organization may choose to use a custom policy with more restrictions. For more information, refer to AWS managed policies for job functions.
Deployment steps
Step 1: Sign in to your AWS account
Sign in to your AWS account using an IAM user with the necessary IAM permissions. Do not use the AWS account root user for any deployment or operations.
Step 2: Create a VPC
Use the VPC wizard to create a VPC:
- Under Resources to create select VPC and more.
- Under Name tag auto-generation give your VPC a descriptive name or leave the default value.
- Under NAT gateways select In 1 AZ.
- Select Create VPC
Step 3: Create an EC2 instance for the Tailscale subnet router
Use the Launch an instance wizard to create an Amazon EC2 instance:
- Under Application and OS Images select Amazon Linux or another supported Linux distribution.
- Under Instance type select an instance type that meets your computing, memory, networking, or storage needs. A
t2.microor any AWS Free Tier-eligible instance type will be sufficient for testing this deployment. - Under Key pair (login) select a key pair to use for SSH.
- Under Network settings select the VPC you created above.
- Assign the instance to a public subnet of the VPC, and enable Auto-assign public IP.
- Create a security group and allow Inbound SSH. (We'll need this during initial setup, but you can turn it off later.)
- Name the security group something distinctive, like
tailscale-subnet-router. - Select Launch instance.
Step 4: Enable IP forwarding
IP forwarding is required to use a Linux device as a subnet router. SSH into the EC2 instance and run the commands below.
If your Linux system has a /etc/sysctl.d directory, use:
echo 'net.ipv4.ip_forward = 1' | sudo tee -a /etc/sysctl.d/99-tailscale.conf
echo 'net.ipv6.conf.all.forwarding = 1' | sudo tee -a /etc/sysctl.d/99-tailscale.conf
sudo sysctl -p /etc/sysctl.d/99-tailscale.conf
Otherwise, use:
echo 'net.ipv4.ip_forward = 1' | sudo tee -a /etc/sysctl.conf
echo 'net.ipv6.conf.all.forwarding = 1' | sudo tee -a /etc/sysctl.conf
sudo sysctl -p /etc/sysctl.conf
Step 5: Install Tailscale on your EC2 instance
SSH into the EC2 instance and install Tailscale by following the installation instructions for your distro.
Once installed, enable the Tailscale systemd service and advertise the desired routes for your subnets:
sudo systemctl enable --now tailscaled
sudo tailscale set --advertise-routes=10.0.0.0/24,10.0.1.0/24
You will be prompted to authenticate the device to your Tailscale network by visiting a link in your browser. Once you're familiar with Tailscale concepts, we recommend using pre-authentication keys ("auth keys" for short) to register new devices. This is most useful when provisioning devices using infrastructure-as-code systems like AWS CloudFormation.
tailscale set --advertise-routes requires IP forwarding to be enabled. If an error displays about IP forwarding, follow these steps.
Step 6: Configure your Tailscale network
Visit the Tailscale admin console and perform the following actions:
- Disable key expiry on the subnet router so that you don't need to reauthenticate the server periodically.
- Authorize subnet routes on the device, so that Tailscale
distributes the
10.0.0.0/24and10.0.1.0/24routes to the rest of your Tailscale network.
Step 7: Verify your connection
Check that you can ping the EC2 instance's Tailscale IP address from your
personal Tailscale device such as Windows and macOS. You can find the Tailscale IP
in the admin console, or by running tailscale ip -4 on
the EC2 instance.
Step 8: Close off your firewall
Now that your EC2 instance is available over Tailscale you can disable the open port in your public-facing firewall.
- In the Security Groups panel of the Amazon EC2 console find and select the
tailscale-subnet-routersecurity group. - Select Edit inbound rules and delete the rule allowing SSH access.
- Select Save rules.
Step 9: Create another EC2 instance to relay to
Back in the Launch an instance wizard create a second Amazon EC2 instance that we will connect to through the Tailscale subnet router:
- Under Application and OS Images select Amazon Linux or another supported Linux distribution.
- Under Instance type select the same instance type as before.
- Under Key pair (login) select a key pair to use for SSH.
- Under Network settings select the VPC you created above.
- Assign the instance to a private subnet of the VPC, and leave Auto-assign public IP set to Disable.
- Create a security group and allow all traffic inbound from the
tailscale-subnet-routersecurity group. - Select Launch instance.
Step 10: Verify your connection
SSH to your newly created private EC2 instance, using its private IP. The SSH session will flow through your Tailscale subnet router and into the private subnet.
Customer responsibility
After deployment, confirm that your resources and services are updated and configured—including patching the firmware and operating system of those devices. For more information, refer to the shared responsibility model.
Support
Tailscale offers multiple support options with varying SLAs for response times. Contact support if you have any issues related to Tailscale setup or configuration.
Next steps
Server setup
If you're setting up servers on Tailscale, we recommend you use an auth key to provision the server, and an tag to restrict its access.
High availability
Multiple subnet routers can be deployed across multiple availability zones and configured to advertise the same routes to achieve high availability failover.
4via6 subnet routers
If your network has subnets with overlapping IPv4 addresses, you can use the 4via6 subnet routers feature to ensure traffic from each node in your tailnet is routed to the correct device.