Use custom domains with Kubernetes Gateway API and Tailscale
Introduction
While Tailscale provides automatic DNS through MagicDNS with *.ts.net domains, you might need to use your own custom domains (such as app.example.com) for services exposed through your Tailscale network (known as a tailnet). For example, a custom domain is useful when migrating existing services to Tailscale, complying with organizational requirements for domain naming conventions, or terminating TLS with your own certificates rather than relying on Tailscale's built-in HTTPS.
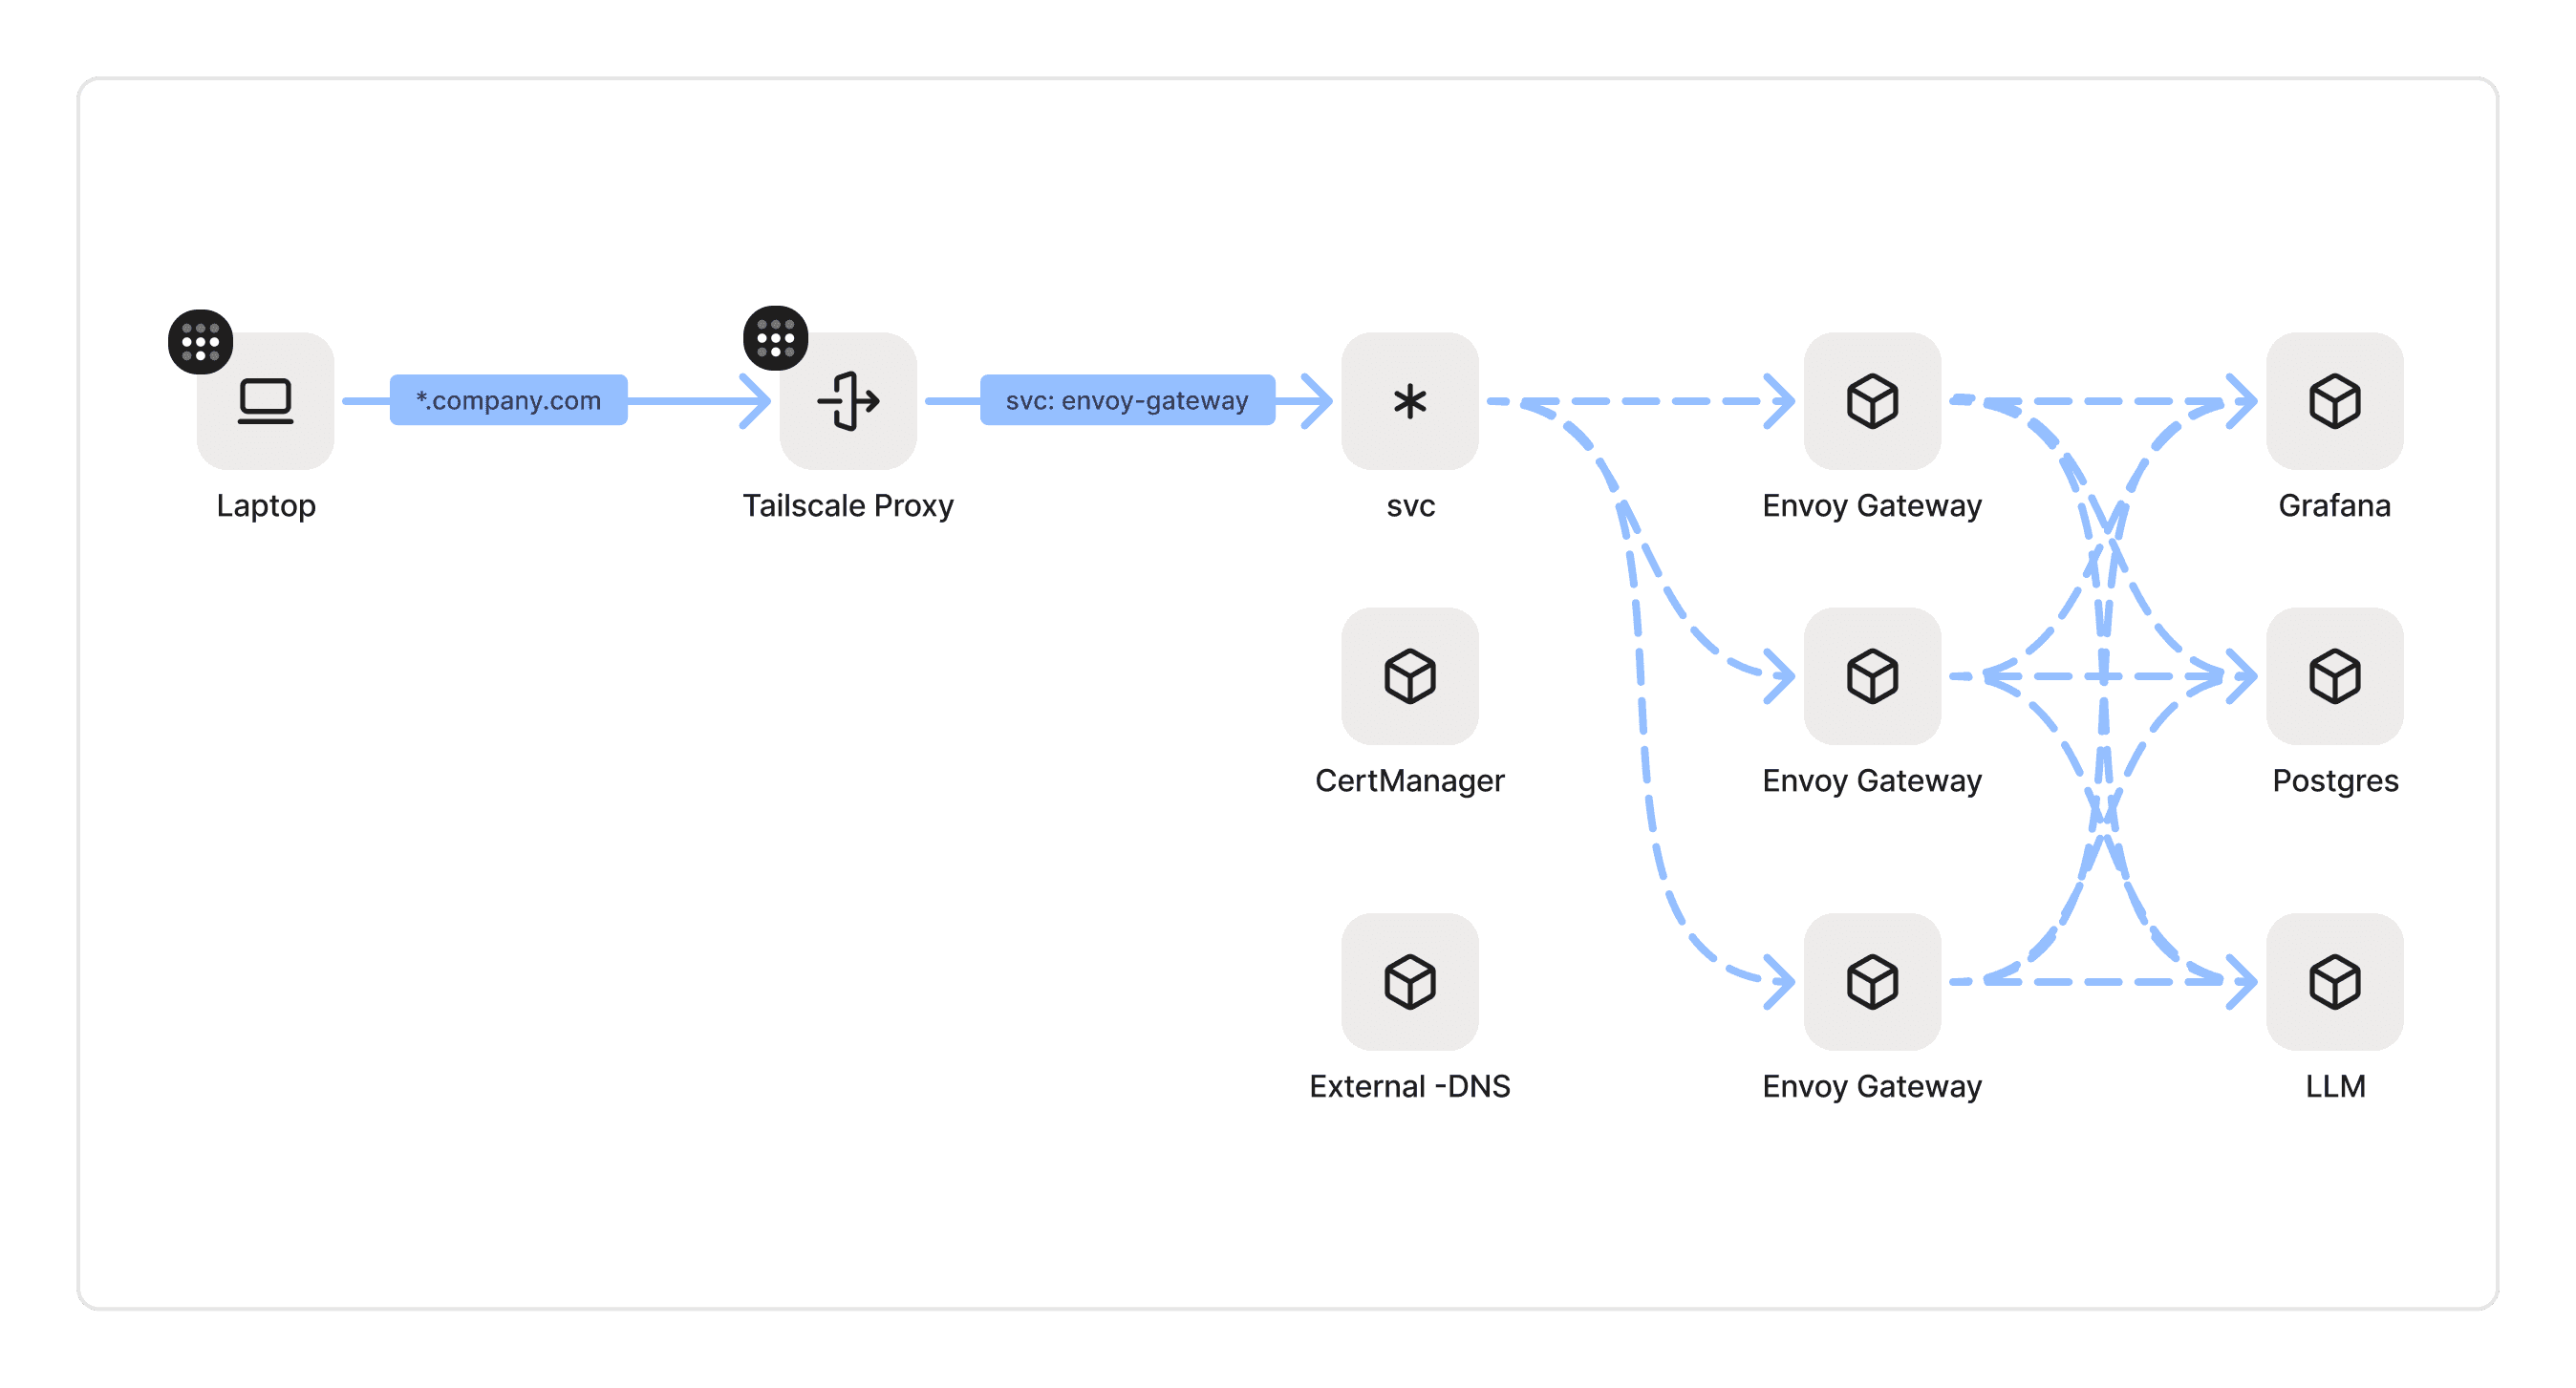
This guide shows you how to integrate the Kubernetes Gateway API with Tailscale to enable custom domains for your services with full TLS termination at the Gateway level. You'll configure Envoy Gateway as your Gateway API implementation to terminate TLS connections, use ExternalDNS to automatically manage DNS records in your internal DNS resolver, and cert-manager to provision and renew TLS certificates. The Gateway terminates TLS using certificates for your custom domain, providing full control over the TLS configuration and certificate management.
The solution uses a DNS resolver with local authoritative records for your custom domain, letting you define domain records that exist only within your tailnet. This approach maintains Tailscale's security model while giving you complete control over domain names and TLS termination.
By the end of this guide, you'll have a fully automated system where creating a Gateway resource automatically provisions authoritative DNS records for your domain in your internal DNS resolver and obtains TLS certificates, enabling secure access to your services through custom domains across your tailnet.
Prerequisites
Before completing this guide, make sure you have the following:
- A Kubernetes cluster with administrative access
- A Tailscale account with Admin access
- The Tailscale Kubernetes Operator installed in your cluster
- OAuth credentials configured for the Tailscale Kubernetes Operator
- Envoy Gateway installed as your Gateway API implementation
- ExternalDNS deployed and configured with your DNS provider
- cert-manager installed with a configured ClusterIssuer
- An internal DNS resolver with local authoritative capabilities (such as CoreDNS, BIND, Pi-hole, or cloud provider private DNS zones) that:
- Is accessible from your Tailscale devices (using a subnet router if needed)
- Can be managed by ExternalDNS to create authoritative records for your custom domain
Step 1: Configure Tailscale split DNS
To resolve custom domains like app.example.com within your tailnet, you need to configure Tailscale's MagicDNS to forward queries for your domain to your internal DNS resolver. This split DNS configuration ensures that Tailscale devices can resolve your custom domains using local authoritative records while maintaining normal DNS resolution for other domains.
To configure split DNS:
- Go to the DNS page of the admin console.
- Select Add nameserver > Custom.
- Enter the IP address of your internal DNS resolver that will hold authoritative records for your domain.
- Enable Restrict to search domain.
- Enter your custom domain (for example,
example.com). - Save your changes.
With this configuration, when a Tailscale device queries app.example.com, MagicDNS forwards the request to your internal DNS resolver. ExternalDNS maintains authoritative DNS records in this resolver, pointing to the Tailscale hostname of your Envoy Gateway.
Step 2: Configure EnvoyProxy with Tailscale integration
The EnvoyProxy resource configures how Envoy Gateway exposes its service. By specifying Tailscale as the LoadBalancer provider, you enable Envoy to be accessible through your tailnet.
Create an EnvoyProxy resource that configures Envoy to use Tailscale as its LoadBalancer provider:
apiVersion: gateway.envoyproxy.io/v1alpha1
kind: EnvoyProxy
metadata:
  name: tailscale-proxy
  namespace: tailscale
spec:
  provider:
    type: Kubernetes
    kubernetes:
      envoyService:
        type: LoadBalancer
        loadBalancerClass: tailscale
        annotations:
          tailscale.com/hostname: gateway-envoy
The tailscale.com/hostname annotation assigns a specific Tailscale hostname to the Envoy service (for example, gateway-envoy.example.com.ts.net). The loadBalancerClass: tailscale tells Kubernetes to use the Tailscale Kubernetes Operator for provisioning the LoadBalancer.
Step 3: Create a GatewayClass
A GatewayClass defines the controller that manages Gateway resources and links them to configuration parameters. This resource connects your Gateway to the EnvoyProxy configuration you created.
Define a GatewayClass that links to your EnvoyProxy configuration:
apiVersion: gateway.networking.k8s.io/v1
kind: GatewayClass
metadata:
  name: tailscale
spec:
  controllerName: gateway.envoyproxy.io/gatewayclass-controller
  parametersRef:
    group: gateway.envoyproxy.io
    kind: EnvoyProxy
    name: tailscale-proxy
    namespace: tailscale
Step 4: Deploy the Gateway
The Gateway resource defines the network entry point for your custom domain. It specifies which domains to listen for, handles TLS termination, and integrates with cert-manager for automatic certificate provisioning.
Create a Gateway resource that listens for HTTPS traffic on your custom domain:
apiVersion: gateway.networking.k8s.io/v1
kind: Gateway
metadata:
  name: custom-domain-gateway
  namespace: tailscale
  labels:
    external-dns: enabled
  annotations:
    cert-manager.io/cluster-issuer: letsencrypt-prod
spec:
  gatewayClassName: tailscale
  listeners:
    - name: https
      protocol: HTTPS
      port: 443
      hostname: "app.example.com"
      allowedRoutes:
        namespaces:
          from: All
      tls:
        mode: Terminate
        certificateRefs:
        - group: ''
          kind: Secret
          name: app-example-com-tls
Key configuration elements:
- The
external-dns: enabledlabel enables ExternalDNS to discover and process this Gateway. - The
cert-manager.io/cluster-issuerannotation specifies which ClusterIssuer to use for TLS certificates. - The
hostnamefield defines which domain this listener handles. - The
certificateRefspoints to the Secret where cert-manager stores the TLS certificate.
Step 5: Route traffic to your services
With the Gateway infrastructure in place, create an HTTPRoute to direct traffic to your backend services:
apiVersion: gateway.networking.k8s.io/v1
kind: HTTPRoute
metadata:
  name: app-route
  namespace: default
spec:
  parentRefs:
    - group: gateway.networking.k8s.io
      kind: Gateway
      name: custom-domain-gateway
      namespace: tailscale
  hostnames:
    - "app.example.com"
  rules:
    - matches:
        - path:
            type: PathPrefix
            value: /
      backendRefs:
        - group: ""
          kind: Service
          name: app-service
          port: 80
This route configuration:
- Links to your Gateway through
parentRefs. - Specifies which hostname to match.
- Routes all traffic (path
/) to your backend service.
Step 6: Configure ExternalDNS for automatic DNS management
ExternalDNS automates DNS record creation based on your Gateway resources. Configure it to watch for Gateways with specific labels and create authoritative records in your DNS resolver. This example demonstrates using Pi-hole as your internal DNS resolver with local authoritative capabilities, providing both ad blocking and custom domain resolution within your tailnet.
Pi-hole needs to be accessible through your tailnet so that Tailscale devices can query it for DNS resolution and so ExternalDNS can manage its records. First, create a secret for the Pi-hole admin password:
kubectl create secret generic pihole-admin \
  --from-literal=password='your-secure-password' \
  -n tailscale
Install Pi-hole using Helm and expose it through Tailscale:
helm repo add pihole https://mojo2600.github.io/pihole-kubernetes/
helm repo update

helm install pihole pihole/pihole \
  --namespace tailscale \
  --set admin.existingSecret=pihole-admin \
  --set admin.passwordKey=password \
  --set serviceDns.mixedService=true \
  --set serviceDns.type=LoadBalancer \
  --set serviceDns.loadBalancerClass=tailscale \
  --set 'serviceDns.annotations.tailscale\.com/hostname=pihole-dns' \
  --set extraEnvVars.FTLCONF_dns_listeningMode=all
This configuration exposes Pi-hole's DNS service through Tailscale at pihole-dns.example.com.ts.net. With Pi-hole running and accessible through your tailnet, deploy ExternalDNS to manage its records. ExternalDNS watches your Gateway resources and automatically creates DNS records in Pi-hole that point your custom domains to the Gateway's Tailscale address:
helm repo add external-dns https://kubernetes-sigs.github.io/external-dns
helm repo update

helm install external-dns external-dns/external-dns \
  --namespace tailscale \
  --set provider=pihole \
  --set 'extraArgs[0]=--pihole-server=http://pihole-web.tailscale' \
  --set 'extraArgs[1]=--pihole-api-version=6' \
  --set 'extraArgs[2]=--gateway-label-filter=external-dns==enabled' \
  --set policy=sync \
  --set 'sources[0]=gateway-httproute' \
  --set 'domainFilters[0]=example.com' \
  --set-string env[0].name=EXTERNAL_DNS_PIHOLE_PASSWORD \
  --set env[0].valueFrom.secretKeyRef.name=pihole-admin \
  --set env[0].valueFrom.secretKeyRef.key=password
This configuration watches for Gateways labeled with external-dns: enabled, creates DNS records for hostnames in HTTPRoutes, and manages only records for the example.com domain.
Step 7: Verify your configuration
After deploying all components, verify that your custom domain setup is working correctly. First, check that the Gateway resource has been successfully created and is ready to accept traffic:
kubectl get gateway custom-domain-gateway -n tailscale
The Gateway should show as Programmed with an address assigned. Once the Gateway is ready, confirm that your custom domain resolves correctly through the split DNS configuration you set up. From a device on your tailnet, run:
nslookup app.example.com
This should resolve to the IP address of your Envoy Gateway's Tailscale interface. Finally, test end-to-end connectivity to confirm that HTTPS traffic reaches your backend service through the Gateway:
curl https://app.example.com
You should receive a response from your backend service with a valid TLS certificate.
Troubleshooting
If you encounter issues with your custom domain setup, refer to Troubleshoot custom domains with Kubernetes Gateway API and Tailscale for detailed troubleshooting guidance.
Advanced configurations
The following configurations demonstrate advanced use cases for Gateway API with Tailscale. You can improve security by automatically redirecting HTTP requests to HTTPS. Create an HTTPRoute that redirects all HTTP traffic:
apiVersion: gateway.networking.k8s.io/v1
kind: HTTPRoute
metadata:
  name: tls-redirect
  namespace: tailscale
spec:
  parentRefs:
    - name: custom-domain-gateway
      sectionName: http
  rules:
    - filters:
        - type: RequestRedirect
          requestRedirect:
            scheme: https
            statusCode: 301
To enable this redirect, add an HTTP listener to your Gateway alongside the existing HTTPS listener:
listeners:
  - name: http
    port: 80
    protocol: HTTP
  - name: https
    protocol: HTTPS
    port: 443
    # ... rest of HTTPS configuration
You can also expose DNS services (like Pi-hole) through the same Gateway that handles your HTTPS traffic, providing a unified entry point. Create a Gateway with both HTTPS and DNS listeners:
apiVersion: gateway.networking.k8s.io/v1
kind: Gateway
metadata:
  name: unified-gateway
  namespace: tailscale
spec:
  gatewayClassName: tailscale
  listeners:
    - name: https
      protocol: HTTPS
      port: 443
      hostname: "*.example.com"
      # ... TLS configuration
    - name: dns-udp
      protocol: UDP
      port: 53
      allowedRoutes:
        kinds:
        - kind: UDPRoute
    - name: dns-tcp
      protocol: TCP
      port: 53
      allowedRoutes:
        kinds:
        - kind: TCPRoute
After adding these listeners, create TCPRoute and UDPRoute resources to route DNS traffic to your Pi-hole service:
---
apiVersion: gateway.networking.k8s.io/v1alpha2
kind: UDPRoute
metadata:
  name: pihole-dns-udp
spec:
  parentRefs:
    - name: unified-gateway
      sectionName: dns-udp
  rules:
    - backendRefs:
        - name: pihole-dns
          port: 53
---
apiVersion: gateway.networking.k8s.io/v1alpha2
kind: TCPRoute
metadata:
  name: pihole-dns-tcp
spec:
  parentRefs:
    - name: unified-gateway
      sectionName: dns-tcp
  rules:
    - backendRefs:
        - name: pihole-dns
          port: 53
This configuration enables clients to use the Gateway's Tailscale IP address for both HTTPS services and DNS resolution. To expose multiple services on different custom domains, configure separate listeners for each domain with its own TLS certificate:
listeners:
  - name: app-https
    protocol: HTTPS
    port: 443
    hostname: "app.example.com"
    tls:
      mode: Terminate
      certificateRefs:
      - name: app-example-com-tls
  - name: api-https
    protocol: HTTPS
    port: 443
    hostname: "api.example.com"
    tls:
      mode: Terminate
      certificateRefs:
      - name: api-example-com-tls
Instead of managing individual certificates for each subdomain, you can use a single wildcard certificate:
hostname: "*.example.com"
tls:
  certificateRefs:
  - name: wildcard-example-com-tls
By default, HTTPRoutes can only reference backend services in the same namespace. Enable cross-namespace routing by configuring the Gateway's allowedRoutes:
allowedRoutes:
  namespaces:
    from: Selector
    selector:
      matchLabels:
        gateway-access: allowed
Conclusion
You've successfully configured custom domains for services exposed through Tailscale using the Kubernetes Gateway API. This setup provides:
- Automated DNS management: ExternalDNS automatically creates and updates DNS records based on your Gateway configurations
- Automatic TLS certificates: cert-manager provisions and renews certificates without manual intervention
- Flexible routing: Gateway API enables sophisticated traffic routing rules
- Secure access: All traffic remains within your tailnet, maintaining Tailscale's security model
This architecture scales well as you add more services, requiring only new HTTPRoute resources to expose additional applications. The combination of Tailscale's secure networking with Kubernetes Gateway API's routing capabilities provides a robust platform for internal service exposure.
For more advanced configurations, explore Gateway API traffic policies or customize the Tailscale Kubernetes Operator for your specific requirements.