Get started
Login
© 2024

Tailscale Slack Accessbot
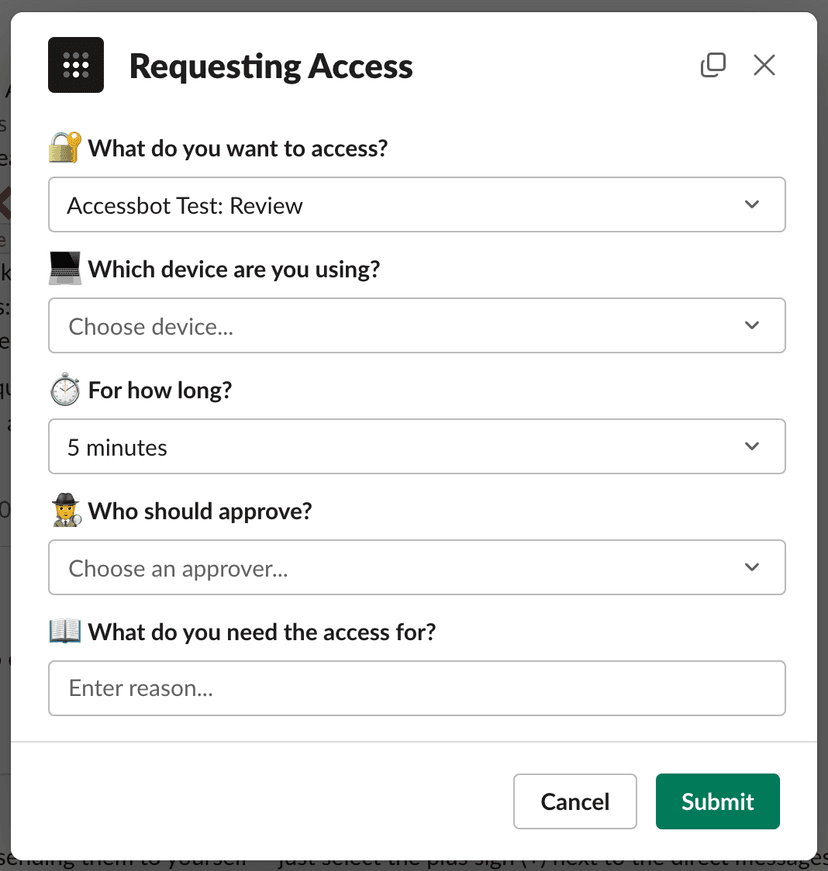
Tailscale Access workflow for Slack is currently in private alpha. Therefore, this topic is currently hidden.

As noted in Just-in-time access, Tailscale provides several ways for you to provide just-in-time (JIT) access to resources in your Tailscale network (known as a tailnet). This topic shows you how you can use the Tailscale Access workflow for Slack to set up a workflow where users can request temporary access via Slack.

How it works

Tailscale Access is a Slack Workflow App developed by Tailscale that allows users to use Slack to request instantaneous, time-bound access, known as just-in-time access, to Tailscale resources from other people in their organization.

Device attributes have an optional expiry property that lets you set a time in the future to expire the attribute. When set, the device attribute automatically expires at the specified time. You can use this to provide just-in-time access to resources by assigning attributes like custom:prodAccess to a device for a given time.

Inside Slack, a user can use the Request Tailscale Access shortcut to Tailscale Access. This will prompt them for:

  • what they want to access
  • which device they want to access it from
  • how long they need access for
  • who should approve their access
  • why they need the access
Tailscale Access request access form in Slack

If there are Tailscale devices owned by a user with an email address matching the Slack user who requested access, a list of those devices will be displayed. The user will also get prompted with a list of all devices in a tailnet.

When the request has been submitted, the selected approver will be notified and they can choose to approve or deny the request. Upon approval, the workflow will add the required attribute to the selected device with an expiry set to the selected time.

Deploy the Slack App for the first time

  1. Confirm that the Slack Team to which you want to install the Tailscale Accessbot has a paid Slack plan which allows you to Deploy apps to Slack infrastructure.

  2. Install Deno on your local machine following the Deno Installation instructions.

  3. Install the Slack CLI on your local machine following the Slack Quickstart Guide.

  4. Authenticate with the Slack CLI by running slack login in your terminal:

    1. The output will contain a command like /slackauthticket NzY5YmViN2QtY2ZjZS12ZmRjLTlmYTktNjI0NjI5NWI1ODFk which you should paste into the Slack chat box.
    2. Approve the permissions that Slack will grant your CLI.
    3. Paste the confirmation code back into the Slack CLI's Enter challenge code prompt.
  5. Add the Tailscale Accessbot code to a git repository of your own:

    1. Run the following commands to create a new directory for the accessbot code and config:

      mkdir tailscale-accessbot
      cd tailscale-accessbot
      
    2. Run the following commands to pull the Tailscale Accessbot code into your new directory:

      git init -b main
      git remote add upstream https://github.com/tailscale/accessbot.git
      git pull upstream main
      
    3. (Optional, recommended) Create a private git repository on GitHub, GitLab, or your preferred git host of choice, and push your code there:

      git remote add origin git@github.com:myorg/tailscale-accessbot
      git push -u origin main
      
  6. Deploy the app to Slack:

    1. Run the following command to begin deploying your app to Slack, which will prompt you to select the Team to install to:

      slack deploy
      
      • If you receive an error containing app_approval_request_denied then your Slack team is configured with Require App Approval turned on but Allow members to request approval for apps turned off. Speak to one of your Slack team owners about changing these settings to allow you to proceed. They can either turn on the Allow members to request approval for apps setting or add your user to the Select App Managers to manage apps > Workspace Owners and selected members or groups option. Retry slack deploy after this change.
      • If you are asked whether you would like to request approval to install the app, select Yes. Once Slack tells you that approval has been granted, you may re-run slack deploy.
    2. Create the trigger when prompted.

    3. Slack will give you a Shortcut URL such as https://slack.com/shortcuts/Ft074AB2RW12/… which won't work in your web browser, but which can be used within the Slack app. Paste the Shortcut URL from your terminal into a Slack chatroom and it will render a Start Workflow button:

      'Start Workflow' link rendered in Slack
    4. Selecting the Start Workflow button will show the following error because we are yet to connect it to Tailscale:

      Tailscale workflow before configuration
    5. The Slack CLI will have created a .slack directory containing apps.json and config.json files. These contain the app identifiers that allow the Slack CLI to update the app later. You should now git commit these files and if backing up to a remote repository, git push.

  7. Connect the app to Tailscale:

    1. Create a tag for the Tailscale Accessbot by adding the following to your Tailnet ACLs (requires Owner or Network Admin role if editing by hand):

      "tagOwners": {
      	"tag:accessbot": ["autogroup:owner", "autogroup:admin", "autogroup:network-admin", "autogroup:it-admin"],
      },
      
    2. Generate an OAuth client in Tailscale with the devices:write scope, selecting the tag:accessbot tag that you created in the prior step:

      Tailscale accessbot OAuth Client
    3. Run the following command from your accessbot directory, using the OAuth Client ID in place of <client-id>, and selecting the appropriate team when prompted:

      slack env add TAILSCALE_CLIENT_ID <client-id>
      
    4. Run the following command from your accessbot directory, using the OAuth Client secret in place of <secret>, and selecting the appropriate team when prompted:

      slack env add TAILSCALE_CLIENT_SECRET <secret>
      
    5. Going back to Slack, selecting the Start Workflow button again should now present the Accessbot screen:

      Tailscale Access starting request form in Slack
      • An alternative way to trigger the workflow is to start typing its name in the "slash command" pop-up menu that you should see after pressing the "/" key.
    6. Any errors that occur during the operation of the Workflow will be sent to you in Slack, or can be inspected on demand using slack activity, or watched in real-time using slack activity --tail.

    7. Proceed to the next section to configure the available access profiles and update your app.

Configure profiles

Configuration of Tailscale Access profiles is done by editing config.ts. All available configuration options can be seen in the schema under config.ts.

An example of a minimal configuration can begin as follows:

export const config: Config = {
  profiles: [
    {
      attribute: "custom:prodAccess",
      description: "Production",
      notifyChannel: "C06TH49GKHC",
      canSelfApprove: true,
      approverEmails: [
        "alice@example.com",
        "bob@example.com",
        "charlie@example.com",
      ],
    },
  ]
} as Config

See the type Profile declaration at the bottom of config.ts for a description of the different fields available in this config.

After changing config.ts, you must run another slack deploy to see the config update in the app. It is recommended that you git commit and git push at this point too.

Slack documentation has instructions on automatic deployment of the workflow using Github Actions.

Use the attributes as part of network policy

After the workflow has been configured and deployed, you can start using attributes corresponding to the configured access profiles as part of your network policy.

For example, the custom:prodAccess attribute managed by the workflow can be referenced by a posture and required for production access:

"postures": {
    "posture:prodAccess": ["custom:prodAccess == true"],
},
"acls": [
    {
        "action": "accept",
        "src": ["group:dev"],
        "dst": ["tag:production"],
        "srcPosture": ["posture:prodAccess"]
    },
],

See the Device Posture topic and the tailnet policy file syntax topic for more information about postures and posture conditions.

Develop with the accessbot locally

You can run the workflow locally, before deploying it to Slack's infrastructure.

First add the Tailscale Client ID and Secret from the previous step to a .env file in the root of the project:

TAILSCALE_CLIENT_ID=abc1234CNTRL
TAILSCALE_CLIENT_SECRET=tskey-client-abc1234CNTRL-qwerty1234...

Then you can run the application using the slack CLI. You'll know an app is the development version if the name has the string (local) appended:

# Run app locally
slack run

Connected, awaiting events

To stop running locally, press <CTRL> + C to end the process.

Posture attributes API with Expiry

This section is an extended version of the Posture attributes API from the Device Posture topic that contains additional information about attribute expiry.

Get posture attributes via API

GET /api/v2/device/{deviceID}/attributes

Retrieve all posture attributes for the specified device. This returns a JSON object of all the key-value pairs of posture attributes for the device.

Parameters

deviceID (required in URL path)

The ID of the device to fetch posture attributes for.

Request example

curl "https://api.tailscale.com/api/v2/device/11055/attributes" \
-u "tskey-api-xxxxx:"

Response

The response is 200 on success. The response body is a JSON object containing all the posture attributes assigned to the node. Attribute values can be strings, numbers, or booleans.

{
  "attributes": {
    "custom:myScore": 87,
    "custom:diskEncryption": true,
    "custom:myAttribute": "my_value",
    "node:os": "linux",
    "node:osVersion": "5.19.0-42-generic",
    "node:tsReleaseTrack": "stable",
    "node:tsVersion": "1.40.0",
    "node:tsAutoUpdate": false
  },
  "expiries": {
    "custom:myScore": "2024-04-23T18:25:43.511Z",
  }
}
  • attributes: a key-value map of all attributes associated with a given node. The values can be either a number, string, or boolean.

  • expiries: a key-value map of attributes that has an expiry time, and when they will expire. Any attribute without an expiry is omitted. If there are no attributes with expiries, the entire expiries field is omitted.

Set custom posture attributes via API

POST /api/v2/device/{deviceID}/attributes/{attributeKey}

Create or update a custom posture attribute on the specified device. User-managed attributes must be in the custom namespace, which is indicated by prefixing the attribute key with custom:.

Custom device posture attributes are available for the Personal and Enterprise plans.

Parameters

deviceID (required in URL path)

The ID of the device on which to set the custom posture attribute.

attributeKey (required in URL path)

The name of the posture attribute to set. This must be prefixed with custom:.

Keys have a maximum length of 50 characters including the namespace, and can only contain letters, numbers, underscores, and colon.

Keys are case-sensitive. Keys must be unique, but are checked for uniqueness in a case-insensitive manner. For example, custom:MyAttribute and custom:myattribute cannot both be set within a single tailnet.

All values for a given key need to be of the same type, which is determined when the first value is written for a given key. For example, custom:myattribute cannot have a numeric value (87) for one node and a string value ("78") for another node within the same tailnet.

Posture attribute value (required in POST body)
{
  "value": "foo"
}

A value can be either a string, number, or boolean.

A string value can have a maximum length of 50 characters, and can only contain letters, numbers, underscores, and periods.

A number value is an integer and must be a JSON safe number (up to 2^53 - 1).

Posture attribute expiry (optional in POST body)
{
  "value": "foo",
  "expiry": "2024-04-23T18:25:43.511Z"
}

An expiry can be any time in the future, formatted as an RFC3339 string. When set, the device attribute will automatically be removed at the time specified.

Posture attribute comment (optional in POST body)
{
  "value": "foo",
  "expiry": "2024-04-23T18:25:43.511Z",
  "comment": "access needed to inspect logs on prod vm"
}

A comment can be added to give a reason why an attribute was added.

Request example

curl "https://api.tailscale.com/api/v2/device/11055/attributes/custom:my_attribute" \
-u "tskey-api-xxxxx:" \
--data-binary '{"value": "my_value", "expiry": "2024-04-23T18:25:43.511Z"}'

Response

The response is 2xx on success. The response body is currently an empty JSON object.