
Workload identity federation
Last validated:
Workload identity federation lets cloud-hosted infrastructure in providers like Microsoft Azure, Google Cloud Platform, Amazon Web Services, or GitHub Actions authenticate to a tailnet or the Tailscale API using provider-native identity tokens instead of Tailscale auth keys or OAuth clients. By leveraging the provider's federated OpenID Connect (OIDC) identities, tailnet administrators can streamline credential management and infrastructure automation.
How it works
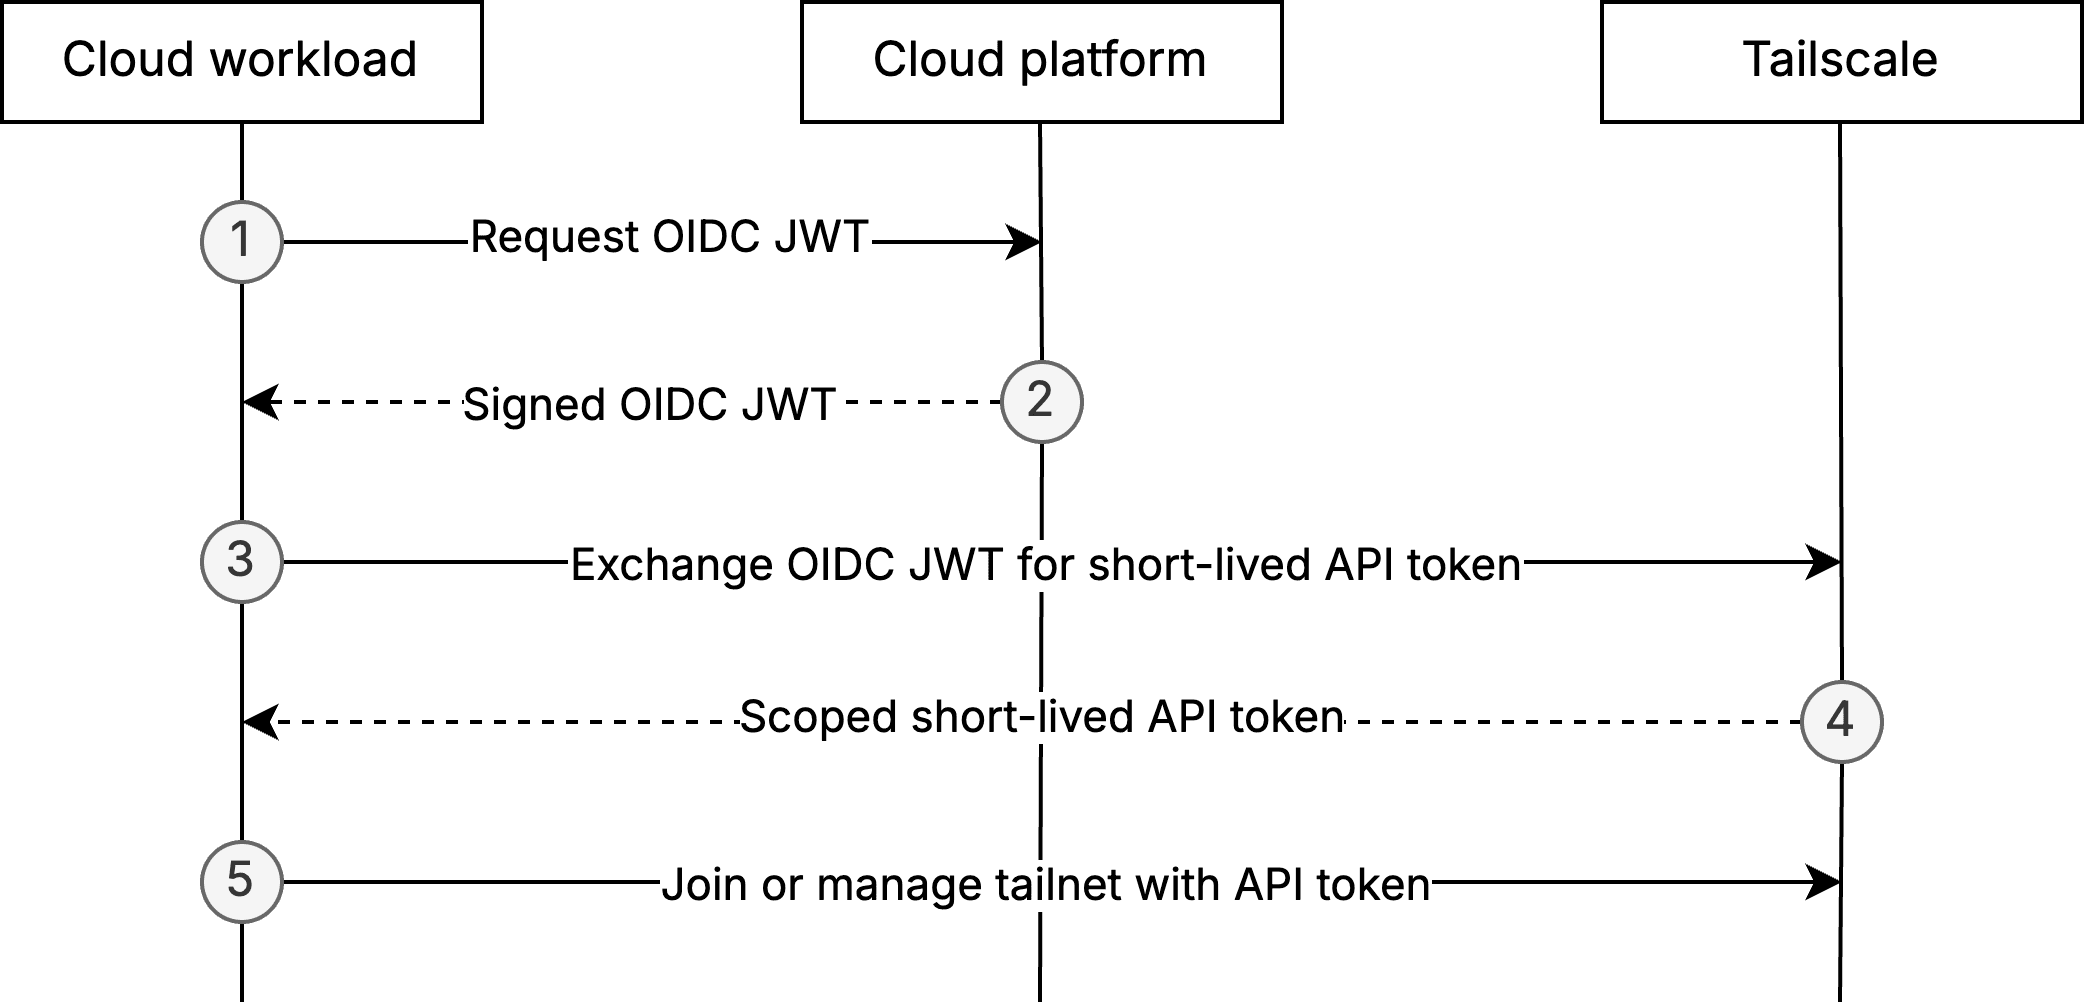
When a cloud workload (such as a CI job, serverless function, or virtual machine) wants to join your tailnet or call the Tailscale API, it first asks its own platform for an OIDC token.
The OIDC token is a signed JSON Web Token (JWT) that conveys three assurances from the cloud platform:
- It vouches for the workload's identity.
- It specifies exactly which workload the JWT represents.
- It declares who is permitted to consume the token.
Because the platform signs the token with its publicly advertised keys, anyone can verify the signature and trust that the claims are genuine.
Before any exchange can take place, a tailnet admin establishes trust by specifying the OIDC issuer to trust and defining claim-matching rules that map specific workloads, such as a particular GitHub repository, Google Cloud service account, or Azure workload, onto the tags and API scopes they should receive. Tokens that fail to match these rules are rejected automatically.
The workload then sends that OIDC token to Tailscale's token exchange endpoint. Behind the scenes, Tailscale fetches the issuer's public keys, validates the signature, standard claims (issuer, audience, expiry), and claim-matching rules and then returns a short-lived API token with the scopes you configured when configuring identity federation in the Tailscale admin console.
With this API token, the workload can join or manage the tailnet with the Tailscale API.
Set up a federated identity
Before a cloud workload can use its signed OIDC token to authenticate to Tailscale, you must set up a federated identity in Tailscale and assign all necessary scopes.
Federated identities can be configured using:
Configure federated identities in the admin console
To configure federated identities in the Tailscale admin console:
- Open the Trust credentials page of the admin console.
- Select the Credential button.
- Select OpenID Connect.
- Select an Issuer from the dropdown. Common cloud providers are included in the dropdown, but any infrastructure provider that supports OIDC for workload identity federation can be used if Custom issuer is selected.
- Enter the Issuer URL for the cloud provider's OIDC issuer if using a Custom issuer.
- Enter the Subject. This value determines the attributes of the workload that must match to successfully receive a Tailscale API token. Learn more about the syntax of the subject (
sub) claims for common cloud providers. - (Optional) Add additional Custom claims to further narrow access. Learn more about token claims for common cloud providers.
- Select the relevant read and write scopes from the list and select Generate credential.
- Copy the Client ID and Audience (aud claim). These are not secrets and will be visible in the admin console.
Retrieve the Client ID in the admin console
If you need to copy the Client ID at a later point in time, you can visit the admin console.
-
Open the Trust credentials page of the admin console.
-
Use the Search and optionally the Filters functionality to find the federated identity you are interested in.
- Searching by
tagmay be useful. - Setting the Filters value to Client type and selecting OIDC may also be useful.
- Searching by
-
Either select the arrow toggle to expand the row or select the
 menu and select View or Edit.
 -
Select the clipboard icon to copy the Client ID.
Configure federated identities using the Tailscale Terraform provider
To configure federated identities using the Tailscale Terraform provider with the tailscale_federated_identity resource:
resource "tailscale_federated_identity" "example_federated_identity" {
  description = "Example federated identity"
  scopes      = ["auth_keys", "devices:core"]
  tags        = ["tag:test"]
  issuer      = "https://example.com"
  subject     = "example-sub-*"
  custom_claim_rules = {
    repo_name = "example-repo-name"
  }
}
For more information, refer to the Tailscale Terraform provider documentation.
Configure federated identities using tailscale-client-go-v2
To configure federated identities federated identities using tailscale-client-go-v2:
package main

import (
	"context"
	"os"

	"tailscale.com/client/tailscale/v2"
)

func main() {
	client := &tailscale.Client{
		// Client configuration
	}

	req := tailscale.CreateFederatedIdentityRequest {
		Description: "Example federated identity",
		Scopes:  []string{"auth_keys", "devices:core"},
		Tags:    []string{"tag:test"},
		Subject: "example-sub-*",
		CustomClaimRules: map[string]string{
			"repo_name": "example-repo-name",
		},
	}

	federatedIdentity, err := client.Keys().CreateFederatedIdentity(context.Background(), req)
}
For more information, refer to tailscale-client-go-v2.
Configure federated identities using the Tailscale API
To configure federated identities using the Tailscale API with the https://api.tailscale.com/api/v2/tailnet/-/keys endpoint:
curl -X POST https://api.tailscale.com/api/v2/tailnet/-/keys \
  -H "Content-Type: application/json" \
  -d   '{
  "keyType": "federated",
  "description": "Example federated identity",
  "scopes": [
    "auth_keys",
    "devices:core"
  ],
  "tags": [
    "tag:test"
  ],
  "issuer": "https://example.com",
  "subject": "example-sub-*",
  "customClaimRules": {
    "repo_name": "example-repo-name",
  }'
For more information, refer to endpoint API.
Exchange workload identity tokens with Tailscale
Workload identity tokens must be exchanged with Tailscale to authenticate and provide a Tailscale access token.
Using workload identity token exchange for authentication is supported natively in:
- The Tailscale GitHub Action
- The Tailscale Terraform provider
tailscale-client-go-v2- The Tailscale API
Workload identity can also be used for registering new nodes in your tailnet.
Tailscale GitHub Action
Workload identity can be used to authenticate the Tailscale GitHub action by using the oauth-client-id, audience, and tags arguments:
- name: Tailscale
  uses: tailscale/github-action@v4
  with:
    oauth-client-id: ${{ secrets.TS_OAUTH_CLIENT_ID }}
    audience: ${{ secrets.TS_AUDIENCE }}
    tags: tag:ci
Workload identity federation requires the id-token: write permission setting for the workflow:
permissions:
  id-token: write # This is required for the tailscale action to request a JWT from GitHub
  # Additional required permissions for your workflow
For more information, refer to GitHub action.
Tailscale Terraform provider
Workload identity can be used to authenticate the Tailscale Terraform provider by using the oauth_client_id and id_token provider arguments:
provider "tailscale" {
  oauth_client_id = "my_client_id"
  identity_token  = "my_identity_token"
  tailnet         = "example.com"
}
For more information, refer to Tailscale Terraform provider.
tailscale-client-go-v2
Workload identity can be used to authenticate tailscale-client-go-v2 by supplying a ClientID and IDTokenFunc to tailscale.Client:
package main

import (
	"context"
	"os"

	"tailscale.com/client/tailscale/v2"
)

func main() {
	client := &tailscale.Client{
		Tailnet: os.Getenv("TAILSCALE_TAILNET"),
		Auth: &tailscale.IdentityFederation{
			ClientID: os.Getenv("TAILSCALE_OAUTH_CLIENT_ID"),
			IDTokenFunc: func() (string, error) {
				return os.Getenv("IDENTITY_TOKEN"), nil
            },
		},
	}

	// Example API call
	devices, err := client.Devices().List(context.Background())
}
For more information, refer to tailscale-client-go-v2.
Token exchange API
The Tailscale token exchange endpoint is https://api.tailscale.com/api/v2/oauth/token-exchange.
Make requests to the Tailscale token exchange endpoint when you need a short-lived Tailscale access token:
curl -X POST https://api.tailscale.com/api/v2/oauth/token-exchange \
  -H "Content-Type: application/x-www-form-urlencoded" \
  -d "client_id=<CLIENT_ID>" \
  -d "jwt=<JWT>"
<CLIENT_ID>: The client ID generated when you configured a federated identity in the Tailscale admin console.<JWT>: The signed OIDC JWT provided to the workload by the cloud provider.
If the client ID and JWT are valid and match the configured audience, subject, and custom claim rules, Tailscale will return a short-lived API token to use for authenticating the workload to the Tailscale API.
If the short-lived API token expires, you can repeat this step to receive a fresh token.
Debugging token exchange errors
The latest token exchange error details for a federated identity can be found in the admin console.
-
Open the Trust credentials page of the admin console.
-
Use the Search and optionally the Filters functionality to find the federated identity you are interested in.
- Searching by
tagmay be useful. - Setting the Filters value to Client type and selecting OIDC may also be useful.
- Searching by
-
Select the
menu and select View or Edit.
Information about the error will be present on this page, with specific guidance varying depending on the type of error.
Errors will only be cleared once a token exchange has succeeded for the federated identity.
API error responses
Errors returned from the token exchange API endpoint will not have specific debugging information directly in the error message.
This is done to prevent leaking information to potential bad actors as they could otherwise attempt to reverse engineer your federated identity's configuration from error messages if they know its client ID.
Error messages will instead contain a direct link to the federated identity within the admin console in a message of the form:
{ "message": "Unauthorized. Visit [link to admin console] for details" }
Information about the error will be present on this page, with specific guidance varying depending on the type of error.
Errors will only be cleared once a token exchange has succeeded for the federated identity.
Register new nodes using workload identity
A device must run Tailscale v1.90.1 or later to have the --client-id and --id-token flags.
You can use a client ID and OIDC token directly in tailscale up to register a new node:
tailscale up --client-id=${CLIENT_ID} --id-token=${IDENTITY_TOKEN} --advertise-tags=tag:ci
The tailscale up command expects the client-id to be the Client ID used to generate auth keys with workload identity federation. Access the admin console to retrieve the Client ID.
The command also expects the id-token to be the ID token from the identity provider to exchange with the control server for workload federation. This value is the signed OIDC JWT and not a short-lived API token.
The workload identity credential must have the auth_keys scope and the tags passed to --advertise-tags must match the tags you selected when you configured the federated identity.
The --client-id flag can accept additional URL-style parameters:
tailscale up --client-id='${CLIENT_ID}?ephemeral=false&preauthorized=true' --id-token=${IDENTITY_TOKEN} --advertise-tags=tag:ci
The available parameters are:
ephemeral: register as an ephemeral node (defaults totrue)preauthorized: skip manual device approval (defaults tofalse)
Automatic cloud token discovery and exchange
A device must run Tailscale v1.94.0 or later to have the --audience flag.
Tailscale can automatically detect certain cloud and CI environments and retrieve a native identity token from the platform it is running on. When enabled, the client uses this token to authenticate the node to your tailnet using workload identity federation without requiring you to manually provision or manage credentials.
This functionality is intended for non-interactive workloads, such as cloud VMs, containerized services, and CI/CD pipelines, where identity should be derived from the execution environment itself.
No long-lived credentials, access keys, or secrets are stored on disk or injected at runtime.
This behavior is enabled by passing a client ID and audience to tailscale up:
tailscale up --client-id=${CLIENT_ID} --audience=${AUDIENCE} --advertise-tags=tag:ci
The command expects audience to be the audience specified in the trust configuration for the federated identity referred to by client-id.
Supported environments
Automatic token discovery requires both a native workload identity on the platform and a matching trust configuration in Tailscale. Once configured, the Tailscale client will obtain a provider token on your behalf on the platforms described below.
AWS
Workload environment
- The workload runs on an AWS service that supports IAM roles. For example, Elastic Cloud Compute (EC2), Elastic Container Service (ECS), or Elastic Kubernetes Service (EKS).
- An IAM role is attached to the instance, task, or pod.
IAM configuration
- The IAM role must allow issuance of web identity tokens from AWS Security Token Service (STS).
- The role's trust policy must permit the configured web identity provider.
{
"Version": "2012-10-17",
  "Statement": [
  {
    "Sid": "AllowGetWebIdentityTokenForTailscale",
    "Effect": "Allow",
    "Action": "sts:GetWebIdentityToken",
    "Resource": "*",
    "Condition": {
      "ForAnyValue:StringEquals": {
        "sts:IdentityTokenAudience": "{YOUR_TAILSCALE_AUDIENCE}"
      },
      "NumericLessThanEquals": {
        "sts:DurationSeconds": "300"
      }
    }
  }
  ]
}
Tailscale configuration
- A workload identity federation configuration exists in Tailscale that:
- Trusts the AWS token issuer.
- Expects the correct audience (
aud). - Matches any required role or environment-specific claims.
Google Cloud
Workload environment
- The workload runs on a Google Cloud Platform (GCP) service that exposes the metadata server. For example, Google Compute Engine (GCE) or Google Kubernetes Engine (GKE).
- A service account is attached to the VM or workload.
IAM configuration
- The service account must be allowed to mint identity tokens.
- The workload must be permitted to request identity tokens for the configured audience.
Tailscale configuration
- A workload identity federation configuration exists in Tailscale that:
- Trusts the GCP token issuer.
- Expects the configured audience.
- Optionally matches service account–specific claims.
GitHub Actions
Workflow configuration
- The workflow runs on a GitHub-hosted or self-hosted runner that supports OIDC.
- The workflow explicitly enables OIDC token issuance:
permissions:
  id-token: write
Repository or organization configuration
- OIDC token issuance is enabled for the repository or organization.
- Any branch, environment, or repository restrictions align with the expected token claims.
Tailscale configuration
- A workload identity federation configuration exists in Tailscale that:
- Trusts the GitHub Actions OIDC issuer.
- Matches the expected audience, repository, and workflow claims.
Unsupported environments
If the client does not detect a supported platform, automatic token discovery is skipped and the client falls back to manual workload identity federation configuration.
Reference
The following sections provide technical details about claims.
Common cloud provider token formats
Cloud providers have unique formats for the sub claim, and the custom claims, for OIDC tokens that they issue.
Below are some common cloud providers and the formats of their OIDC tokens.
Subject format
The ARN of the IAM principal that requested the token. Refer to AWS token claims.
Token Claims
Refer to AWS token claims.
Claim value format
Values specified for the subject and custom claims are matched against claims values in the OIDC JWT.
Values can contain an * to match against any character. Other characters specified must directly match the value of the claim.
For example, specifying my-example-sub/* for the subject will successfully match sub claims that start with my-example-sub/.
Custom claim key format
Keys for custom claims specify the claim in the OIDC JWT to match against.
For example, given a token of the form:
{
	"sub": "123456-example",
	"iss": "https://example.com",
	"aud": "api.tailscale.com/12345-67890",
	"user": "example"
}
the user claim can be referenced by specifying user for the key.
Nested claims
Keys can refer to nested claims within a JWT by separating the nested key names with a period.
For example, given token of the form:
{
	"sub": "123456-example",
	"iss": "https://example.com",
	"aud": "api.tailscale.com/12345-67890",
	"user": "example",
	"user": {
		"name": "foobar"
	}
}
the nested name claim can be referenced by specifying user.name for the key.
Escaping claim names
Keys that contain a period in their name can be escaped by surrounding them in double quotes.
For example, given a token of the form:
{
	"sub": "123456-example",
	"iss": "https://example.com",
	"aud": "api.tailscale.com/12345-67890",
	"user": "example",
	"open.id": {
		"username": "foobar"
	}
}
the open.id key can be referenced as "open.id" and the nested username key as "open.id".username.
Generated audience format
Audience values generated by Tailscale are of the form: api.tailscale.com/<client ID>.
For example, a federated identity with the client ID Tz8TefihCR11EXAMPLE-kZDRvszg8621EXAMPLE will have a generated audience of api.tailscale.com/Tz8TefihCR11EXAMPLE-kZDRvszg8621EXAMPLE
Limitations
- The issuer that provides signed JSON Web Tokens (JWTs) to your workloads must be publicly accessible.