
GitOps for Tailscale with GitLab CI
Access control policies define what users or devices are permitted to access in your Tailscale network (known as a tailnet). An alternative to managing the access control policy changes in the Access Controls page of the admin console is to use GitOps for Tailscale to manage the access control policy changes. This topic provides details on how to use GitLab CI/CD to automatically apply and test access control policy changes to your tailnet.
Prerequisites
In addition to already having your own Tailscale network, you need:
- A GitLab account.
- Working knowledge of GitLab procedures including committing changes, creating merge requests, and merging requests.
- A private GitLab repository that will contain your tailnet policy file.
Make sure this repo is private, as tailnet policy files contain personally identifiable information (PII), such as users email addresses.
- A Tailscale API access token for your tailnet. You can create an API access token in the Keys page of the admin console.
GitLab CI file to sync Tailscale access control policies
Tailscale publishes a GitLab CI Template to Sync Tailscale access control policies, available to include in your own CI file.
You do not need to use this GitLab CI Template to set up a GitOps pattern — you can also write your own or use another CI/CD tool.
What this template does
On merge requests that target the main branch, the test stage will send your tailnet policy file to Tailscale to determine whether the ACL is valid and whether all tests pass. Tailscale will provide your workflow with the result of those checks.
On push (merge) operations that target the main branch, the apply stage will again check access control policy validity and run tests, with Tailscale reporting back the results to your workflow. If the tests succeed, the merge will complete and the workflow will automatically apply your access control policy changes to your tailnet. If the tests fail, an error will prevent the merge from continuing.
You can see the status of the workflow in the GitLab CI/CD tab for your project. Look for a job with the name test or apply.

Inputs
The following inputs apply to the Sync Tailscale ACLs CI.
-
api-key(Required): An API access token authorized for your tailnet. You can create an API access token in the Keys page of the admin console. -
policy-file(Optional): The path to your tailnet policy file in the repository. If not set this defaults topolicy.hujsonin the root of your repository. -
tailnet(Required): This is your organization, which you can find in the Settings page of the admin console.
Set up your GitOps configuration
-
In your GitLab repo, create a file named
policy.hujson. Copy your tailnet policy file contents from the Access Controls page of the admin console into this file.If you want to change the tailnet policy file name to something else, you will need to add the
policy-fileargument to thewithblocks in your GitLab CI configuration discussed below. Otherwise, the template will default topolicy.hujsonas the tailnet policy file. -
To prevent others admins in your organization from accidentally changing your tailnet policy file, add a comment as the first line in the policy file so the Access Controls page can display a warning:
// This tailnet's ACLs are maintained in <url>Ensure this comment is the first line of the policy file, otherwise the Access Controls page will not display the warning.
-
Commit the tailnet policy file and push it to GitLab. For example, if you are using the command line:
git add . git commit -sm "policy: import from admin console" git push -u origin main -
Create the following GitLab CI secrets in your repository's settings:
TS_API_KEY: Use your Tailscale API access token as the value.TS_TAILNET: Use your organization as the value. For example,example.com,myemail@example.com,example.gitlab, orexample.org.gitlab. You can find your organization in the Settings page of the admin console.
These secrets provide the configuration for the CI Job. For both of these secrets, within the GitLab CI secrets UI, enable the Expand variable reference option. For more information about GitLab CI environment variable expansion, see GitLab CI/CD variables.
-
Make a new GitLab CI job that uses the Sync Tailscale ACLs template.
Create a file named
.gitlab-ci.ymland paste in the following:include: - project: 'tailscale-dev/gitops-acl-ci' ref: main file: 'acls.gitlab-ci.yaml' with: api-key: $TS_API_KEY tailnet: $TS_TAILNET stages: - test - apply test: rules: - if: '$CI_PIPELINE_SOURCE == "merge_request_event" && $CI_MERGE_REQUEST_TARGET_BRANCH_NAME == $CI_DEFAULT_BRANCH' apply: rules: - if: '$CI_PIPELINE_SOURCE == "push" && $CI_COMMIT_BRANCH == $CI_DEFAULT_BRANCH'Note this workflow appropriately uses the
TS_API_KEYandTS_TAILNETenvironment variables to access your secrets. Do not place your actual secret values in.gitlab-ci.yml—use the environment values as shown.For an example that has set up this workflow, see the GitLab CI to Sync Tailscale ACLs repository.
-
Commit and push
.gitlab-ci.yml.
The main steps in the CI are installing gitops-pusher, setting the correct environment variables and flags, and then running the workflow. For more details, see GitLab CI Template.
With this setup, you have created a continuous integration (CI) that automatically tests and pushes your tailnet policy file changes to Tailscale!
Push changes to your tailnet policy file
Now that your configuration has been set up, any time your want to update your tailnet policy file, modify the tailnet policy file in your repo and use the typical GitLab authoring/review/merge flow. You can check the status of the access control policy validity checks and tests in the GitLab UI in the Actions tab for your pull request. Look for a job with the names test or apply.
Prevent others from accidentally modifying your tailnet policy file
To prevent other admins in your organization from accidentally changing your tailnet policy file, you can use either the Tailscale admin console (preferred) or a code comment in your tailnet policy file (deprecated).
If your tailnet uses both the admin console and a code comment, the admin console setting takes precedence.
For either way, any admin with permissions to edit the tailnet policy file can still edit it directly by selecting Edit anyway. For example, in case of an emergency.
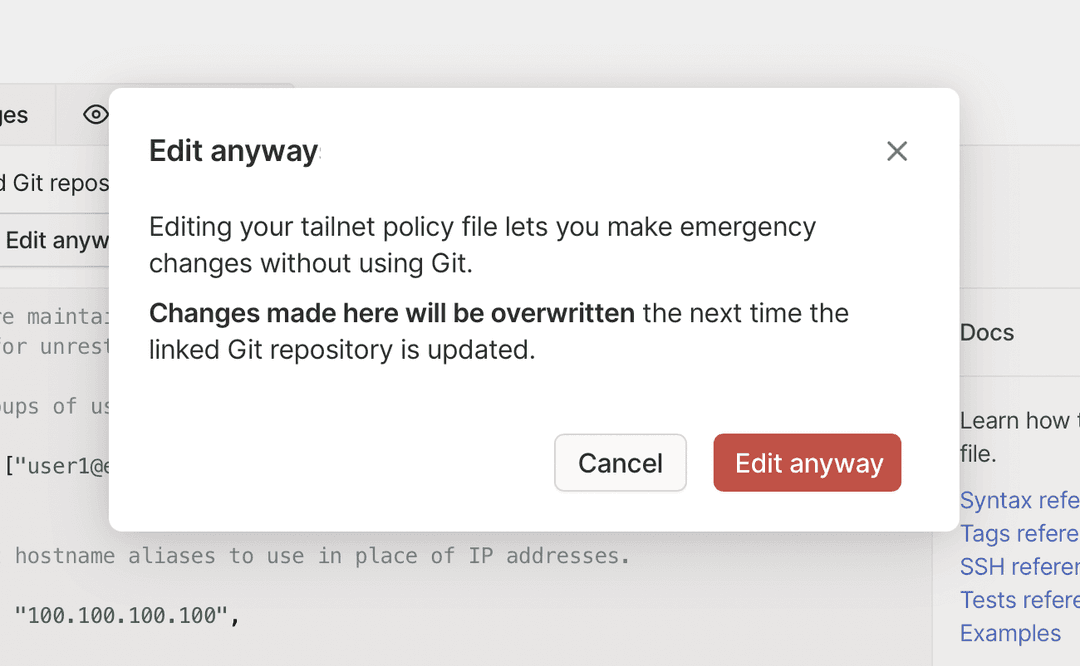
The next time you use the GitOps flow, it overwrites the tailnet policy file changes made in the admin console.
Use the admin console to prevent accidental modification
You must be an Owner, Admin, or Network admin of a tailnet to update tailnet policy file settings.
- Open the Policy file management page in the Tailscale admin console.
- If it is not already enabled, select Lock edit to prevent editing of the file.
- For External reference, enter the URL of your repository.
- Select Save.
Use a code comment to prevent accidental modification
We deprecated this technique. Use the admin console instead to prevent accidental modification.
Add the following comment as the first line in the policy file with the URL of your repository so the Access Controls page can display a warning:
// This tailnet's ACLs are maintained in <url>
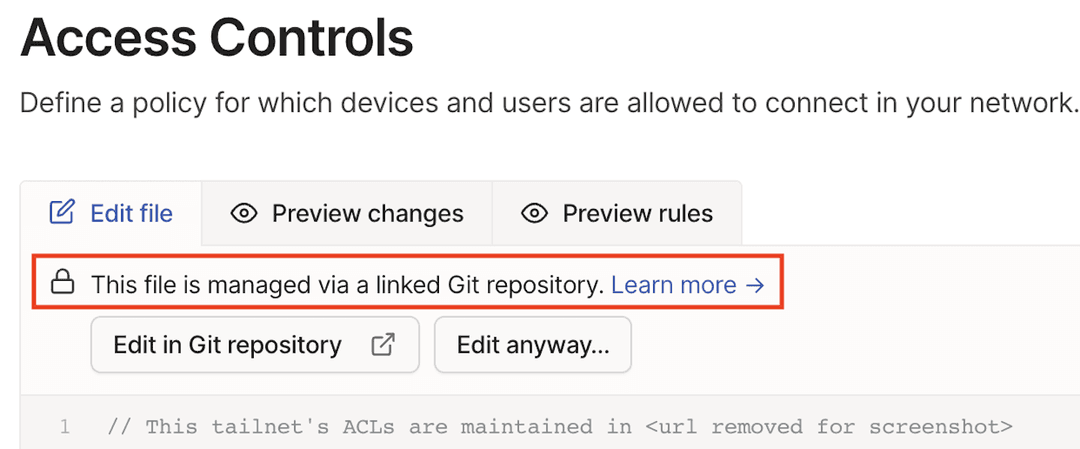
You can link to any Git repository or URL. You can use your existing source management system and do not need to use the Sync Tailscale ACLs GitLab CI to display this warning.
Revert the most recent change to your tailnet policy file
If you need to revert the most recent change, use the GitLab UI to revert the merged pull request.
Remove your GitOps configuration
-
Remove the following line from the top of tailnet policy file. You can make this edit through your current GitOps configuration, or by manually editing your tailnet policy file.
// This tailnet's ACLs are maintained in <url> -
Revoke any associated Tailscale API access tokens for this configuration.
-
Archive or delete the associated GitLab repository.
Additional information
-
Any manual tailnet policy file changes in the admin console won't be reflected in your GitLab version of the tailnet policy file. The next time you use the Sync Tailscale ACLs GitLab CI, any changes made in the Tailscale admin console will be overwritten.
-
Tailscale API access tokens expire and currently there is no mechanism to have them automatically renewed. To handle the expiration, create a new API access token and update the GitHub
TS_API_KEYsecret to use the new value. Tailscale API access tokens after 90 days (or less if the key has a shorter expiry) but updating the GitLab secret monthly is a good practice.When you no longer need to use a Tailscale API access token, make sure you revoke it in the Keys page of the admin console.
-
Tailscale tailnet policy files are in HuJSON, a JSON format with trailing commas and comments. If you don't want to write your tailnet policy files in HuJSON directly, you can use a tool that lets you generate JSON in the same schema as the HuJSON format. Make sure your tool puts the file in the same place as the
policy-filesetting in the GitLab CI.