Tailscale on Kubernetes
Kubernetes is a popular method for deploying, scaling, and managing containerized applications. There are many ways you can use Tailscale with Kubernetes. Examples include for ingress to Kubernetes services, egress to a tailnet, and secure access to the cluster control plane (kube-apiserver). You can run Tailscale inside a Kubernetes Cluster using the Tailscale Kubernetes Operator, or as a sidecar, as a proxy, or as a subnet router. This doc shows several common ways.
Tailscale is available as a Docker image.
Prerequisites
You can follow the examples in this doc by cloning from GitHub. For example:
gh repo clone tailscale/tailscale
cd tailscale/docs/k8s
Setup
-
(Optional) You can choose to use an auth key to automate your container logging in to your tailnet. Create an auth key in the Keys page of the admin console. We recommend using an ephemeral key for this purpose, since it will automatically clean up devices after they shut down. We also recommend using a reusable key so when containers are stopped and started they can still connect to your tailnet.
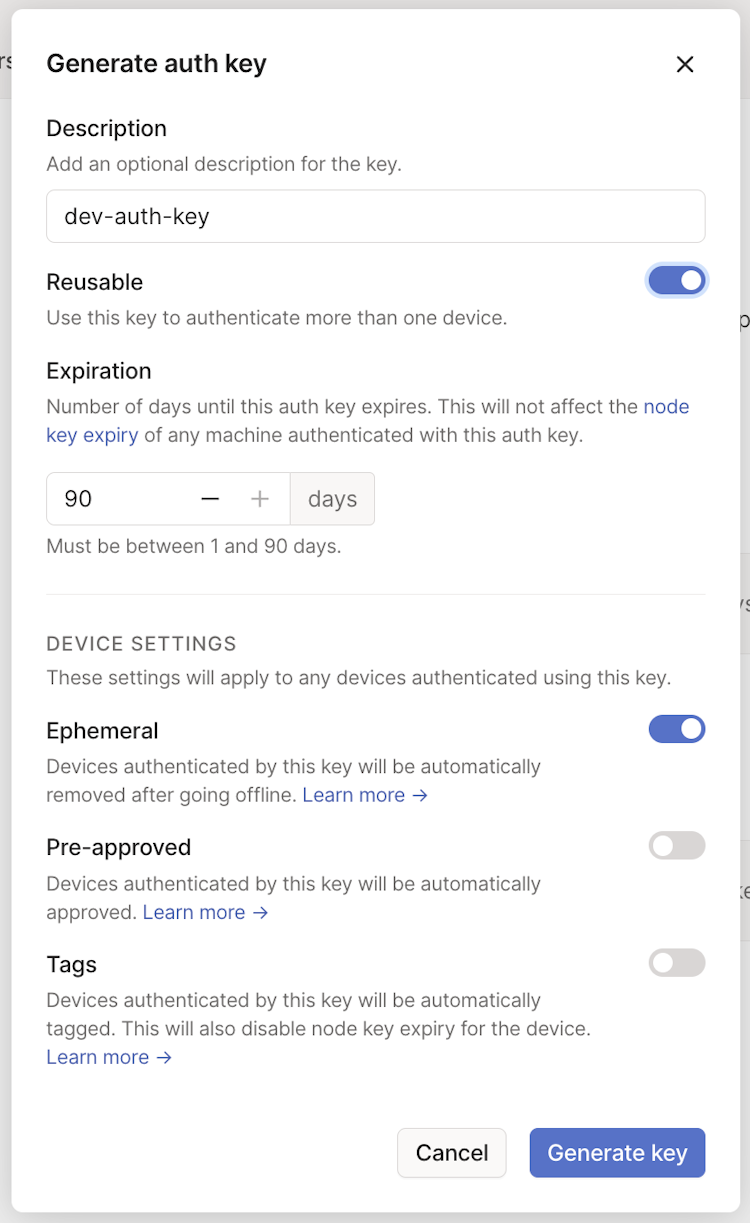
The Pre-approved option will only display in the dialog if device approval is enabled in your Tailscale network.
If you don't provide the key, you can still authenticate by logging in at the URL provided in logs when using the container image below.
apiVersion: v1 kind: Secret metadata: name: tailscale-auth stringData: TS_AUTHKEY: tskey-0123456789abcdef -
Tailscale (v1.16 or later) supports storing state inside a Kubernetes Secret.
Configure role-based access control (RBAC) to allow the Tailscale pod to read/write the
tailscalesecret.export SA_NAME=tailscale export TS_KUBE_SECRET=tailscale-auth make rbac | kubectl apply -f-
Use the Kubernetes operator
Tailscale also provides the Tailscale Kubernetes Operator. The Kubernetes operator lets you:
- Expose services in your Kubernetes cluster to your Tailscale network (known as a tailnet).
- Securely connect to the Kubernetes control plane (kube-apiserver) by using an API server proxy, with or without authentication.
- Egress from a Kubernetes cluster to an external service in your tailnet.
Sample sidecar
Running as a sidecar lets you directly expose a Kubernetes pod over Tailscale. This is particularly useful if you do not wish to expose a service on the public internet. This method enables bi-directional connectivity between the pod and other devices in the tailnet. You can use access control policies to control traffic flow.
The examples below are intended for quick testing. For deployments with persistent state and DNS configuration, refer to the sidecar deployment guide.
-
Create and login to the sample nginx pod with a Tailscale sidecar:
make sidecar | kubectl apply -f- # If not using an auth key, authenticate by grabbing the Login URL here: kubectl logs nginx ts-sidecar -
Check if you can connect to nginx over Tailscale:
curl http://nginxOr, if you have MagicDNS disabled:
curl "http://$(tailscale ip -4 nginx)"
Userspace sidecar
You can also run the sidecar in userspace networking mode. Userspace networking reduces the permissions Tailscale needs to run. The downside is that outbound connectivity from the pod to the tailnet requires either the SOCKS5 proxy or HTTP proxy.
-
Create and login to the sample nginx pod with a Tailscale sidecar:
make userspace-sidecar | kubectl apply -f- # If not using an auth key, authenticate by grabbing the Login URL here: kubectl logs nginx ts-sidecar -
Check if you can connect to nginx over Tailscale:
curl http://nginxOr, if you have MagicDNS disabled:
curl "http://$(tailscale ip -4 nginx)"
Sample proxy
Running a Tailscale proxy lets you provide inbound connectivity to a Kubernetes Service.
Visit the Kubernetes operator ingress page for details on deploying an ingress proxy using the operator instead.
-
Provide the
ClusterIPof the service you want to reach by either:Creating a new deployment
kubectl create deployment nginx --image nginx
kubectl expose deployment nginx --port 80
export TS_DEST_IP="$(kubectl get svc nginx -o=jsonpath='{.spec.clusterIP}')"
Using an existing service
export TS_DEST_IP="$(kubectl get svc <SVC_NAME> -o=jsonpath='{.spec.clusterIP}')" -
Deploy the proxy pod:
make proxy | kubectl apply -f- # If not using an auth key, authenticate by grabbing the Login URL here: kubectl logs proxy -
Check if you can connect to nginx over Tailscale:
curl http://proxyOr, if you have MagicDNS disabled:
curl "http://$(tailscale ip -4 proxy)"
Subnet router
Running a Tailscale subnet router lets you access the entire Kubernetes cluster network (assuming NetworkPolicies allow) over Tailscale.
Visit the Kubernetes operator subnet routers page for details on deploying a subnet router using the operator instead.
-
Identify the Pod/Service CIDRs that cover your Kubernetes cluster. These will vary depending on which CNI you are using and on the Cloud Provider you are using. Add these to the
TS_ROUTESvariable as comma-separated values.SERVICE_CIDR=10.20.0.0/16 POD_CIDR=10.42.0.0/15 export TS_ROUTES=$SERVICE_CIDR,$POD_CIDR -
Deploy the subnet-router pod.
make subnet-router | kubectl apply -f- # If not using an auth key, authenticate by grabbing the Login URL here: kubectl logs subnet-router -
In the Machines page of the admin console, ensure that the routes for the subnet-router are enabled.
-
Make sure that any client you want to connect from has
--accept-routesenabled. -
Check if you can connect to a
ClusterIPor aPodIPover Tailscale:# Get the Service IP INTERNAL_IP="$(kubectl get svc <SVC_NAME> -o=jsonpath='{.spec.clusterIP}')" # or, the Pod IP # INTERNAL_IP="$(kubectl get po <POD_NAME> -o=jsonpath='{.status.podIP}')" INTERNAL_PORT=8080 curl http://$INTERNAL_IP:$INTERNAL_PORT
(Optional) Add DNS information
By default, we do not set DNS for containers. To enable MagicDNS for a Kubernetes container, you will need to export TS_ACCEPT_DNS=true in the environment.
Remove ephemeral nodes from a tailnet
When an ephemeral node goes offline, it is automatically removed from your tailnet. You can also control ephemeral node removal using the tailscale logout command to either manually force the removal or incorporate the command into the tailscaled Tailscale daemon. For more information, refer to Ephemeral nodes.