Access AWS RDS privately using Tailscale
Amazon's Relational Database Service (AWS RDS) provides a managed relational database accessible using SQL and other methods. RDS is an Amazon-managed service reached by using hostname, public IP address, or private IP address. To make RDS accessible to a tailnet, we use a subnet router.
Prerequisites
Before you begin this guide, you'll need a Tailscale network set up and configured with at least one existing device. Read our getting started guide if you need help with this.
Setting up the RDS instance itself won't be covered here, we'll assume that RDS is already in use. There are a number of different database engines available with RDS, from Amazon's own Aurora, MySQL, PostgreSQL, and more. The connectivity techniques described here works with all of them.
For purposes of this topic, let's assume the RDS is set up in the us-west-2 region.
Step 1: Set up a subnet router
First, create an EC2 instance running Amazon Linux on either x86 or ARM. Tailscale produces Linux packages containing binaries for both architectures, and the AWS ARM instances are very cost effective.
Some AWS Regions have multiple data centers, each with an associated Availability Zone and a subnet of IP addresses. RDS instances in a Region are reachable from all of these subnets, so the EC2 instance can be created on any of them. Other AWS managed services may require connecting to a specific subnet.
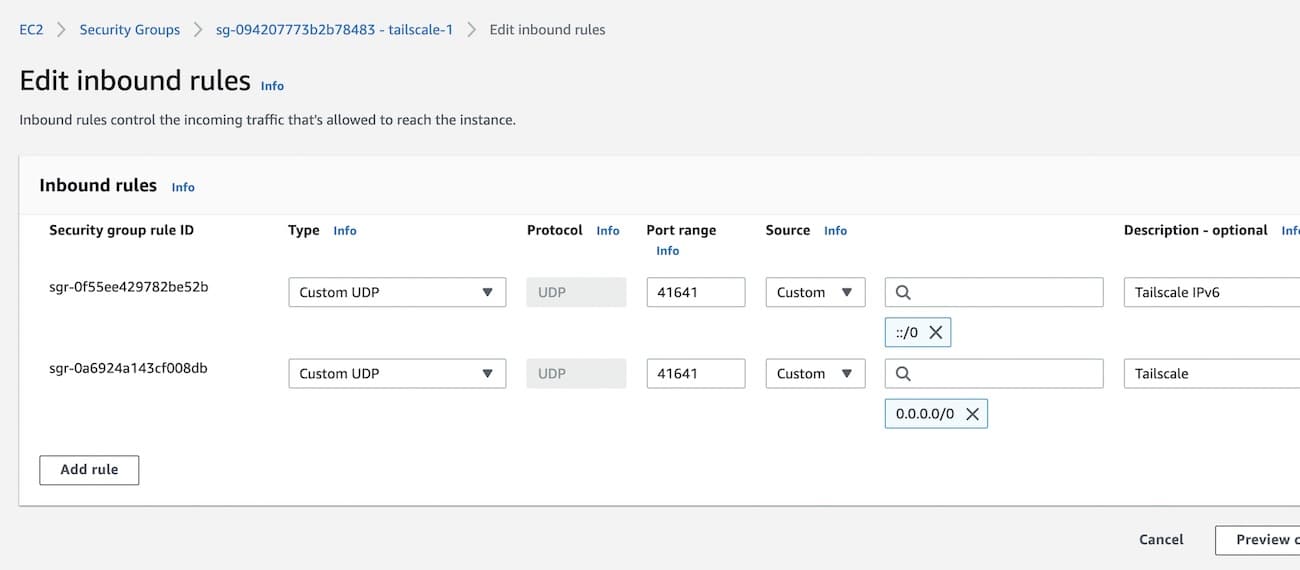
If at least one side of a tunnel has "easy NAT," where Tailscale can determine the UDP port number on the far side of the NAT device, then it will make direct connections to minimize latency. When setting the security policy, allow UDP port 41641 to ingress from any source. This will enable direct connections, to minimize latency.
Then SSH to the system and follow the steps to
install Tailscale on Amazon Linux 2
and configure subnet routing.
When running tailscale up or tailscale set, pass your VPC subnet to --advertise-routes.
For example, if the subnet address range is 172.31.0.0/16, the command would be:
tailscale set --advertise-routes=172.31.0.0/16 --accept-dns=false
For EC2 instances it is generally best to let Amazon handle the DNS configuration,
not have Tailscale override it, so we added --accept-dns=false.
The Windows, macOS, Android, iOS, and other clients all accept advertised routes by default, but
Linux clients need to use tailscale set --accept-routes=true to use the routes being advertised
by the subnet router in AWS.
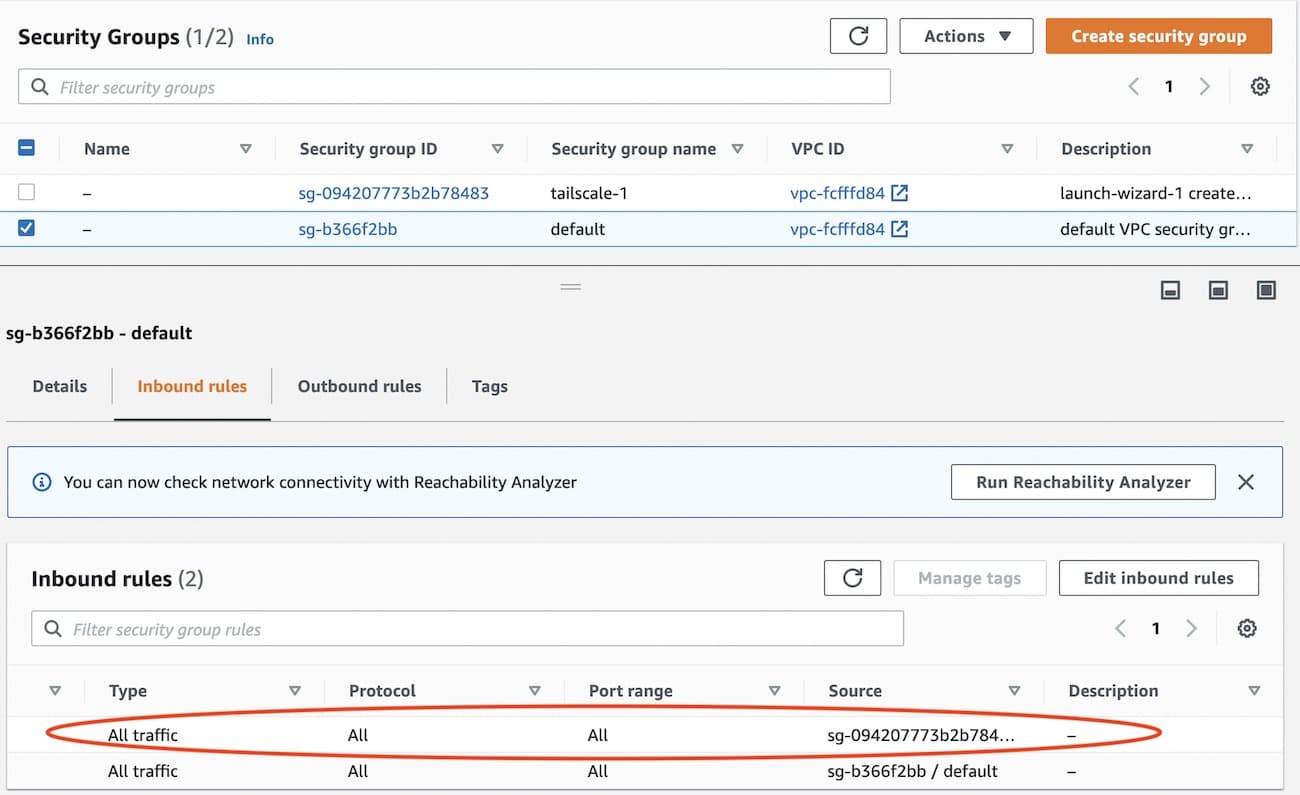
Step 2: Configure RDS security policy
We need the RDS security policy to allow connection from the subnet router. The RDS security policy can be found in the instance details of the RDS instance. We add the security policy created for the EC2 subnet router instance.
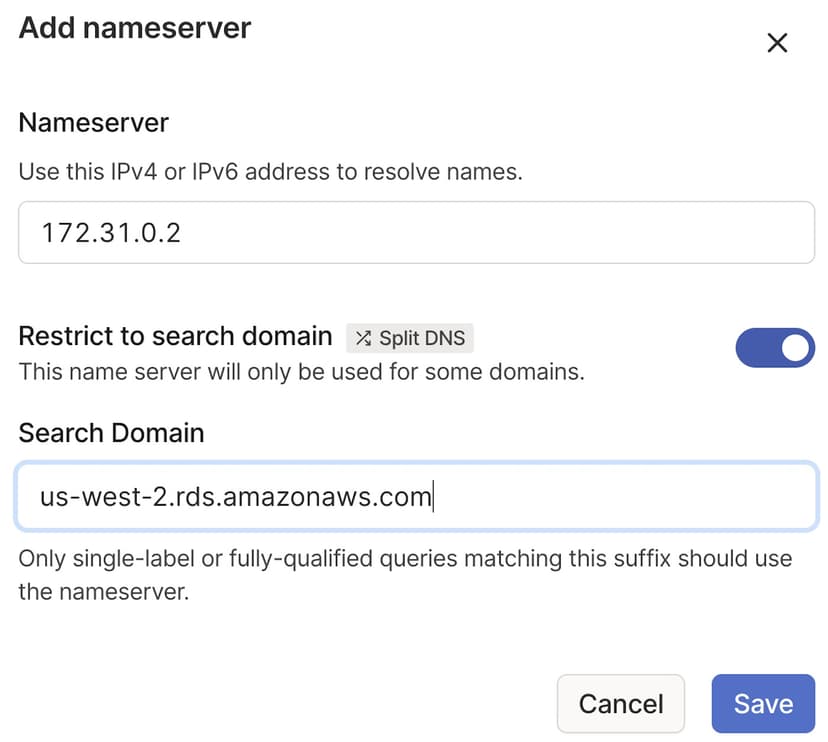
Step 3: Add AWS DNS for your tailnet
For the benefit of the other nodes in the tailnet we'll set up split DNS to allow use of the same DNS names as are used inside of AWS.
The AWS DNS server address is always the base of the VPC subnet + 2.
For example, if the subnet is 172.31.0.0, the DNS server will be 172.31.0.2. In the
DNS page of the admin console, add the AWS DNS server and restrict
it to the region-specific rds.amazonaws.com domain, for example, us-west-2.rds.amazonaws.com.
We recommend hiding your DB instance from the internet to prevent access over the internet.
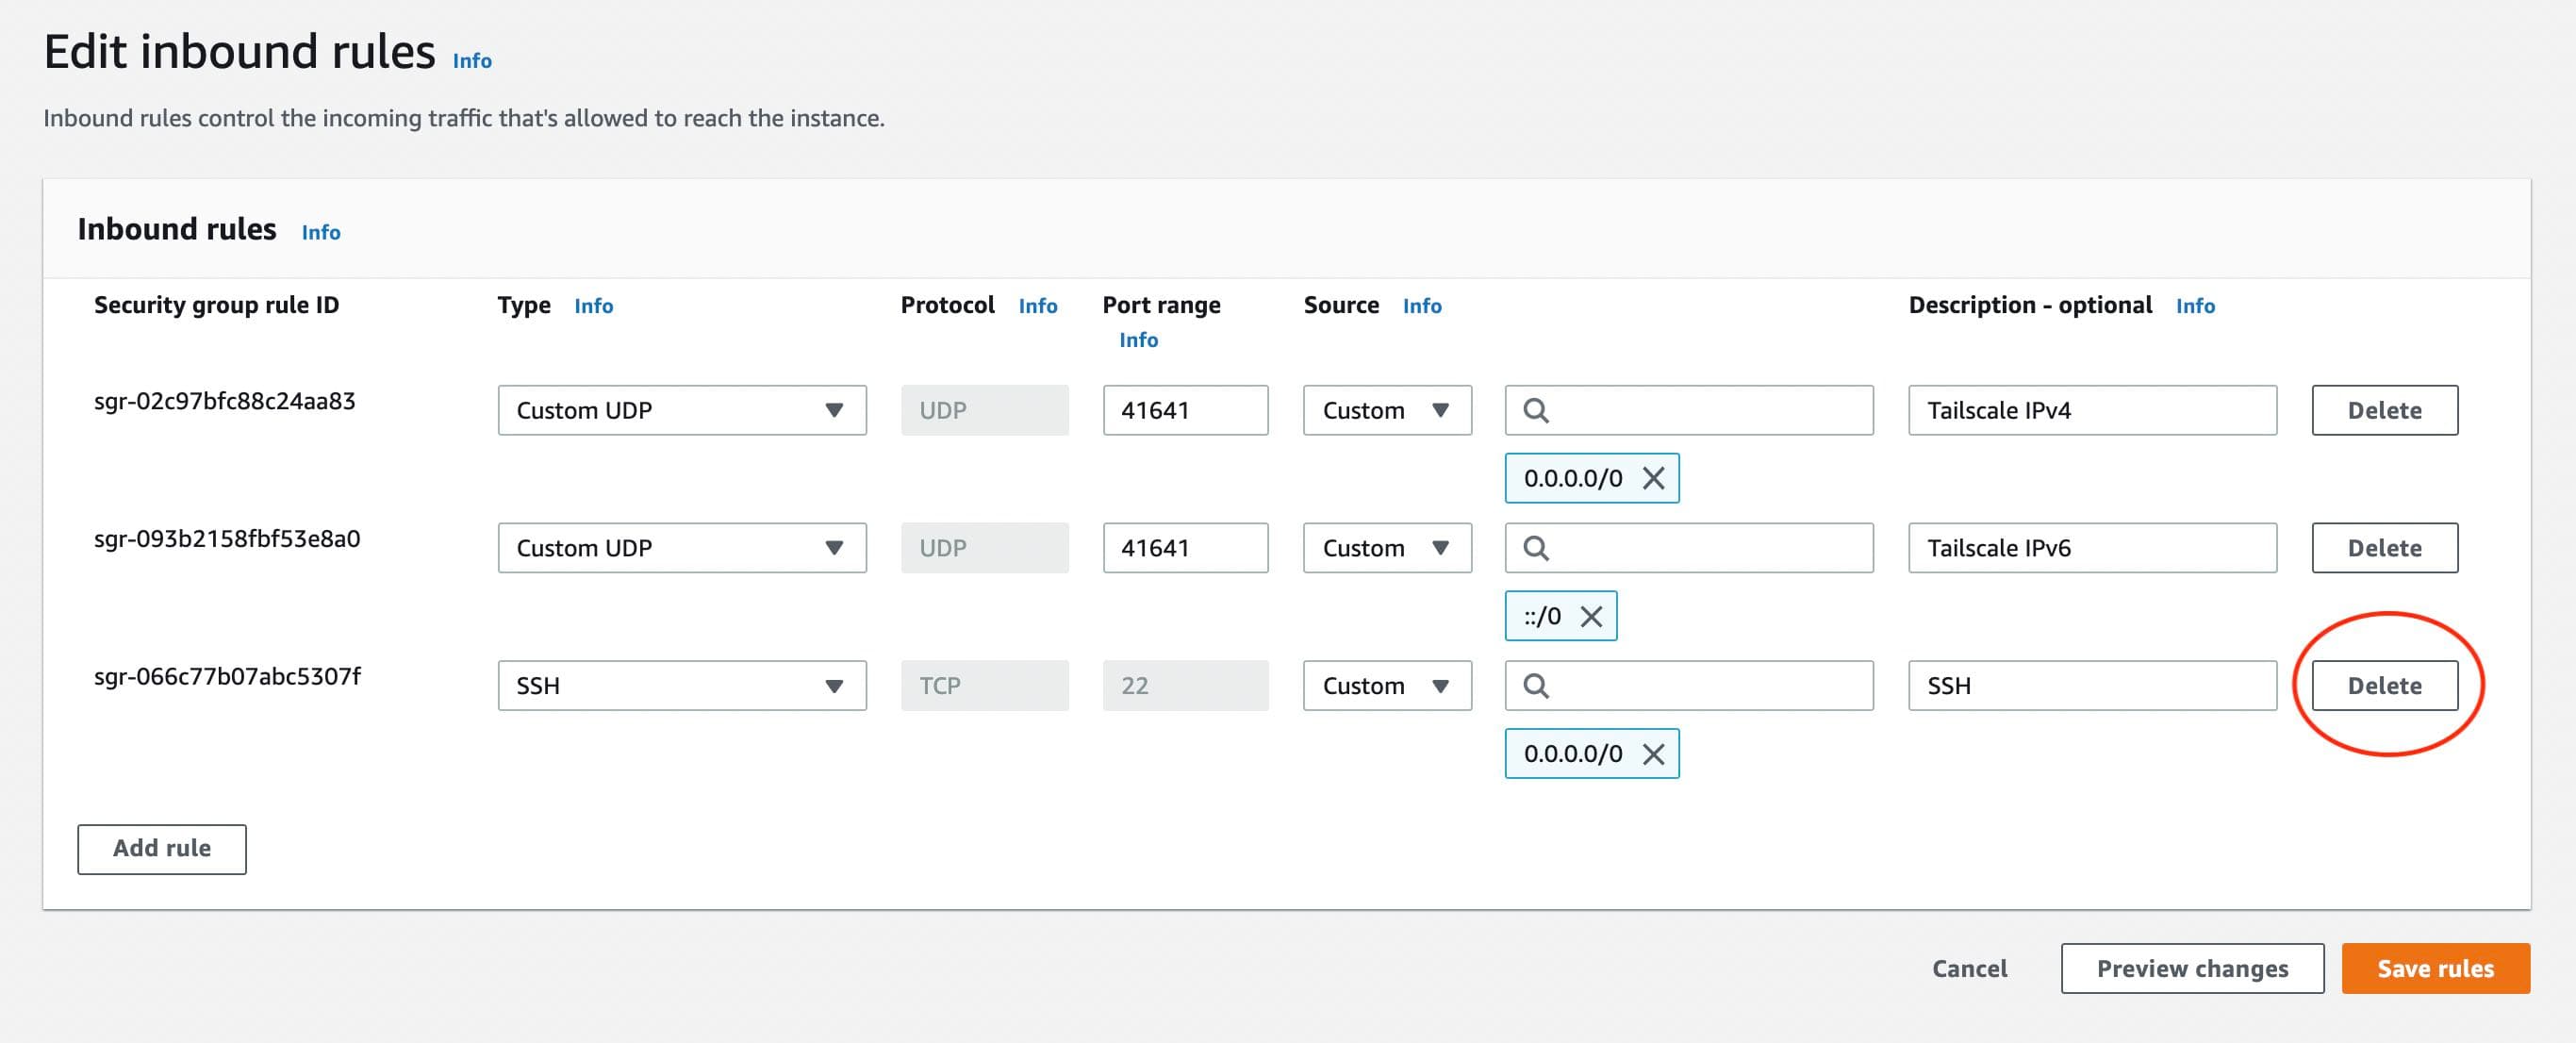
Step 4: Remove public SSH access
As we can now SSH to the system over the private Tailscale network, there is no reason to leave the SSH port open on a public IP address. In the security group for the EC2 instance, delete the SSH rule allowing inbound connections.
Step 5: Connect to RDS
We can now connect to RDS from any node in the tailnet, using the same DNS name as is used inside AWS.
For example, to access your RDS server from your personal computer, while logged into your tailnet:
mysqlsh --uri=admin@database-2.0123456789ab.us-west-2.rds.amazonaws.com:3306
MySQL  database-2.0123456789ab.us-west-2.rds.amazonaws.com:3306 ssl  JS > \sql
Switching to SQL mode... Commands end with ;
MySQL  database-2.0123456789ab.us-west-2.rds.amazonaws.com:3306 ssl  SQL > show databases;
+--------------------+
| Database           |
+--------------------+
| demo               |
| information_schema |
| mysql              |
| performance_schema |
| sys                |
+--------------------+
5 rows in set (0.0297 sec)
Using a subnet router lets you connect to many services within AWS, not just RDS, using their internal AWS IP address.