Tailscale Funnel
Tailscale Funnel lets you route traffic from the broader internet to a local service running on a device in your Tailscale network (known as a tailnet). You can use it to share a local service, like a web app, for anyone to access—even if they don’t use Tailscale.
If you’d like to share local services only with other devices in your tailnet, use Tailscale Serve instead. Also check out Funnel vs. sharing.
Explore the following to learn more about Funnel:
- Get started with Funnel
- How Funnel works
- The
tailscale funnelcommand - Troubleshoot Funnel
- Funnel examples
How Funnel works
Funnel exposes a local resource to the internet through a unique Funnel URL. Using Funnel to share a local resource creates an encrypted tunnel from the internet to a specific resource on your device. Tailscale does this using a TCP proxy and Funnel relay servers.
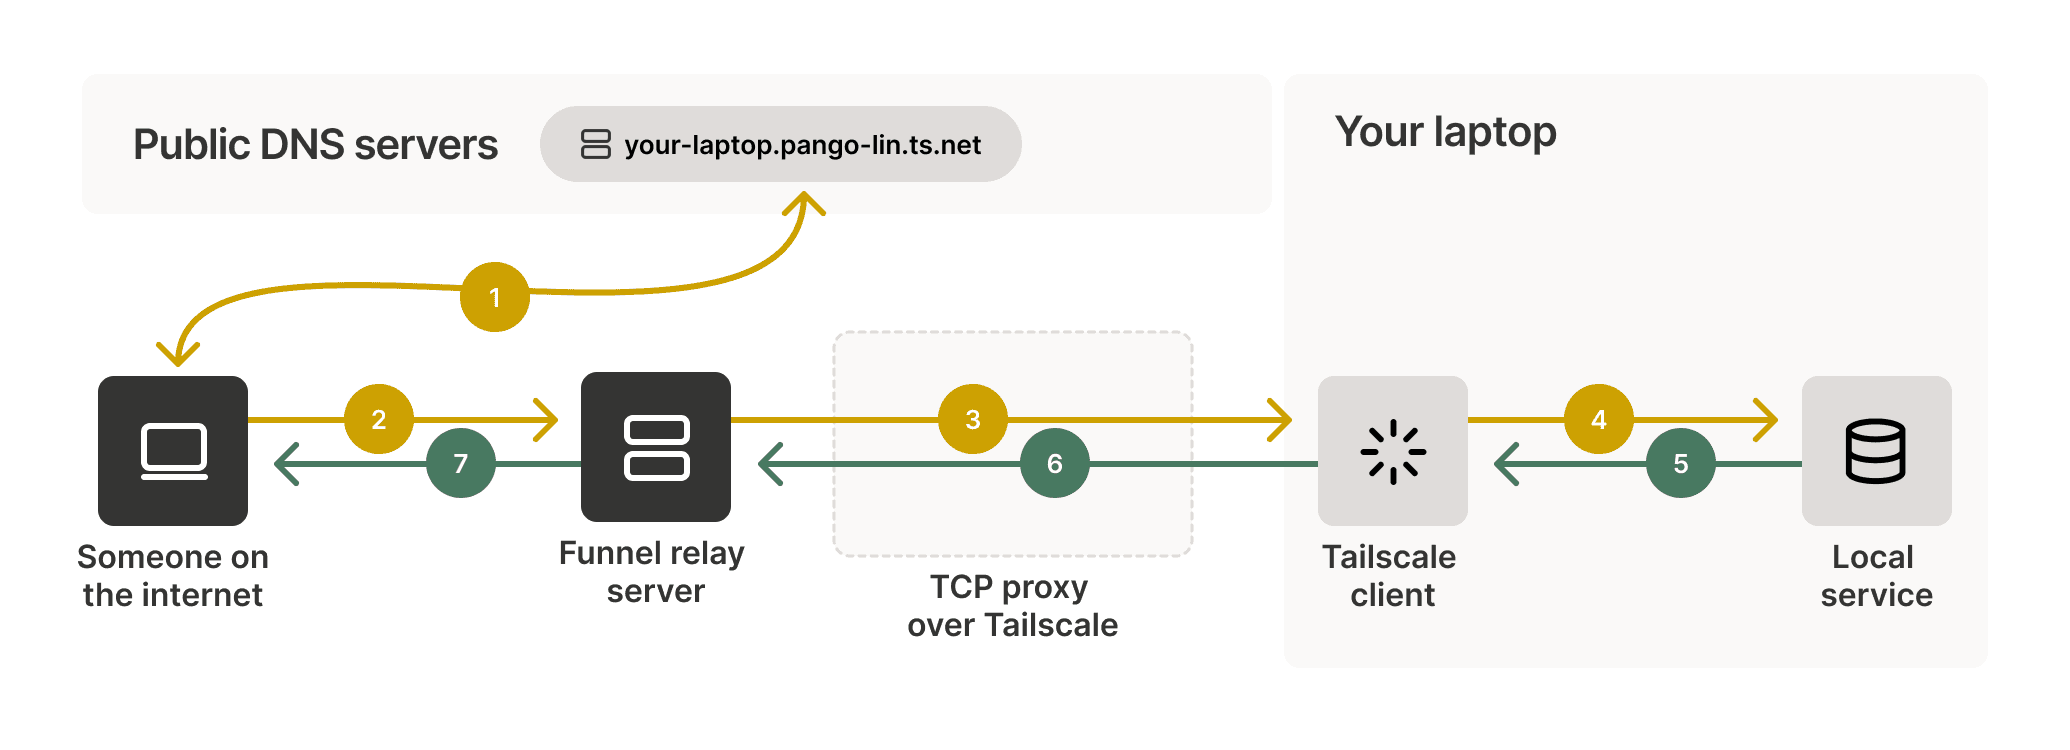
When you share a local resource with Funnel, it creates a unique Funnel URL that you can share. When someone uses your Funnel URL, their device sends a request to the Funnel relay server. After receiving the request, the Funnel relay server will establish a TCP proxy to your device using Tailscale. This proxy is an encrypted tunnel between the local resource and the device accessing the Funnel URL that points to it. Using a TCP proxy protects the shared data and lets Tailscale hide the IP address of your local device. The Funnel relay server cannot decrypt data sent over this proxy.
Learn more
The process, from creating a Funnel to accessing a resource shared through it, involves:
- Creating and sharing the Funnel URL.
- Resolving the Funnel URL to an IP address.
- Establishing an encrypted proxy.
- Serving the shared resource through the proxy.
Creating and sharing the Funnel URL
When you share a local resource with Funnel, it creates a unique Funnel URL that you can share. The generated URL points only to the specific resource you used Funnel to share. So, if you share a local web server, the Funnel only shares that specific web server. Likewise, if you share a file or directory, the Funnel only shares the specific file or directory.
Resolving the Funnel URL to an IP address
When a device tries to access a Funnel URL, it first contacts public DNS servers to resolve the URL to an IP address. These DNS servers respond with the IP address of a Funnel relay server, not your device's IP address. This step hides your device's location from the public internet. After resolving the URL to an IP address, the device sends a request to the Funnel relay server.
Establishing an encrypted proxy
After receiving the request, the Funnel relay server creates a TCP proxy to your device over Tailscale. This proxy acts as an encrypted relay between the Funnel relay server and your device. It ensures that your device's IP address is never exposed to the internet.
Funnel relay servers do not decrypt the traffic between public devices and your device. This ensures that Tailscale cannot access or view any content. It maintains end-to-end encryption and privacy.
The Tailscale server running on your device receives the encrypted request from the TCP proxy. It then terminates the TLS connection and passes the decrypted request to the local service you exposed through Funnel. The local service processes the request and generates a response.
Serving the shared resource through the proxy
After the local server on your device processes the request, it sends the response to the Tailscale server on your device. The Tailscale server then encrypts the response and sends it back to the Funnel relay server over the established TCP proxy.
Upon receiving the encrypted response, the Funnel relay server forwards it to the user's device. It does not decrypt its contents; it maintains the end-to-end encryption of the data. Finally, the user's device ends the TLS connection. It then decrypts the response and shows the requested information to the user accessing the Funnel URL.
Get started with Funnel
Tailscale Funnel is disabled by default, but you can use the Tailscale CLI to enable the Funnel service and create Funnels.
Requirements and limitations
Funnel requires the following to work:
- Tailscale v1.38.3 or later.
- Valid HTTPS certificates for your tailnet.
- A funnel node attribute in your tailnet policy file. This attribute tells Tailscale which tailnet users can use Funnel.
Additionally, Funnel has the following limitations:
- Funnel can only use DNS names in your tailnet’s domain (
tailnet-name.ts.net). - Funnel can only listen on ports
443,8443, and10000. - Funnel only works over TLS-encrypted connections.
- Traffic sent over a Funnel is subject to non-configurable bandwidth limits.
- Funnel only works on platforms that can run the Tailscale CLI.
- To use Funnel on macOS, you must use one of the open source variants of the Tailscale application for macOS.
When you enable Funnel using the Tailscale CLI, Tailscale automatically creates valid HTTPS certificates and updates your tailnet policy file. By default, it allows any users in the autogroup:members autogroup to use Funnel. You can adjust this by manually updating your tailnet policy file.
Enable Funnel
Use the tailscale funnel command to enable Funnel. The command triggers a web interface that prompts you to approve enabling Funnel. After you approve it, Tailscale will create valid HTTPS certificates for your tailnet and add a funnel node attribute to your tailnet policy file.
Create a Funnel
To create a Funnel, use the tailscale funnel command and pass the target you want to share. You can share a service, a file, or a directory. You can also optionally pass any of the available flags.
tailscale funnel 3000
Available on the internet:
https://amelie-workstation.pango-lin.ts.net

|-- / proxy http://127.0.0.1:3000

Press Ctrl+C to exit.
When you use Tailscale Funnel, the Funnel relay servers show up in your device's list of Tailscale peers. You can view all peers using the command tailscale status --json.
Sharing files and directories with Funnel only works with the open source variants of the Tailscale client for macOS. Other variants have sandbox limitations.
You can only use Funnel to share ports if you installed Tailscale for macOS from the App Store or as a standalone System Extension.
Next steps
- Explore the collection of Funnel use case examples for inspiration and ideas.
- Use the TCP forwarder.
- Reset the Funnel configuration.
- Disable Funnel.
Troubleshoot Funnel
Trouble with Funnels is usually related to one of the following issues:
Funnel node attribute
Tailscale Funnel requires a node attribute (nodeAttrs) of funnel in your tailnet policy file to tell Tailscale who can use Funnel. If you use the Tailscale CLI to enable Funnel, Tailscale ensures this requirement is met. Alternatively, you can manually add the node attribute for Funnel. You need to be an Owner, Admin, or Network admin of a tailnet to modify a tailnet policy file.
- Open the Access controls page of the admin console.
- Expand the Funnel section and select Add Funnel to policy.
This adds the default nodeAttrs section and saves the tailnet policy file automatically.
"nodeAttrs": [
    {
        "target": ["autogroup:member"],
        "attr":   ["funnel"],
    },
],
HTTPS certificates
Tailscale Funnel requires valid HTTPS certificates for your tailnet to automatically provision TLS certificates for your unique tailnet DNS name. If you use the Tailscale CLI to enable Funnel, Tailscale ensures this requirement is met.
Access controls
If the funnel node attribute in your tailnet policy file doesn’t permit you to use Funnel, you won’t be able to. The default node attribute to enable Funnel includes all tailnet members by default, but Owners, Admins, and Network admins can modify this to further restrict access.
DNS propagation
Public DNS records can take up to 10 minutes to show up for your tailnet domain. This delay might prevent someone from using a Funnel URL until the public DNS records are updated.