Using passkeys for Tailscale authentication
Passkeys are a method for authenticating users to a Tailscale network (tailnet) using passwordless authentication.
How it works
Passkeys are based on the FIDO Alliance standard. This standard uses public key cryptography by generating a private key on the user's device that is never exposed to the outside world. You can store passkeys on a device or in a keychain. For example, when you create a passkey using an Apple ID, you can use the same passkey on other Apple devices with the same Apple ID.
Biometrics, a PIN, or a pattern are examples of processes that let you authenticate with a passkey, the same way you can unlock a device that supports the FIDO standard.
When a user initially accepts an invite to join a tailnet by using a passkey, a tailnet matching the invitee's passkey username is created. This tailnet's name is in the form <user_name>@passkey. For example, bobbuilder@passkey.
The invited user's Tailscale identity is dependent on the existence of the tailnet created for their passkey username. Other tailnet admins can also invite the same user to join a tailnet, so the user associated with bobbuilder@passkey could join more than one tailnet.
A given passkey username is allowed to be created only once. For example, there will always be only one user associated with bobbuilder@passkey, even if the bobbuilder@passkey tailnet is deleted. If the tailnet for a given passkey username is deleted, the tailnet cannot be recovered, and the passkey username cannot be reused, even by the user that initially created the passkey username.
Deleting a tailnet of the form <user_name>@passkey deletes the associated user's membership to all other tailnets.
Supported passkey managers
Tailscale supports passkey management from the following:
- 1Password
- Apple
- Bitwarden
- Microsoft
- Yubikey
Because Tailscale cannot determine the source of a passkey, Fido Alliance standard passkeys provided by any other company should also work with Tailscale.
Passkey username rules
A passkey username:
- Can contain a combination of lowercase alphanumeric characters (
a-zand0-9) and hyphens (-). - Cannot begin with a number.
- Must be between 3 and 63 characters in length.
- Must be unique across all of Tailscale.
Invite a passkey user
A user invite is for one-time use, so a given invite should be sent to only a single user. If you want to invite multiple users, send each of them their own invite.
Your Tailscale billing includes invited users who join and transfer data in your tailnet. This includes invited users who are paid users in other tailnets. Tailscale bills for every active user on every tailnet.
For information about inviting a user to your tailnet, refer to:
Refer to Invite any user to your tailnet for additional information about inviting users, including viewing or removing open invites.
Create a passkey user from an invite
-
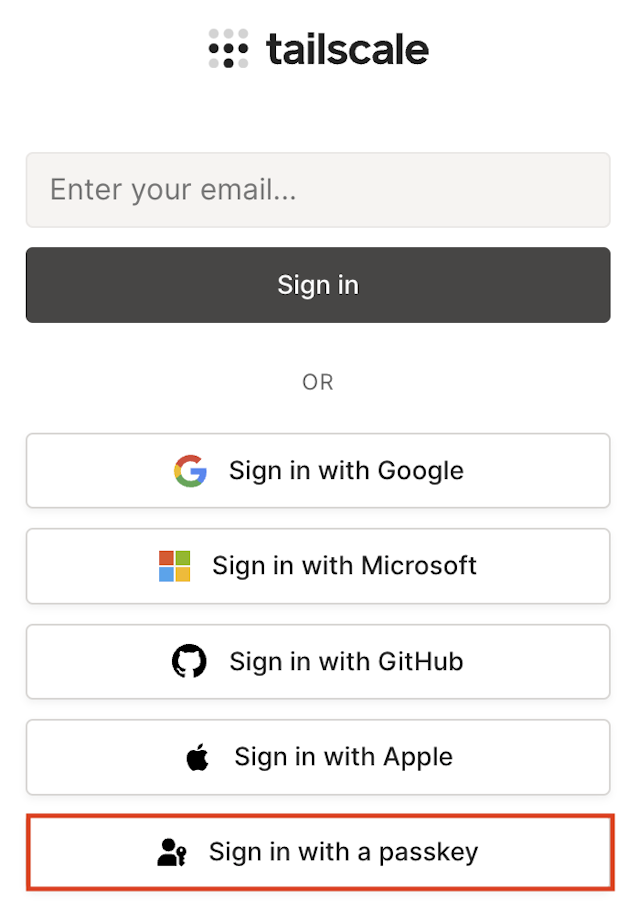
From a web browser, open the URL provided in your invite. If you are logged into a tailnet already, make sure you log out.
-
In the Tailscale login page, select Sign in with a passkey.
-
Enter a unique username to register with your passkey, subject to the passkey username rules. The
@passkeyvalue is automatically appended. The username you select must be a universally unique name across all of Tailscale. For example, ifbobbuilder@passkeyis used by someone in another tailnet, it cannot be registered in your tailnet.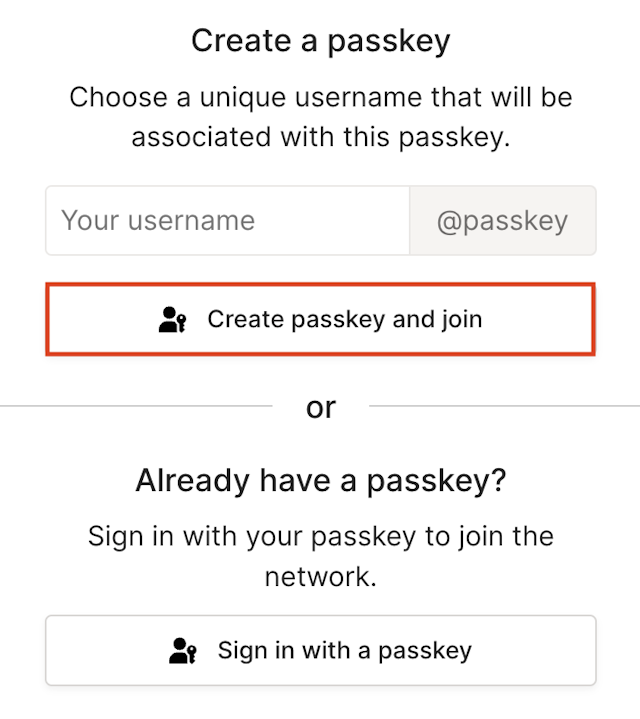
-
Select Create passkey and join.
-
Choose how you want to create and store the passkey. Follow the instructions on the device you are using for passkey authentication.
-
Authenticate with the tailnet using your chosen method for authentication. When a passkey user authenticates, the user displays on the Users page of the admin console.

Sign in with an existing passkey
-
From a web browser, open the URL provided in your invite. If you are logged into a tailnet already, make sure you log out.
-
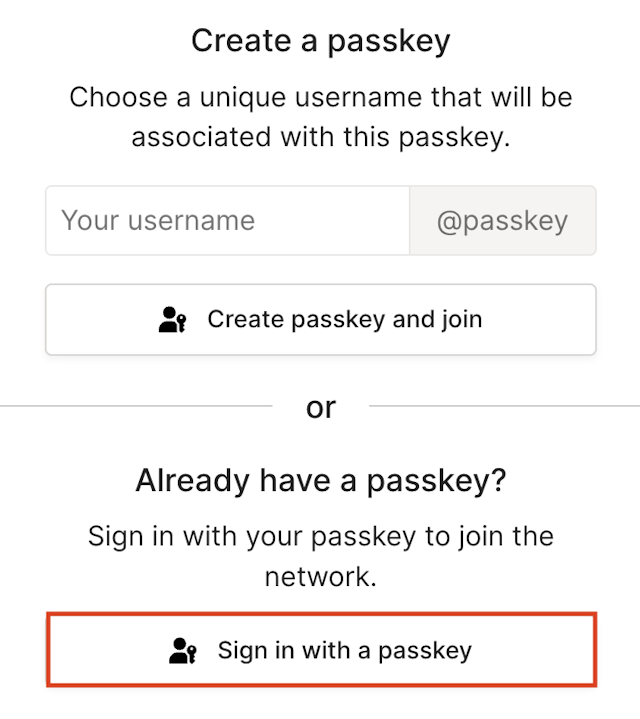
In the Tailscale login page, select Sign in with a passkey.
-
Select Sign in with a passkey.
-
Log in to the tailnet using your passkey authentication method.
Limitations
- Users cannot create a new tailnet using passkey authentication. You must create the tailnet before sending user invites for passkey authentication.
- You cannot reuse a previously used passkey username once it has been deleted.