Tailnet Lock
Last validated:
Tailnet Lock lets you verify that no node joins your Tailscale network (known as a tailnet) unless trusted nodes in your tailnet sign the new node. With Tailnet Lock enabled, even if Tailscale were malicious or Tailscale infrastructure hacked, attackers can't send or receive traffic in your tailnet.
What is Tailnet Lock?
Tailnet Lock lets trusted nodes in your tailnet sign and verify other nodes, meaning you don't need to trust the Tailscale coordination server for distributing public node keys to peer nodes in your tailnet. You can control which nodes are trustworthy to sign another node's public key.
Tailscale's control plane has the ability to add to and remove nodes from a tailnet. Inherently, customers must trust Tailscale's control plane to make the right decisions about who and what can join any given tailnet. Customers sometimes consider this a vector for abuse or security threats. Tailnet Lock largely mitigates the risk of Tailscale suddenly acting like a threat vector, by enforcing that the customer must use a trusted node to sign new additions to the tailnet. Tailnet Lock follows a "Trust on first use (TOFU)" model, where customers must initially trust Tailscale's control plane, but after first use, the customer can move centers of trust into their network.
Customers could alternatively host their own trusted control plane by using Headscale. This is however a path that removes the availability guarantees and low maintenance overhead that Tailscale's software as a service (SaaS) model provides. Customers who want to keep the center of trust on their networks while still subscribing to the benefits of a Tailscale-maintained control plane can use Tailnet Lock.
How it works
Without Tailnet Lock, when a new node joins the tailnet, the Tailscale coordination server distributes the public node key to peer nodes. If Tailscale were malicious, and stealthily inserted new nodes into your network, then Tailscale could send or receive traffic to your existing nodes in plaintext.
With Tailnet Lock, when a new node joins the tailnet, its public node key requires a signature from a Tailnet Lock key. The coordination server distributes the signed public node key to peer nodes in the tailnet. Peer nodes can then verify the signature before allowing connections. In this manner, you control which nodes are trustworthy to be in your tailnet, as well as which nodes are trustworthy to sign other nodes.
Each node has a node key, and a Tailnet Lock key:
-
The node key is a public/private key pair generated on a node by a Tailscale client. The coordination server ties the node key to a specific identity. The private key remains private on the node. The public key is transmitted to the coordination server.
-
The Tailnet Lock key (TLK), which is also a public/private key pair. Every node generates a TLK, even if Tailnet Lock is not enabled. The private key of each TLK is stored on the node that generated it, and a copy of each trusted public TLK is stored in the tailnet key authority (TKA).
Tailnet Lock primarily consists of two components:
-
Signing nodes, which are nodes that can be used to sign new nodes into the tailnet.
-
The tailnet key authority, which is a storage mechanism for the available signing nodes in a tailnet. By knowing the current set of trusted TLKs, the TKA can verify signatures in two situations:
-
Verifying node key signatures before adding node keys to its list of peers.
-
Verifying signatures for requests to change the set of trusted TLKs before processing those changes.
The TKA storage mechanism is a cryptographic chain. The TKA can grow unbounded as customers change the tailnet's configuration.
-
For more information about the architecture of Tailnet Lock, refer to Tailnet Lock white paper.
Disablement secrets
Disablement secrets are long passwords generated during the process of enabling Tailnet Lock. Because disabling Tailnet Lock is a security-relevant operation, you must have a disablement secret if you want to disable Tailnet Lock. If the disablement procedure lacked authorization checks, a compromised coordination server could trivially disable Tailnet Lock (and all its protections) to attack a tailnet as if Tailnet Lock wasn't running.
You get your disablement secrets only when you initialize Tailnet Lock. Ensure that you securely store them. Some options include using your organization's secure storage like a password manager, or printing them and storing them in a secure safe. During Tailnet Lock initialization, you can optionally generate a disablement secret for Tailscale support. This way, Tailscale support could disable Tailnet Lock in case of an issue with how we've implemented Tailnet Lock, or if you have lost your disablement secret.
Tailnet key authority
To determine which Tailnet Lock keys to trust, nodes implement a new subsystem, called the tailnet key authority (TKA). The TKA tracks and updates the set of Tailnet Lock keys available to sign node keys. You specify the initial set of trusted lock keys when you enable Tailnet Lock. You can add or remove keys to change the set of trusted Tailnet Lock keys. The coordination server publishes the set of trusted Tailnet Lock keys across your tailnet.
Enable Tailnet Lock
You need to be an Owner, Admin, or IT admin of a tailnet to enable Tailnet Lock.
Tailnet Lock is not enabled by default. With Tailnet Lock enabled, all existing nodes in the tailnet have signatures provided by a trusted node in your tailnet.
Ensure the nodes that you want to lock with Tailnet Lock are running Tailscale v1.46.1 or later.
Enabling Tailnet Lock requires using the tailscale lock init command. Use the Tailscale admin console to make it easier to create the tailscale lock init command values.
- Open the Device management page of the admin console. Ensure that you log into the same tailnet for both the admin console and the Tailscale clients running on the signing nodes.
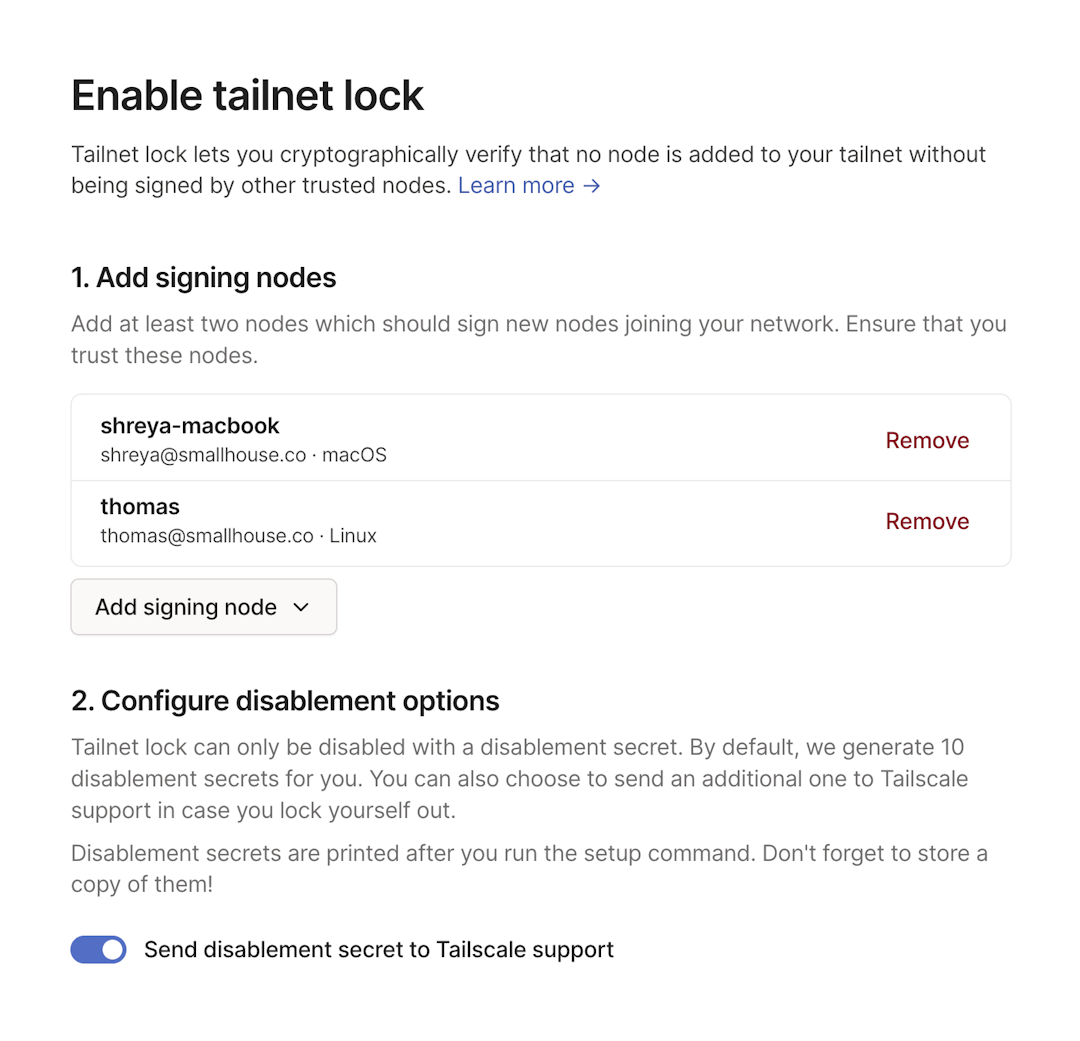
- Select Enable Tailnet Lock.
- In the Add signing nodes section, select Add signing node.
- Select the nodes whose Tailnet Lock keys you want to trust. You must select at least two signing nodes.
- (Optional): In the Configure disablement options section, specify whether to send a disablement secret to Tailscale support. When Send disablement secret to Tailscale support is enabled, this option will create an extra disablement secret that is automatically transmitted to Tailscale support. This way, Tailscale support could disable Tailnet Lock in case of an issue with how we've implemented Tailnet Lock, or if you have lost your disablement secret.
- In the Run command from signing node section, copy the
tailscale lock initcommand. - Open a terminal window on one of the signing nodes you selected.
- Paste in the
tailscale lock initcommand that you copied from the admin console and press Enter.
When you run the tailscale lock init command provided by the admin console, the command creates and displays ten disablement secrets. You need only a single disablement secret to disable Tailnet Lock, not all ten, although tailscale lock init generates ten. Make note of the disablement secrets displayed in the output. The disablement secrets are long passwords needed to disable your Tailnet Lock. For more information about disablement secrets, refer to tailscale lock disable.
The disablement secrets display only when you initialize Tailnet Lock. If you lose your disablement secrets, and you did not provide one to Tailscale support, the tailnet cannot be recovered. Ensure that you securely store the disablement secrets. Some options include using your organization's secure storage like a password manager, or printing them and storing them in a secure safe.
After tailscale lock init completes successfully:
- All existing nodes in the tailnet are signed by the trusted Tailnet Lock keys.
- The set of trusted Tailnet Lock keys is distributed to the existing nodes.
- Nodes verify the signature of a peer's node key before allowing a connection.
- All new node keys must be signed by an existing Tailnet Lock key.
When Tailnet Lock is enabled, each node relies on the initial state of Tailnet Lock sent to it from the control plane (Trust on First Use). To confirm that the initial state has not been compromised, you can verify the provisioned state of Tailnet Lock on each node by running the tailscale lock status command and checking the list of trusted signing keys. All nodes in your tailnet should report the same set of signing keys, which should match the Tailnet Lock keys of your designated signing nodes.
Disable Tailnet Lock
You need to be an Owner, Admin, or IT admin of a tailnet to disable Tailnet Lock.
- Open the Device management page of the admin console.
- Select Disable Tailnet Lock.
- For Disablement secret, enter a disablement secret that you stored securely when you enabled Tailnet Lock.
- Select Disable Tailnet Lock.
Once you use the specified disablement secret, the Tailscale coordination server distributes it to all nodes in the tailnet and you should consider it public.
If you re-enable Tailnet Lock, for example, by running the tailscale lock init command again, you get new disablement secrets.
If you encounter a significant issue with Tailnet Lock for your entire tailnet and can't disable it by using the Device management page (for example, if you can't locate your disablement secret), you could run the tailscale lock local-disable command on each of your nodes to make your tailnet in effect ignore Tailnet Lock. For details, refer to tailscale lock local-disable.
Add a node to a locked tailnet
If you have already enabled Tailnet Lock and want to add an additional node, you need to sign the new node's node key.
You have two options to add a node:
- Use a Tailscale client app signing link. This is possible only for macOS, Windows, and iOS. We are working on Android.
- Use the
tailscale lock signcommand, which is part of the Tailscale CLI. This is possible only for Linux, macOS, and Windows.
Both options require access to the Tailscale admin console, because retrieving information for the node key to add is possible only through the Machines page of the admin console.
Use a client app to add a node
- Open the Machines page of the admin console. Ensure that you log into the same tailnet for both the admin console and the Tailscale clients running on the signing nodes.
- Select the node that needs a signature. Look for the Locked out badge in the machines list, or use the
property:locked-outfilter to find all devices that are locked out. - Select Sign machine.
- In the Sign machine dialog, you have 3 tabs to choose from, to add the node.
-
In the Desktop tab, if you are on a macOS or Windows device that is a signing node, select Sign this node. Otherwise, select Copy signing URL, send the URL to a signing node, and open the URL on the signing node. Either process opens the Tailscale client and lets you add the node.
-
In the Mobile tab, if you are on an iOS device that is a signing node, scan the QR code to open the Tailscale client, then add the node. Alternatively, select Copy signing URL, send the URL to a signing node, and open the URL on the signing node. Either process opens the Tailscale client and lets you add the node.
Using a QR code to add a node is currently supported only on iOS devices.
-
In the CLI tab, select the Copy icon to copy the
tailscale lock signcommand. Run the command on a signing node to add the node.
-
Use the CLI to add a node
Use the tailscale lock sign command to add a node.
This example adds a node:
tailscale lock sign nodekey:1abddef1 tlpub:abcdef12
nodekey:1abddef1is the node key for the node you want to add to your tailnet.tlpub:abcdef12is an optional Tailnet Lock key for a trusted signing node, to use for key rotation.
Replace these example values with your actual node key and optional Tailnet Lock key.
You can determine the tailscale lock sign command either using the admin console or using the Tailscale CLI.
To determine the tailscale lock sign command using the admin console:
- Open the Machines page of the admin console. Ensure that you log into the same tailnet for both the admin console and the Tailscale clients running on the signing nodes.
- Select the node that needs to be signed. Look for the Locked out badge in the machines list, or use the
property:locked-outfilter to find all devices that are locked out. - Select Sign node.
- Select CLI.
- Copy the
tailscale lock signcommand needed to sign the node. - Run the command on a signing node to add the node.
Alternatively, to determine the tailscale lock sign command using the Tailscale CLI:
-
On the node that you want to add to your tailnet, run:
tailscale lock status -
In the output of
tailscale lock status, copy thetailscale lock signcommand needed to sign the node. -
Then, on a node with a trusted Tailnet Lock key, run the command you copied in the previous step:
tailscale lock sign nodekey:<your-node-key> tlpub:<your-tailnet-lock-key>Replace these example values with your actual node key and optional Tailnet Lock key.
When a signed node key expires, the new node key will not need to be re-signed. When the user re-authenticates, the node's signature will be automatically rotated, by signing the new node key with the node's Tailnet Lock key.
Add a node using a pre-signed auth key
Signing an auth key lets you add devices to your locked tailnet using pre-signed auth keys, so that you don't need to add the node and then sign its node key.
-
Generate a pre-approved auth key.
-
On a node with a trusted Tailnet Lock key, set an environment variable,
AUTH_KEY, to the value of the auth key:export AUTH_KEY="tskey-auth-<XXXXCTRL-NNNNNN>"Replace this example value with your actual auth key.
-
Sign the auth key by running the
tailscale lock signcommand:tailscale lock sign $AUTH_KEY -
Use the new key that is generated by the
tailscale lock signcommand to pre-approve devices in your tailnet.
Determine a node's Tailnet Lock public key
For some Tailnet Lock operations, you need to know a node's Tailnet Lock public key. A node's Tailnet Lock public key is of the form tlpub:abcdef12.
This is not the same as a node's Tailscale public key, which is of the form nodekey:abcdef12.
Determining the Tailnet Lock public key by using the CLI
To determine a node's Tailnet Lock public key using the Tailscale CLI, which is possible only for Linux, macOS, and Windows:
- Run
tailscale lock status. The command displays the Tailnet Lock public key for the node.
Determining the Tailnet Lock public key by using the admin console
To determine a node's Tailnet Lock public key using the admin console:
-
Open the Machines. Ensure that you log into the same tailnet for both the admin console and the Tailscale clients running on the signing nodes.
-
Select the node whose Tailnet Lock public key you want to determine.
-
In the Machine Details section, look for Tailnet Lock key. If you do not find Tailnet Lock key within the UI, then Tailnet Lock is not enabled for the tailnet.
-
Select Copy to copy the key to your clipboard.
Determining the Tailnet Lock public key by using the client
- Select Settings from the Tailscale client menu.
- Select the Settings tab if it is not already active.
- In the Tailnet Lock section, select Manage.
- In the dialog that opens, the Tailnet Lock Key section shows the Tailnet Lock public key. Select the Copy icon to copy the key to your clipboard.
Add a signing node
-
Determine the Tailnet Lock public key for the node you want to add as a signing node.
-
On a node with a trusted Tailnet Lock key, run the
tailscale lock addcommand, passing in the Tailnet Lock keys that you determined in the previous step.This examples adds two signing nodes:
tailscale lock add tlpub:trusted-key1 tlpub:trusted-key2Replace these example values with your Tailnet Lock key or keys.
Remove a signing node
You need to run this process from a node with a trusted Tailnet Lock key.
-
If you don't already have the Tailnet Lock public key for each node you want to remove as a signing node, determine the Tailnet Lock public key.
-
On a node with a trusted Tailnet Lock key, run the
tailscale lock removecommand, passing in the Tailnet Lock keys that you determined in the previous step.This example removes two signing nodes:
tailscale lock remove tlpub:trusted-key7 tlpub:trusted-key8Replace these example values with your Tailnet Lock key or keys.
When you remove a signing node Node-B by running tailscale lock remove on node Node-A, by default all nodes previously signed by Node-B are re-signed with Node-A's key. You can disable this by passing in --re-sign=false to the tailscale lock remove command.
Revoke a compromised signing node
If a signing node becomes compromised, revoke the compromised key by running the tailscale lock revoke-keys command. Once you revoke a key, you can no longer use it for Tailnet Lock. Any nodes that were previously signed by a revoked key lose their authorization and require a new signature.
If you want to remove a key that is not compromised, use the tailscale lock remove command instead.
Revocation is a multi-step process that requires several signing nodes to co-sign the revocation. Each step uses the tailscale lock revoke-keys command.
-
Open a terminal on a signing node that does not have a compromised key.
-
Run the
tailscale lock revoke-keyscommand.This example revokes two signing nodes -
tlpub:compromised-key1 tlpub:compromised-key2is a space-separated list of the keys to revoke:tailscale lock revoke-keys tlpub:compromised-key1 tlpub:compromised-key2Replace these example values with your Tailnet Lock key or keys.
The output of this command contains a
tailscale lock revoke-keys --cosigncommand, which you will use in the next step. -
On another trusted signing node, run the
tailscale lock revoke-keys --cosigncommand. The output of this command contains a newtailscale lock revoke-keys --cosigncommand. Repeat this process, always using the new output from each--cosigncommand, until the number of times you used--cosignexceeds the number of revoked keys. For example, if you revoked 3 keys, you need to run thetailscale lock revoke-keys --cosigncommand 4 times. -
Finish the process by running the command that was output from the last use of
--cosignexcept replace--cosignwith--finish:tailscale lock revoke-keys --finish <hex-data>Replace this example value with your hex data.
By default, Tailscale will determine the appropriate point in the Tailnet Lock log to fork. If more signing nodes agree that a key should be revocable than not, then your tailnet uses the keys in the fork that Tailscale determined as still trustworthy, instead of the revoked keys.
If the majority of signing nodes become compromised, you can disable and then re-enable Tailnet Lock itself.
How Tailnet Lock works with other Tailscale features
Take the following into consideration for how Tailnet Lock works with other Tailscale features.
Sharing
To use Tailnet Lock with the sharing feature, a node shared into a tailnet with Tailnet Lock requires a signature before it is accessible.
To share nodes out of a tailnet with Tailnet Lock, the user who accepts the share invite needs to have their nodes signed in the locked tailnet before they can access the shared node.
Tailscale SSH Console
You can use Tailscale SSH Console to establish an SSH session for a signed node in your tailnet, provided:
- your tailnet policy file permits network access.
- a Tailscale SSH rule permits SSH access.
Configuration audit logging
Enabling, disabling, or modifying Tailnet Lock configuration creates events that will appear in the configuration audit logs.
Independent of configuration audit logging, you can run the tailscale lock log command on a node to find recent Tailnet Lock changes to your tailnet.
Tailnet Lock state
Tailnet Lock tries to store data in the Tailscale state directory of each node:
- If you use the macOS, Windows, iOS, Android, and tvOS clients, the state directory is set automatically.
- If you run the
tailscaleddaemon, the state directory is set by the--statediror--stateflags. - If you use the default systemd unit files distributed with the official Tailscale
deb,rpmandtar.gzpackages, the--stateflag is set automatically. - If you use Tailscale in Docker or Kubernetes, the state directory is set by the
TS_STATE_DIRenvironment variable.
If you do not provide a state directory, Tailscale must store Tailnet Lock data in-memory. This means your node must re-fetch the complete state from the control plane whenever it starts.
We strongly recommend setting a state directory, which removes this control plane startup dependency.
Limitations
- You need to securely store the disablement secrets yourself. If you lose your disablement secrets, and you did not provide one to Tailscale support, the tailnet cannot be recovered.
- You can have a maximum of 20 signing nodes in your tailnet.
- To prevent unbounded growth of the TKA, rotate Tailnet Lock keys at most once per year.
- You cannot enable both Tailnet Lock and device approval—they are mutually exclusive features.
- Tailnet Lock keys are stored on the device. If the device is compromised, the key can be obtained.
- You cannot use an Android device as a signing node, because it cannot be used for signing operations. This is being worked on.