How to generate SSH keys
SSH keys are integral to distributed teams’ security and ability to collaborate, but setting them up for the first time can be troublesome. In this article, you’ll learn how to generate SSH keys, both with and without Tailscale.
What is Secure Shell (SSH)?
SSH, also known as Secure Shell, is a popular protocol used to securely access computers over an unsecured network. SSH is widely used by system administrators and developers to securely log into remote computers.
A common and simple way to log into a remote computer via SSH is to use a password. However, passwords can be weak or insecure, and they can be brute-forced or guessed. It’s also challenging to create a new password for every single machine you log into, and using the same password repeatedly is not recommended. A more secure approach is to use SSH keys to access your computers.
In this article, you’ll learn how to generate SSH keys. You’ll also learn how Tailscale simplifies handling SSH keys by improving the SSH process.
What are SSH keys?
The SSH protocol works based on two concepts called public-key cryptography and challenge-response authentication.
- Public-key cryptography: Also known as asymmetric cryptography, uses a pair of keys: a public key and a private key.
- The private key should be secured and known only to the user who generates the keys.
- The public key is safe to be shared publicly and will be shared with the SSH server the user wants to connect to.
- Challenge-response authentication: This is a security mechanism that verifies the identity of a user or system through an interactive process.
Challenge-response authentication works by presenting a challenge, such as an encrypted message, that can only be solved or decrypted using specific credentials—typically a private key in the case of SSH.
How Challenge-Response Authentication Works
- The server generates a random challenge and encrypts it using the user’s public key.
- The user’s SSH client decrypts the challenge with their private key.
- The user’s SSH client then sends a valid response back to the server.
- Once verified, the server authenticates the user and establishes the connection.
What are SSH Host Keys?
A discussion about SSH keys is incomplete without talking about SSH host keys. Just as SSH keys are used to verify a client’s identity, host keys are used to verify the identity of a server.
Key File Storage
By default, the public and private keys are stored in the .ssh folder of a user’s home directory. For convenience, a copy of the public keys often live alongside the private key file with a .pub extension. Private key files have the same name without any extension, and contain both the private and public key. You can rename key files, and also generate a public key file from a private key using ssh-keygen -y keyfile > keyfile.pub.
What cryptography systems does the SSH protocol use?
The SSH protocol is commonly used via the OpenSSH implementation, which supports and uses a large number of cryptography systems.
There are two broad classifications of the systems in use, based on their mathematical properties:
- Integer factorization: such as Rivest, Shamir, and Adleman (RSA) and Digital Signature Algorithm (DSA), relies on the fact that it’s easy to multiply two very large prime numbers but practically difficult to factorize the result back to recover the primes. 3072-bit RSA is the default key type and size produced by
ssh-keygen. - Elliptic curve cryptography: such as Elliptic Curve Digital Signature Algorithm (ECDSA) and Ed25519, relies on certain elliptic curves and their discrete logarithm problem being hard. Where supported, elliptic curve keys often provide improved performance and simpler usage than integer factorization keys. Many modern configurations standardize on Ed25519 keys.
How are SSH keys used?
When a client requests an SSH connection, the server provides its public host key to the client. If the client has never made an SSH connection to this server before, SSH shows a fingerprint of the server’s public host key:
$ ssh pi@192.168.0.4
The authenticity of host '192.168.0.4 (192.168.0.4)' can't be established.
ED25519 key fingerprint is SHA256:5lkC61T+vQ7mR4INcwBktQaolmAswQx9bws/cT+A/Kc.
This key is not known by any other names
Are you sure you want to continue connecting (yes/no/[fingerprint])?
Once the client verifies and accepts the fingerprint, it is stored in the ~/.ssh/known_hosts file and will be automatically verified when used again.
Once the server is verified, both parties use algorithms like Diffie-Hellman key exchange and elliptic-curve Diffie-Hellman key exchange to create a shared secret that is used to encrypt subsequent communication.
User Authentication Process
In the next step, user authentication takes place using the user’s SSH keys. Briefly, the process is as follows:
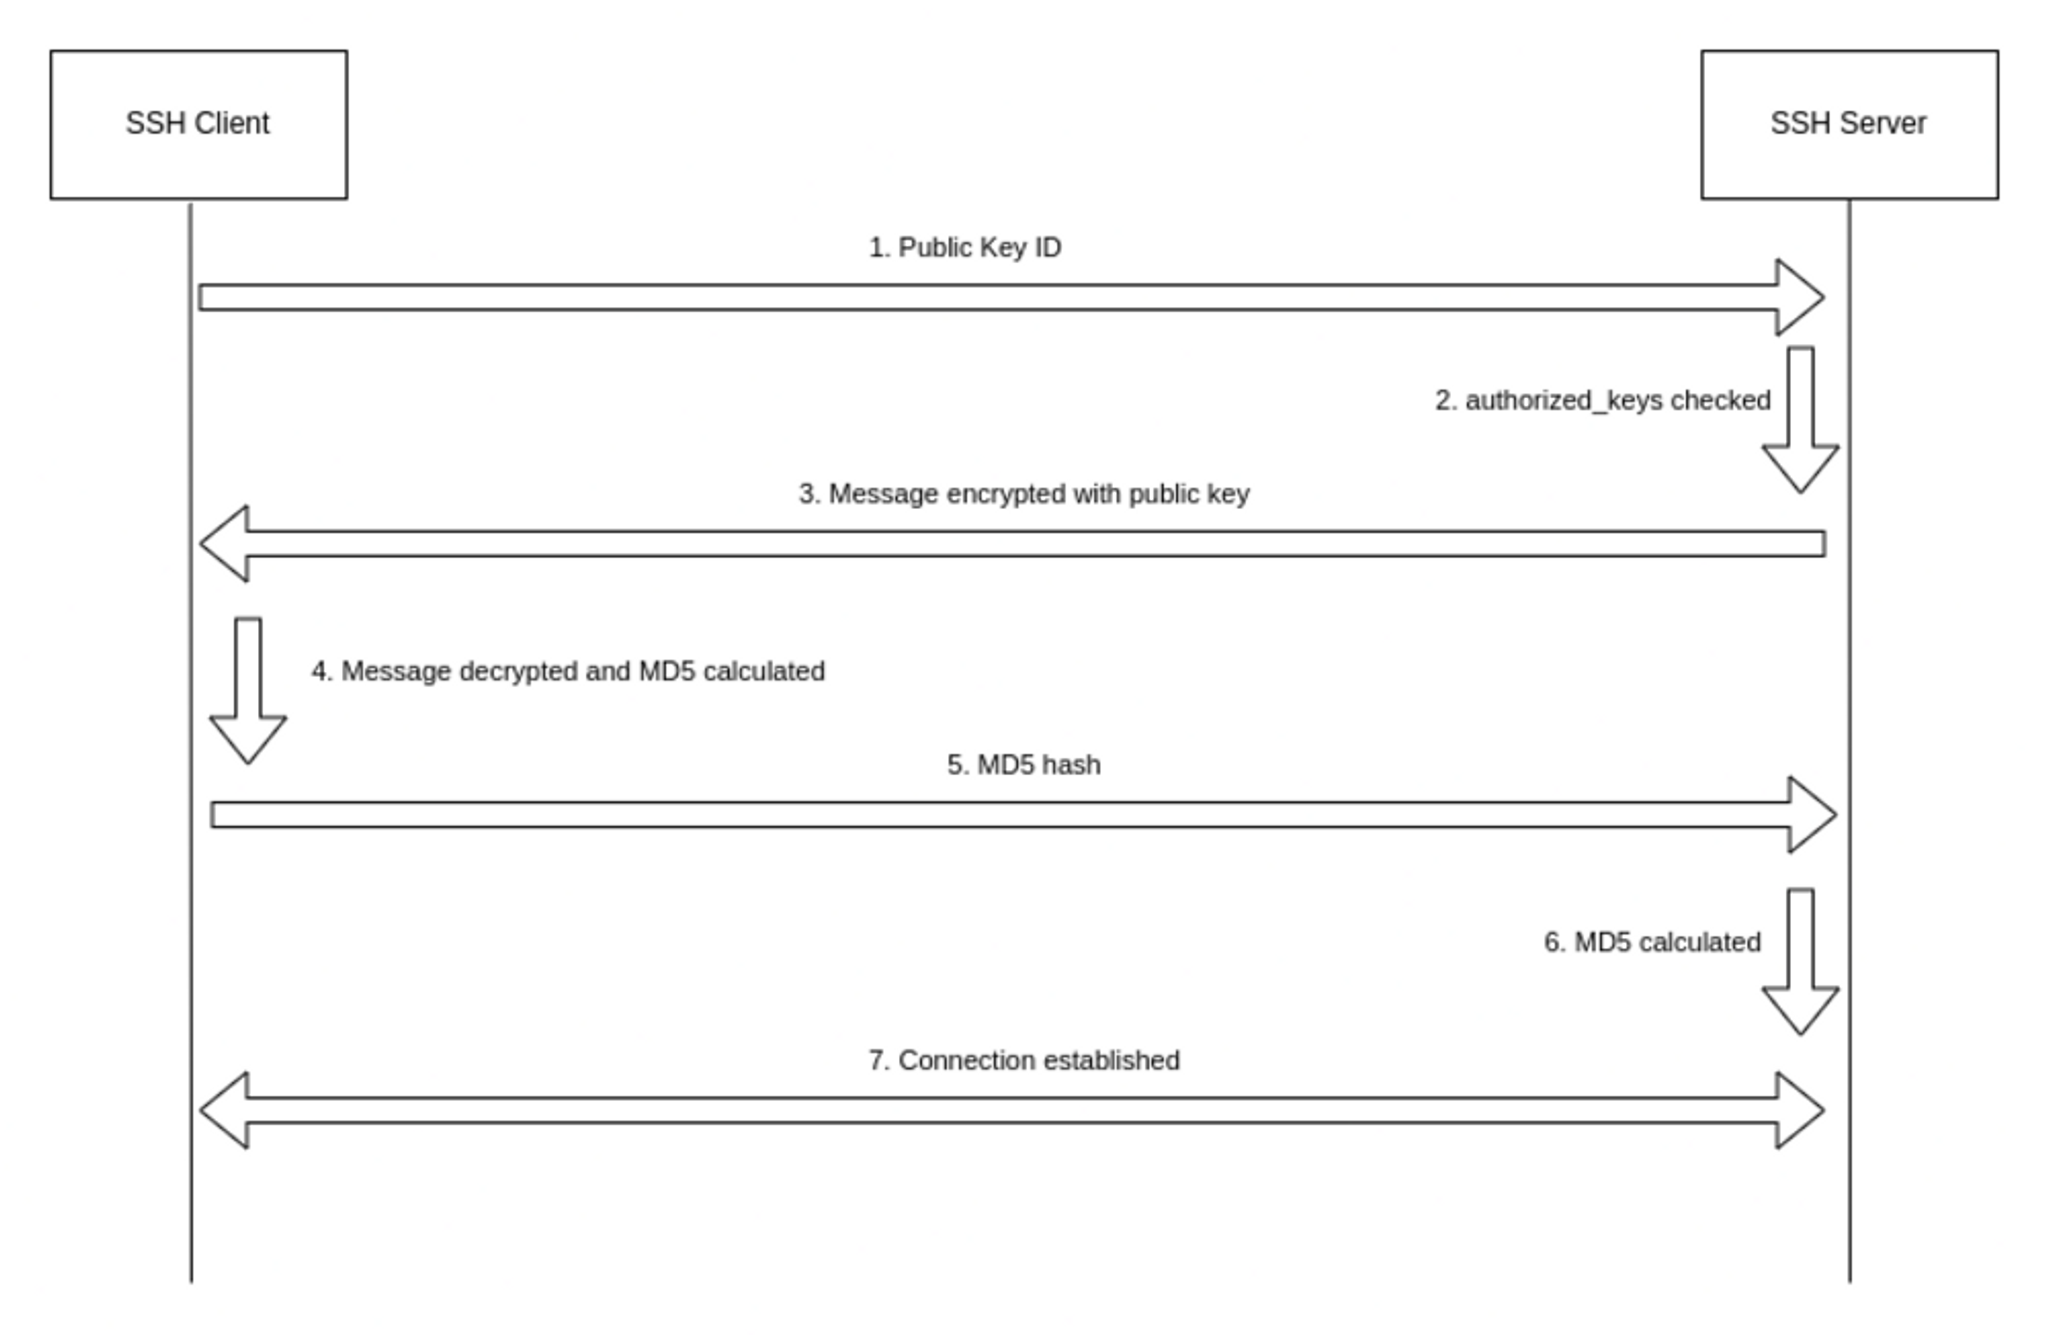
- The client sends an ID for the key pair it wishes to authenticate itself with, and the server checks the
.ssh/authorized_keysfile of the account the client wants to log into. If a public key with the given ID is found, the server generates a challenge. - As stated previously, a challenge is simply a random number generated by the server that is encrypted with the user’s public key and sent to the client. Only the corresponding private key can decrypt this challenge.
- The client decrypts the message to reveal the original number, combines it with the shared session key, and calculates the MD5 hash of the result. This MD5 hash is the response that is sent to the server.
- The server calculates the MD5 on its own, and if the two values match, the client is authenticated and a connection is made.
How to generate SSH keys
Like SSH keys, the SSH host keys are generated in pairs of public and private keys.
SSH host keys are automatically created when OpenSSH is installed.
Usually, they’re stored in the /etc/ssh directory with the file names ssh_host_rsa_key, ssh_host_dsa_key, ssh_host_ecdsa_key, and ssh_host_ed25519_key.
The corresponding public keys end in .pub.
Generating SSH key pairs
To generate SSH key pairs, the ssh-keygen utility is used. By default, the 3072-bit RSA key pair is generated, but you can change the algorithm with the -t flag and the bit length with the -b flag. The following command generates an RSA key pair with 4096 bits:
ssh-keygen -t rsa -b 4096When you run this command, you will be prompted to enter a passphrase, which encrypts the private key. Doing so is highly recommended because it makes keys much more difficult to steal. You will also be prompted for the location of the file, which defaults to ~/.ssh/id_<name of the algorithm>.
After the keys are generated, you’ll be presented with a randomart image and the fingerprint of the key:
$ ssh-keygen -t ed25519
Generating public/private ed25519 key pair.
Enter file in which to save the key (/home/aniket/.ssh/id_ed25519):
Enter passphrase (empty for no passphrase):
Enter same passphrase again:
Your identification has been saved in /home/aniket/.ssh/id_ed25519
Your public key has been saved in /home/aniket/.ssh/id_ed25519.pub
The key fingerprint is:
SHA256:pEFozJNtV5RS7YncUAlDUvkbZ575P9ST9gL24Pl6Bk4 aniket@andromeda
The key's randomart image is:
+--[ED25519 256]--+
|   o +. .*O*..   |
|    B.o o.+.o    |
|   . o...o * .   |
|       +  o * o  |
|      . S    * oo|
|            E +=.|
|           = *o.o|
|            + =.o|
|            .=..+|
+----[SHA256]-----+
When you use this key to authenticate, you’ll be prompted for the passphrase. If you don’t want to be asked for a passphrase every time you use SSH, you can add it to your SSH agent.
You can also use ssh-keygen to generate SSH host keys. The following command generates SSH host keys for each of the key types (RSA, DSA, ECDSA, and Ed25519) only if they don’t already exist. This means you must delete existing keys before generating new ones:
ssh-keygen -AThe new host keys are stored in the default paths and have an empty passphrase.
Best practices for SSH keys
Although SSH keys offer excellent security and ease of use, they can be compromised if not used correctly. Best practices for SSH keys include:
- Keeping private keys private
- Keeping track of actively used SSH keys
- Rotating SSH keys
- Verifying host keys
Keep private keys private
Keeping private keys secure is crucial. This might seem like a no-brainer, but you’d be surprised to find out how often private SSH keys get leaked on the internet.
The most common reason for this is user carelessness: Accidentally committing private keys to a public repository, copying private keys to another computer via email or other means, or even sharing the private key with a third party are all common ways of accidentally leaking your private key.
To significantly increase the security of private keys, always have a passphrase set on the key. This prevents arbitrary programs running as your user from being able to use the keys, even if they are stolen.
To protect the private key from local users, it must have a 600 or 400 permission. A 600 permission makes the file readable and writable only by the owner, whereas a 400 disables write access for everyone, including the owner.
Thankfully, SSH will refuse to run if the permissions are too open and throw an error:
Permissions 0644 for 'id_rsa' are too open.
It is required that your private key files are NOT accessible by others.
This private key will be ignored.
Use chmod to set appropriate permission:
chmod 600 ~/.ssh/id_rsaKeep track of actively used SSH keys
A 2017 study of over 400 IT security professionals revealed that 90% of the respondents didn’t have a complete and accurate inventory of all SSH keys being used. The repercussions of this could be dire — for example, if a user leaves or is terminated but an inaccurate inventory prevents their SSH keys from being revoked, that user would still have the ability to access the company’s infrastructure.
Rotate SSH keys
You’re probably familiar with the best practice of changing passwords every six months. SSH key rotation is based on this same concept: Rotating SSH keys essentially means regenerating and replacing the key pairs. By rotating your keys, you can invalidate your old keys and safeguard your infrastructure in case the old keys are compromised.
However, this is a very tedious process and can quickly become unwieldy. If you have your private keys on multiple computers, you must copy the new key to each of them, and if your public key is on multiple servers, you must also replace those.
While there are ways to make this process easier, it can still be daunting, and the alternatives, like U2F hardware keys or SSH jump hosts, come with their own downsides and risks.
Verify host keys
As mentioned before, you are prompted to verify the server’s fingerprint when connecting to a server for the first time. If the fingerprint doesn’t match, that could mean the server is malicious, the public key is outdated, or you’re falling victim to a man-in-the-middle attack. If you’re a user, you should get the correct fingerprint from the SSH server administrator and must verify the host key fingerprint before connecting to the server. If you’re an administrator, you can generate the fingerprint from the host key.
If the server’s host key has changed, you’ll be greeted with an error when you try to SSH to the server:
@@@@@@@@@@@@@@@@@@@@@@@@@@@@@@@@@@@@@@@@@@@@@@@@@@@@@@@@@@@
@    WARNING: REMOTE HOST IDENTIFICATION HAS CHANGED!     @
@@@@@@@@@@@@@@@@@@@@@@@@@@@@@@@@@@@@@@@@@@@@@@@@@@@@@@@@@@@
IT IS POSSIBLE THAT SOMEONE IS DOING SOMETHING NASTY!
Someone could be eavesdropping on you right now (man-in-the-middle attack)!
It is also possible that a host key has just been changed.
The fingerprint for the RSA key sent by the remote host is
xx:xx:xx.
Please contact your system administrator.
Add correct host key in /home/hostname /.ssh/known_hosts to get rid of this message.
Offending RSA key in /var/lib/sss/pubconf/known_hosts:4
RSA host key for pong has changed and you have requested strict checking.
Host key verification failed.
If you can verify that the host key change is legitimate, you can remove the offending entry from the known_hosts file with ssh-keygen -R and reconnect:
ssh-keygen -R <hostname_of_the_server>How to generate an SSH key with Tailscale
Tailscale SSH simplifies management and security and aims to improve traditional SSH. When you start Tailscale, it handles incoming SSH requests from your tailnet on port 22 to your Tailscale IP. Tailscale then authenticates and encrypts the connection over WireGuard using the client’s node key.
Upon successful connection, the request is handed off to the Tailscale SSH server. At this point, no further authentication is required since Tailscale is already aware of the client’s identity. Essentially, instead of using your SSH keys to connect, the Tailscale identity is used to set up the SSH connection.
Tailscale already manages the machine and node keys for you. Each node key is tied to a unique identity typically established via an interactive browser-based login flow by the client, like OAuth or SAML. There’s also a provision to use pre-authenticated keys for cases where interactive login is not feasible, like with a container or IoT devices.
Clients can also regenerate and replace the node keys themselves, or the control server can require keys to be rotated at a regular interval. This means you don’t have to replace the SSH keys on every server manually. From the Tailscale dashboard, you can find a list of authorized clients and revoke access any time:

It’s also possible to revoke an auth key.
How Tailscale can help
Tailscale provides access control lists (ACLs) for fine-grained control over SSH connections. SSH connections between two devices are only allowed when ACLs permit it.
Typically, to restrict certain users from SSH access to certain devices, their public keys need to be purged from the server.
With Tailscale, it’s just a matter of changing the ACL.
If the ACL permits it, Tailscale also distributes public SSH host keys that let the client recognize the device it is connecting to. The host key is stored by Tailscale, much like traditional SSH.
Tailscale SSH removes the burden of managing SSH keys and makes the SSH process safe, secure, and smooth while not hampering connectivity for devices not on your tailnet.
Ready to try Tailscale? Download it and get started for free.
FAQs
How often should you rotate SSH keys?
There’s no one-size-fits-all answer. If you wait too long to rotate keys, compromised keys can be used to gain unauthorized access and have ample time to wreak havoc. If you rotate keys too often, you’ll end up with a significant manual burden.
It’s recommended to rotate keys as often as possible while considering the difficulties that can arise, or you can use Tailscale to make this process simple.
What happens if you lose your SSH key?
If you accidentally delete or remove read permissions from your SSH keys or lose access to them, you can regenerate them with ssh-keygen and upload your new public key to all your servers. With Tailscale, however, you never have to worry about losing SSH keys.
Can you have more than one SSH key?
You can have as many SSH keys as you want. But be sure to use different file names for each key when generating them with ssh-keygen. By default, ssh tries the following key files in succession: ~/.ssh/id_rsa, ~/.ssh/id_ecdsa, ~/.ssh/id_ecdsa_sk, ~/.ssh/id_ed25519, ~/.ssh/id_ed25519_sk, and ~/.ssh/id_dsa. You can provide a keyfile to the -i flag of the ssh command to use that particular keyfile instead of the default:
ssh -i ~/my/other/key hostYou can also specify multiple keyfiles as well as set keyfiles on a per-host basis in ~/.ssh/config:
Host somehost
    User someuser
    IdentityFile ~/.ssh/id_someid
    IdentitiesOnly yes


