SSH Security Best Practices: Protect Your Remote Access Infrastructure
This article provides best practices and tools to secure your SSH connections. It covers enforcing strong authentication, managing SSH keys, securing SSH settings, implementing SSH bastion hosts, monitoring and auditing SSH activity, and an overview of network segmentation and firewall rules. You’ll also learn how Tailscale SSH can simplify SSH security and management.
Secure Shell (SSH) is a network protocol that allows for secure remote login from one system to another. Properly securing your SSH connections is paramount because unauthorized users who access your systems through SSH can wreak havoc on your infrastructure, steal sensitive data, and disrupt your entire operation.
But managing and securing remote access infrastructure isn’t a walk in the park. You must ensure authorized access and keep track of every remote login across all the devices, users, and systems you manage.
This article provides best practices and tools to secure your SSH connections. It covers enforcing strong authentication, managing SSH keys, securing SSH settings, implementing SSH bastion hosts, monitoring and auditing SSH activity, and an overview of network segmentation and firewall rules.
Tailscale SSH
Enforcing Strong Authentication
Enforcing strong authentication is your first line of defense—the sentry at the gate—to ensure that only authorized individuals can gain access to your system.
Authentication verifies that you are who you claim to be before granting access to a system. But it’s about much more than a password.
Here are some best practices to ensure your authentication bulwark is as strong as it can be:
- Require strong passwords. Require passwords that are at least twelve characters long, and combine uppercase and lowercase letters, numbers, and special characters.
- Enable two-factor authentication. Two-factor authentication (2FA) requires users to provide a second form of identification besides the password, such as a fingerprint, a code sent to a mobile device, or a physical token. This extra layer of security makes it significantly more difficult for unauthorized users to gain access to your system, even if they somehow obtain a password.
- Regularly update passwords. Require users to update their passwords every thirty to sixty days.
- Implement account lockouts. If several failed login attempts occur, lock out the account. This strategy prevents brute-force attacks where attackers attempt to gain access by trying various password combinations.
- Educate users. Emphasize the importance of strong passwords and their role in securing the system at all opportunities. For example, when they set their password, remind them to avoid common or easily guessed passwords like “password123” or “admin.” Also encourage them to use password managers to generate and store strong passwords.
- Use SSH keys. When SSH keys are properly managed (refer to the next section), they provide a more secure form of authentication than using only passwords. So let’s see what that looks like.
Managing SSH Keys
SSH keys are one of the most common ways to authenticate SSH sessions. Used independently or with password-based authentication, they offer more resistance to most brute-force attacks.
An SSH key pair consists of a public key and a private key. While the public key can be openly shared, the private key must remain confidential and known only to the user.
However, SSH keys are also not invincible. If your private keys fall into the wrong hands, the security of your SSH connections can be compromised. Using SSH keys isn’t enough; you must also manage them effectively. Here are some best practices:
- Properly generate SSH key pairs. Use a reputable tool such as OpenSSH. Opt for a higher bit value for increased security, typically 2048 bits at a minimum or 4096 bits for more sensitive connections.
- Safeguard private keys. The private key is akin to a secret password and should be treated as such. It should never be shared or transmitted over insecure networks. Consider encrypting private keys with a passphrase for additional security.
- Rotate SSH keys. Just like passwords, SSH keys should be changed or rotated regularly to reduce the risk of a key being used maliciously if it’s compromised and unnoticed.
- Revoke SSH keys. Have a clear process for revoking SSH keys when they are no longer in use or if a key might be compromised. Any stale or unused keys represent a potential security risk.
- Regularly audit your SSH keys. This ensures they’re still valid, secure, and necessary. Regular audits prevent the buildup of unused or insecure keys up over time.
- Implement key management solutions. Especially for larger environments with many keys, SSH key management solutions can automate many tasks like distributing keys, rotating keys, and auditing key usage.
Automated SSH key management
Securing Your SSH Settings
Your SSH settings determine how your SSH server behaves and interacts with clients. In other words, they are the rule book defining what’s allowed and what’s not when it comes to SSH connections.
Using default SSH settings can potentially have several vulnerabilities. For instance, allowing root login or using default ports can make your system an easy target for attackers. Use these best practices instead:
- Change the default SSH port. By default, SSH uses port 22. Attackers are well aware of this setting and usually target this port. Changing the port doesn’t necessarily increase security, but it can reduce the amount of noise and automated attacks.
- Disable root login. The root user has full control over a system. If an attacker gains root access, the consequences can be disastrous. It’s highly recommended to disable root login via SSH and use sudo or privilege escalation when necessary.
- Disable password authentication. If you have SSH keys set up, consider disabling password authentication to eliminate the risk of brute-force password attacks.
- Limit user logins. Only allow necessary users to access the system via SSH. This reduces the number of potential entry points for an attacker.
As an aside, changing the default SSH port, disabling root login and password authentication, and limiting user logins requires that you edit your /etc/ssh/sshd_config file using sudo nano /etc/ssh/sshd_config and update the following values as shown below.
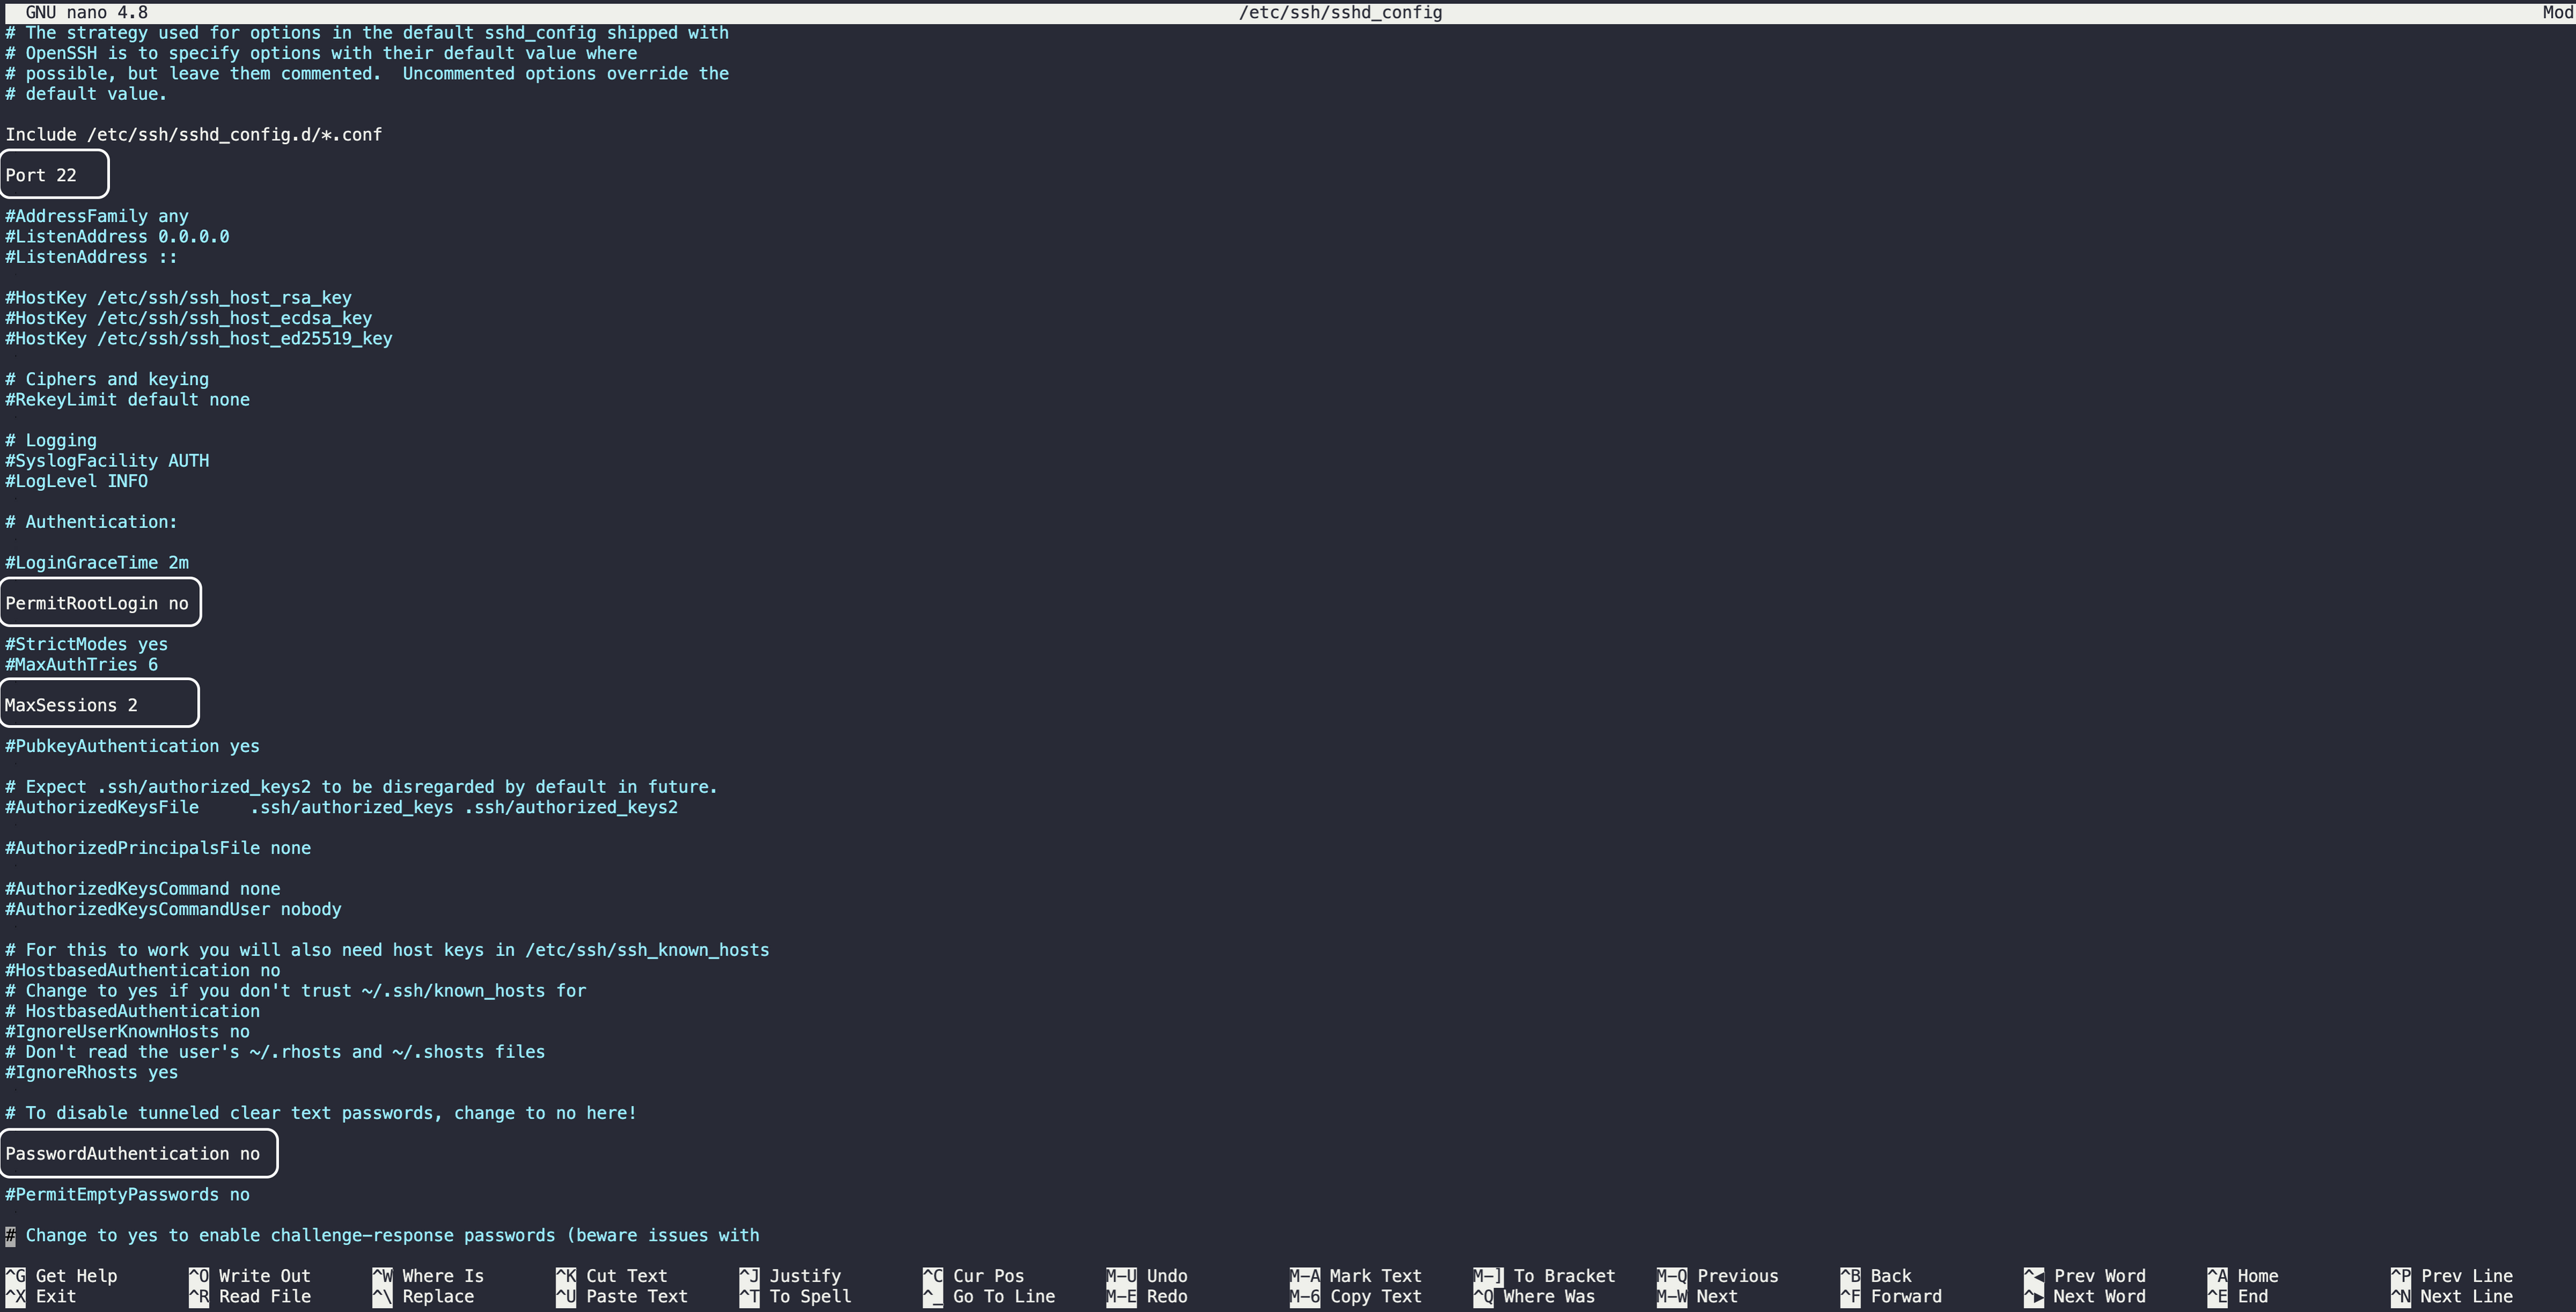
Afterwards, restart your SSH:
sudo systemctl restart sshOr:
sudo service ssh restart- Enable public key authentication. Enabling public key authentication in your SSH settings allows you to use the keys for authentication.
- Use Fail2ban or similar tools. These tools can help to protect your server from brute-force attacks by banning IP addresses that show malicious signs, such as too many password failures.
Understanding SSH Bastion
Think of an SSH bastion host as a heavily fortified gatekeeper, serving as the single controlled point of access to your internal network from the outside world. It’s like the front door of a house that everyone needs to go through before they can access the rest of the building.
If you’ve implemented an SSH bastion host, all SSH traffic is funneled through a single point. This allows for easier monitoring and auditing of SSH traffic as well as enhanced control over who can access what within your internal network.
One of the downsides of an SSH bastion host is it becomes a single point of failure if it is not configured and maintained properly. If it goes down, it can prevent you from accessing all your servers behind it.
Here are some best practices for preventing such issues:
- Set up a standalone server as the bastion host. This server should be hardened and secure, running a minimal set of services to reduce potential attack vectors.
- Control access. Allow only necessary users to access the bastion host. Use public key authentication instead of passwords, and employ strong two-factor authentication methods.
- Monitor and log all activity. As all SSH traffic goes through the bastion host, it provides an excellent point to monitor and log all SSH activity. These logs should be regularly reviewed for any suspicious activity.
- Use SSH agent forwarding. This allows you to connect from your local machine to the bastion host and from there to another machine in your network without storing private keys on the bastion host. However, note that agent forwarding does come with its own security considerations and should be used wisely.
- Regularly update and patch the bastion host. This ensures it’s resistant to known vulnerabilities.
Monitoring and Auditing SSH Activities
No matter how fortified your walls may be, it’s always crucial to keep a watchful eye on what’s happening inside them. For SSH, it means monitoring and auditing SSH activity.
Monitoring and auditing SSH activity provides your SSH traffic visibility, allowing you to spot any irregularities or signs of malicious activity. By logging SSH activity, you create an audit trail that can be invaluable in forensic investigations and compliance audits.
Here’s what you need to consider when monitoring and auditing SSH activity:
- What to log? Log details like login attempts (both successful and unsuccessful), command executions, file transfers, and any changes to system files or configurations.
- Where to store logs? Store logs in a secure, centralized location. It not only protects the integrity of the logs but also makes it easier to review and analyze them.
- How to review logs? Review logs regularly for any anomalies or signs of malicious activity. Automated log-analysis tools can help you sift through large amounts of data and highlight potential issues.
Beyond logging, consider leveraging more sophisticated security tools:
- Intrusion detection system (IDS) tools monitor your network for signs of malicious activity. If they detect anything suspicious, they can alert you so you can take action.
- Security information and event management (SIEM) tools collect and analyze log and event data from various sources, providing centralized visibility into your security landscape. They can help you detect complex threats that might otherwise go unnoticed.
Implementing Network Segmentation and Firewall Rules
By implementing network segmentation and stringent firewall rules, you can reduce your network’s attack surface and limit the potential impact of a breach.
Network segmentation is the practice of dividing your network into smaller isolated subnetworks or segments. Each segment serves a specific purpose and contains certain types of data or applications.
Network segmentation restricts an attacker’s ability to traverse your network. Even if an attacker gains access to one segment, they’ll be contained within that segment, protecting the rest of the network.
Here’s how to implement network segmentation:
- Identify and categorize assets. Identify all the assets on your network, including servers, applications, and data. Categorize them based on their functions, sensitivity, and security requirements.
- Create network segments based on the categories you’ve defined. Each segment should contain assets that have similar functions and security requirements.
- Apply access controls. Define who can access the network for each segment and what they can do. Allow only necessary traffic between segments.
Firewall rules are the guidelines that dictate how traffic is handled in your network. They can allow or block traffic based on various criteria, such as IP addresses, ports, and protocols. By creating strict firewall rules, you can control what gets to access your SSH servers and what doesn’t.
To create effective firewall rules, you start by defining a default deny policy that blocks all traffic unless explicitly allowed:
# Using ufw

# Enable UFW

sudo ufw enable

# Set default deny policy for incoming traffic

sudo ufw default deny incoming
Next, you need to create rules to allow necessary traffic. For example, you may want to allow SSH traffic from specific IP addresses or networks:
# Using ufw

# Allow SSH from specific IP address or network

sudo ufw allow from YOUR_IP_ADDRESS to any port 22

# Replace IP_ADDRESS with the IP address or range you want to allow.
Lastly, you need to regularly review and update rules to ensure they’re still relevant and effective:
# Using ufw

# List current rules

sudo ufw status verboseSimplifying SSH Security with Tailscale
As you can tell, the pursuit of better SSH security can get you tangled in complex configurations, a variety of tools, and ever-changing best practices. While it’s important to understand how to implement SSH security best practices, tools and technologies like Tailscale SSH provide a simpler, more secure way of managing SSH access.
Traditional SSH management often involves intricate manual configuration of key pairs, firewall rules, authentication methods on each server, and constant upkeep, especially in a large-scale environment.
Tailscale SSH lets you quickly set up secure access to your servers without the need for complex configurations. It also comes with built-in security features such as two-factor authentication, rotating SSH keys, and firewall rules.
Tailscale SSH is designed to scale with your needs, whether you’re adding more servers or onboarding new users. It also provides better visibility into access rights and lets you control access at a granular level.
Other Tailscale functionalities that simplify and enhance SSH security include the following:
- Session Recording
Instead of only keeping logs locally, you can have your SSH session logs streamed to another node in your tailnet. This means all your sessions are encrypted from end to end, boosting your security. These recordings are in the asciinema format, creating newline-delimited JSON files for you. You can easily search through them and replay them using either the recorder node’s web UI or the asciinema CLI. But remember, sometimes the terminal display could have sensitive data; be wary of what gets captured.
- Restricted Access
You can use Tailscale to make sure you’re restricting access to recorded logs—especially those on the recorder node’s host disk—to only a handful of trusted individuals. This tight access control ensures that your logs stay untouched and are viewed only by those you’ve granted permission to.
- Log Streaming Integration
Streaming logs in real-time allows you to integrate and stream your logs directly into SIEM systems like Splunk, Elasticsearch Logstash, and Panther. Such integration empowers you to detect security anomalies swiftly and set up timely alerts and monitoring.
- Private Endpoints
Tailscale lets you either publish logs to a host that’s publicly accessible using HTTPS or lean into Tailscale’s secure connectivity by opting for a private host. This flexibility ensures that your logs can be shared confidentially to only reach the right eyes to maximize your data protection.
How Tailscale can help
In this article, you learned some best practices for securing SSH as well as how Tailscale SSH can make your life simpler.
Managing and securing remote access via SSH can be a complex task, but the right knowledge and tools make it more manageable. As you take steps to secure your SSH infrastructure, remember the fundamental principle of security: it’s a journey, not a destination.
Get started with Tailscale for free today - no credit card required.


