
Creating small, trusted networks with your friends, family and coworkers is central to our mission here at Tailscale. In this article we're going to dive deep into using Docker to do just that, with containers.
Why might you want to consider putting Tailscale in a container? By design, containers are isolated execution environments. Access to resources both inside and outside of these container environments must be explicitly granted and managed.
By putting containers directly onto your tailnet (our term for a Tailscale network), you're able to connect these isolated things together no matter the networking topology that stands in your way.
Each container becomes a fully-fledged node on your tailnet, just like any other. This means no reverse proxies. No complex firewall rules or port forwarding. And no matter how bad your NAT situation, Tailscale will traverse it.
This post is also available as a YouTube video, and copies of the files used throughout are available in this GitHub repo. To make the most of this article some familiarity with Docker, Docker Compose, and general networking concepts is advised.
Today we're going to cover adding a container directly to your tailnet with auth keys, and OAuth secrets (and the difference between them), plus how to proxy a web service through Tailscale both locally via Serve and over the public internet via Funnel.
Adding a container to your tailnet
Tailscale offers an official Docker container which provides several parameters we'll need to configure via environment variables. A full list of those variables is provided in our documentation.
There are two primary methods to add a container to your tailnet. Option 1 is to use an auth key, and option 2 is using OAuth secrets—we'll cover both here as they can be useful in different scenarios.
Should I use Auth Keys or OAuth secrets?
Can we just agree that this is a classic "it depends" situation? [editor: no.] Ok, fine.
Before we dig into how to use them, let's figure out which authentication method is right for you. Both methods support a lot of the same things and both will work for many of you. However, there are subtle differences between these two authentication methods which may make or break your use case.
| Auth keys | OAuth clients |
|---|---|
| ✅ Grant full API access | ✅ Limits API access via scopes e.g. dns:read |
| ✅ Maximum lifespan of 90 days | ✅ Never expires |
| ✅ Doesn't require tags | ✅ Requires tags for created nodes |
| ✅ Authenticates the machine as the user who generated the key | ✅ Authenticates nodes via tagOwner tag |
In order to better understand some of the nuance here, let's examine node ownership and tags. When a node is authenticated to your tailnet via tailscale up, the user who logged into the admin console and clicked the generate button owns that node. That ownership manifests as a tag, which is why we refer to them in ACLs as tagOwners. Each node on a tailnet must have an owner, whether it's a user or a tag.
When you use an auth key, the node is added to your tailnet as the user who generated the key. With an OAuth client the node is owned by the tag assigned at secret creation time.
Another crucial difference is token / key expiry. On the face of it, it appears that an auth key will be useless after the maximum 90 day expiry window. However, when an auth key expires it doesn't automatically mean any machine which used it to authenticate to your tailnet is suddenly expired as well—it simply means you can't use that key to add any new nodes, existing ones continue to function until their node keys expire (default is 180 days). Nodes added with an OAuth client never expire.
Now we know some of the nuances involved, let's dig into added a container to your tailnet using these methods.
Using Auth Keys
To use an auth key we need to generate one using the admin console. Navigate to https://login.tailscale.com/admin/settings/keys and select Generate auth key. The most up to date information on generating auth keys and the available parameters can be found in this kb article. The values you select for your auth key will be highly specific to your environment, but for our purposes here let's just use the following to get you started:
- Description:
docker-testing - Reusable:
yes - Expiration:
7 days - Ephemeral:
No - Tags:
tag:container
Note that in order to use a tag, it must first be defined in your Access control policy like so:
"tagOwners": {
	"tag:container": ["autogroup:admin"],
},
If you're feeling adventurous or programmatic is your middle name, we also provide a utility named get-authkey to automate this process.
Once you have an auth key (do not share or lose this, treat it like a password), we want to plug it into our container using TS_AUTHKEY=tskey-auth-123abc... as an environment variable (see below).
It's vitally important that the container is able to persist the Tailscale session state across reboots and recreation events. To do this we need to map /var/lib/tailscale to a volume (see below for an example), and also explicitly configure the path the container will use to store state using the environment variable TS_STATE_DIR=/var/lib/tailscale.
Here's a full example docker compose YAML file showing a minimum viable configuration to get a simple nginx based web server onto your tailnet. When docker compose up is run against this file a node will be added to your tailnet with the name webserver1. All the usual Tailscale goodies like MagicDNS, subnet routing, and access controls via ACLs, are available inside the context of this container. It's just another node on your tailnet, after all.
# compose-authkey.yaml
---
version: "3.7"
services:
  ts-webserver1:
    image: tailscale/tailscale:latest
    hostname: webserver1
    environment:
      - TS_AUTHKEY=tskey-auth-k7TsXC6CNTRL-D9notarealAuthKey2NFQQcUvtP9WJ
      - TS_STATE_DIR=/var/lib/tailscale
    volumes:
      - tailscale-data-webserver1:/var/lib/tailscale
		devices:
      - /dev/net/tun:/dev/net/tun
    cap_add:
      - net_admin
      - sys_module
    restart: unless-stopped
  webserver1:
      image: nginx
      network_mode: service:ts-webserver1
      depends_on:
        - ts-webserver1
volumes:
  tailscale-data-webserver1:
    driver: local
We've deployed a Tailscale docker container alongside an nginx web server container. The network_mode setting on the nginx container routes all traffic for that container via the Tailscale container—this is often referred to as a "sidecar" container. In this fashion we can effectively directly deploy multiple individual services to our tailnet with unique names matching the service. This is a deployment pattern we'll come back to later on in this post, so don't worry if the details don't quite click yet.
One last point on auth keys. There is a common misconception that auth keys aren't useful for long running workloads due to the fact that they have a maximum life span of 90 days. However, if a node comes up tagged then key expiry is automatically disabled. Furthermore, so long as the container is able to persist state, removing the auth key completely (or it expiring) has no impact once the node has joined your tailnet. What will be affected after the auth key expires is the ability to join new nodes to your tailnet without rotating the key.
Using OAuth
OAuth clients provide a framework for delegated and scoped access to the Tailscale API. In other words, unlike an auth key which is fully scoped (i.e., if you have this key you can do anything), OAuth clients allow fine-grained control on the access granted to client. You can get a better idea of the scopes offered in the documentation but we're going to focus on the Auth Keys: Write scope. This limits us to auth key–related actions and we cannot, for example, modify ACLs or DNS on clients authenticated with this token. If the word auditor is in regular use in your vocabulary, then OAuth should be on your radar.
But how does one go about using an OAuth client token with Docker? Instead of using TS_AUTHKEY=tskey-auth-blah we replace that value with our OAuth client secret, and define another environment variable stating our desired tag like TS_EXTRA_ARGS=--advertise-tags=tag:container. Behind the scenes, the Tailscale container will execute tailscale up, recognize this is an OAuth client secret and use that mechanism to automatically generate an auth key for you. The outcome is a container on your tailnet all the same.
To generate an OAuth client token:
- visit https://login.tailscale.com/admin/settings/oauth
- click Generate OAuth client
- fill out the description
- select
Auth Keys: Write- (note
Auth Keys: Readwill be automatically selected too)
- (note
- select an appropriate tag
- in our example we created the tag
container - as in the auth key section you must have already defined an ACL tag before this step in your ACLs
- in our example we created the tag
- then it's time to Generate Client
The Client ID is not important for our purposes, nor is it particularly sensitive. The Client secret however, should be treated like a password - it is a secret after all. This key is only shown once and cannot be rotated. To rotate a OAuth client secret you must revoke and recreate a new one.
Here's the same example from above but configured to use OAuth instead of auth keys:
# compose-oauth.yaml
---
version: "3.7"
services:
  ts-webserver2:
    image: tailscale/tailscale:latest
    hostname: webserver2
    environment:
      - TS_AUTHKEY=tskey-client-kXGGbs6CNTRL-wXGXnotarealsecret1U3aeeaj
      - TS_EXTRA_ARGS=--advertise-tags=tag:container
      - TS_STATE_DIR=/var/lib/tailscale
    volumes:
      - tailscale-data-webserver2:/var/lib/tailscale
		devices:
      - /dev/net/tun:/dev/net/tun
    cap_add:
      - net_admin
      - sys_module
    restart: unless-stopped
  webserver2:
      image: nginx
      network_mode: service:ts-webserver2
      depends_on:
        - ts-webserver2
volumes:
  tailscale-data-webserver2:
    driver: local
As was the case in our previous auth key example, this compose snippet will create a container and join it to your tailnet automatically with the hostname webserver2. We're also creating that same nginx web server, which proxies all its traffic via the Tailscale container thanks to the network_mode: service:ts-webserver2 parameter.
Those of you paying attention might notice that by default an OAuth client authenticated node is marked as ephemeral. In other words as soon as you stop the container (or very soon after), it is removed from your tailnet altogether. This might be really handy if it's a temporary thing like a CI build but for other services we want more permanence. To this end, append the argument ?ephemeral=false to TS_AUTHKEY in the form TS_AUTHKEY=tskey-client-kXGGbs6CNTRL-wXGXnotarealsecret1U3aeeaj?ephemeral=false. Our documentation includes information about the other arguments available.
Service linking
Now we know how to join a container to your tailnet, let's take a look at the mechanics of what linking a sidecar container to your service is actually doing. Documentation from Docker on what exactly network_mode: service: <service-name> does is a little sparse—see its section on container networks and network_mode in particular. However, we can examine what's going on for ourselves easily enough.
Here is an example docker compose file which instantiates a web service container, and a Tailscale container acting as a sidecar proxy to the web service.
---
version: "3.7"
services:
  ts-nginx-test:
    image: tailscale/tailscale:latest
    container_name: ts-nginx-test
    hostname: nginx-test
    environment:
      - TS_AUTHKEY=tskey-auth-kvt6L96CNTRL-SnotarealkeyTUxNkuuYb14d
      - TS_STATE_DIR=/var/lib/tailscale
    volumes:
      - ${PWD}/ts-nginx-test/state:/var/lib/tailscale
		devices:
      - /dev/net/tun:/dev/net/tun
    cap_add:
      - net_admin
      - sys_module
    restart: unless-stopped
  nginx-test:
    image: nginx
    network_mode: service:ts-nginx-test  # <-- this is where the magic happens

volumes:
  ts-alpine:
    driver: local
The end result is that we can visit http://nginx-test in our browser and reach the nginx service hello world web page. If we execute curl http://nginx-test from another node on our tailnet, we receive a response showing that traffic is flowing through the sidecar container to the underlying nginx container. There are no ports mapped to the host from either container, nor any other method of data ingress or egress except via Tailscale.
# curl http://nginx-test
<html>
<h1>Welcome to nginx!</h1>
<p>If you see this page, the nginx web server is successfully installed and
working. Further configuration is required.</p>
</html>
A freshly created Tailscale container which has been joined to a tailnet, but not linked up with another service isn't really doing much. If we try to connect that container with curl http://nginx-test from another node on our tailnet, as expected, nothing happens—note the DNS resolution is working, there's just nothing to answer the request that came in.
# curl http://nginx-test
curl: (7) Failed to connect to nginx-test port 80 after 187 ms: Couldn't connect to server
If we use docker exec to run a command inside the container, we can see that there are a handful of outbound tailscaled connections on ports 80 and 443, these are to the Tailscale DERP servers and are part of the NAT traversal process that makes Tailscale feel like magic.
# user@ubusrv2204:~$ docker exec -it ts-nginx-test netstat -pant
Active Internet connections (servers and established)
Proto Recv-Q Send-Q Local Address           Foreign Address         State       PID/Program name
tcp        0      0 0.0.0.0:52382           0.0.0.0:*               LISTEN      10/tailscaled
tcp        0      0 172.21.0.3:40436        3.125.149.81:80         ESTABLISHED 10/tailscaled
tcp        0      0 172.21.0.3:46754        54.161.152.147:443      ESTABLISHED 10/tailscaled
tcp        0      0 172.21.0.3:49334        199.38.182.118:443      ESTABLISHED 10/tailscaled
But as soon as we add network_mode: service:ts-nginx-test to our nginx web service container, we get a much longer list of processes. Interestingly on 127.0.0.1 there is an unnamed process bound to port 80/tcp. That's our nginx server! By linking these containers together using network_mode we are merging the containers network namespaces together inside the Linux kernel. In practice this means that these processes appear as if they are inside the Tailscale container, even though they are not running in it. Containers are cool OK?
# user@ubusrv2204:~$ docker exec -it ts-nginx-test netstat -pant
Active Internet connections (servers and established)
Proto Recv-Q Send-Q Local Address           Foreign Address         State       PID/Program name
tcp        0      0 0.0.0.0:80              0.0.0.0:*               LISTEN      -
tcp        0      0 0.0.0.0:52382           0.0.0.0:*               LISTEN      12/tailscaled
tcp        0      0 127.0.0.11:43379        0.0.0.0:*               LISTEN      -
tcp        0      0 127.0.0.1:45072         127.0.0.1:80            ESTABLISHED 12/tailscaled
tcp        0      0 127.0.0.1:45084         127.0.0.1:80            ESTABLISHED 12/tailscaled
tcp        0      0 127.0.0.1:80            127.0.0.1:45072         ESTABLISHED -
tcp        0      0 172.21.0.2:46468        199.38.181.93:443       ESTABLISHED 12/tailscaled
tcp        0      0 172.21.0.2:60662        3.124.108.117:80        ESTABLISHED 12/tailscaled
tcp        0      0 172.21.0.2:48084        54.161.152.147:443      ESTABLISHED 12/tailscaled
tcp        0      0 127.0.0.1:80            127.0.0.1:45084         ESTABLISHED -
tcp        0      0 :::80                   :::*                    LISTEN      -
The same rules apply here as normal to any kind of interface port binding situation in so much that you may only have one service per port. We'll discuss a kind of workaround to this later if you'd like to only run one Tailscale container for some reason. The resource requirements per sidecar container are minimal, consuming typically less than 20mb of memory each. Therefore we recommend one sidecar container per service.
Remote access
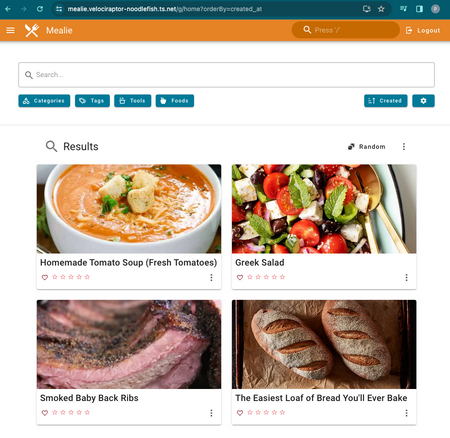
With the above example if your container has a web service running on port 80, it will just work. But in the real world services run on all sorts of ports such as the excellent, and freely available self-hosted recipes app, Mealie which runs on port 9000 by default. And what if we wanted to make these services available outside of your tailnet on the public internet? Enter Tailscale Serve and Funnel. We've covered them in some detail in this Tailscale Explained video.
Allow me to get a little excitable for a moment, and come with me as we imagine a future where your entire family's secret recipes are digitized and accessible by the whole family, no matter where that information lives! I can't tell you the number of times I've texted my mum for that special way she does potatoes or lost track of how I smoked a brisket successfully last time out. By putting apps on your tailnet, they are securely accessible only by people you trust and explicitly allow. No more port forwarding, dynamic IP addresses, or firewall rules. And thanks to the way Tailscale performs NAT punching each remote client is almost always able to establish a direct connection to your service without being relayed through any kind of proxy.
We're going to use Tailscale Serve and Funnel to expose this app to your tailnet and then the public internet. Here's the full docker compose YAML file we'll be using throughout the rest of this section. Mealie exposes many more environment variables but this config will suffice for our needs. Obviously you can substitute any other self-hosted application or service in the place of Mealie here, but remember that one Tailscale sidecar container per service is recommended for best results.
---
version: "3.7"
services:
  ts-mealie:
    image: tailscale/tailscale:latest
    container_name: ts-mealie
    hostname: mealie
    environment:
      - TS_AUTHKEY=tskey-client-kvtJAbRNotARealKey4d?ephemeral=false
      - TS_EXTRA_ARGS=--advertise-tags=tag:container
      - TS_SERVE_CONFIG=/config/mealie.json
      - TS_STATE_DIR=/var/lib/tailscale
    volumes:
      - ${PWD}/ts-mealie/state:/var/lib/tailscale
      - ${PWD}/ts-mealie/config:/config
		devices:
      - /dev/net/tun:/dev/net/tun
    cap_add:
      - net_admin
      - sys_module
    restart: unless-stopped
  mealie:
    image: ghcr.io/mealie-recipes/mealie:v1.0.0
    container_name: mealie
    network_mode: service:ts-mealie
    depends_on:
      - ts-mealie
    volumes:
      - mealie-data:/app/data/
    environment:
      - ALLOW_SIGNUP=true
    restart: unless-stopped

volumes:
  mealie-data:
    driver: local
  ts-mealie:
    driver: local
Place the contents above into a YAML file (our VSCode extension works really well for this!) in a separate directory named compose.yaml. If you don't yet have Docker installed on your host, you can follow these quickstart directions to get going.
Tailnet prerequisites
In order to proceed we'll need to ensure a few things are in order.
- MagicDNS is enabled for your tailnet. This can be found under the DNS section of your admin console. If you are so inclined, you might also want to roll the dice on our tailnet name generator to make your DNS names more fun!
- If you intend to use Funnel, you'll need to enable in your access controls as per this kb article.
- Notably make sure that your
nodeAttrsare configured to allow the Tailscale sidecar proxy container to allow Funnel traffic. You will only know the IP of the container doing this after you create it.
- Notably make sure that your
- Enable HTTPS under the DNS section of your admin console
Configuring Serve and Funnel
Next we're going to need to tell Serve and funnel how to proxy the traffic for our Mealie application. We do this by specifying the environment variable TS_SERVE_CONFIG=/config/mealie.json and putting a JSON file in the file path we specified in our volumes: section for the same parameter. For example, we're using the container internal file path /config/mealie.json mapped to ${PWD}/ts-mealie/config on the host. ${PWD} is a fancy way of writing "the directory you're currently working in"—this path should ideally be an absolute path not a relative one. This path must also be a directory and not an individual file mount, otherwise changes made to the serve configuration will not be automatically detected by fsnotify, the tool we use to detect changes to config files in real-time.
You might be wondering how you go about figuring out what the contents of that JSON file need to look like. The first option is easy—copy what's below and modify to your needs. The second option involves manually configuring Serve and Funnel manually and the printing out the resulting configuration with tailscale serve status -json. I'll leave the details of this as an exercise for the reader. For most people, copying what is below should suffice with only minor tweaks required.
# tailscale serve status -json
{
  "TCP": {
    "443": {
      "HTTPS": true
    }
  },
  "Web": {
    "mealie.auto-generated.ts.net:443": {
      "Handlers": {
        "/": {
          "Proxy": "http://127.0.0.1:9000"
        }
      }
    }
  },
  "AllowFunnel": {
    "mealie.auto-generated.ts.net:443": true
  }
}
This is all fine if you are comfortable hardcoding the DNS name for your application and tailnet into a configuration file, but that's not the best idea long term. What if the tailnet name changes? Or you rename the app? Or don't want to have to manually update a bunch of configuration files all the time. Well, in the immortal words of Professor Farnsworth: "Good news everyone!" We have a solution for that.
Simply replace any hardcoded tailnet related values with ${TS_CERT_DOMAIN} and on startup, the Tailscale sidecar proxy container will do all the heavy lifting of substituting those values as required. Your service will be available at mealie.auto-generated.ts.net as if by magic.
{
  "TCP": {
    "443": {
      "HTTPS": true
    }
  },
  "Web": {
    "${TS_CERT_DOMAIN}:443": {
      "Handlers": {
        "/": {
          "Proxy": "http://127.0.0.1:9000"
        }
      }
    }
  },
  "AllowFunnel": {
    "${TS_CERT_DOMAIN}:443": false
  }
}
Breaking down the syntax of this configuration file, we are proxying http://127.0.0.1:9000 any time a request to the root of the domain (signified with /) is received. In other words I type mealie.auto-genereated.ts.net into my browser, the request is routed to the sidecar proxy which matches the traffic as a request for the root and returns the contents of the service running at http://127.0.0.1:9000 to the requestor.
Need to expose the app to the internet? You should make that decision carefully, but then it's simple. Set the value of AllowFunnel to true and after a few seconds anyone on the internet will be able to reach the service.
Running the app
Took us a while to get here didn't it? Phew. I'm glad you're still here. Running the app is the easy bit, thankfully. On your Docker host, execute docker compose up -d followed by docker compose logs -f to follow the log output of the new containers just incase there are an issues with Tailscale authentication (a copy paste or formatting error, or expired keys are the most common problems here).
mealie | INFO: Uvicorn running on http://0.0.0.0:9000 (Press CTRL+C to quit)
Wait for the line in the logs and the check your Tailscale admin dashboard. Run docker exec -it ts-mealie tailscale status to print the current tailnet status. This command executes inside the context of the ts-mealie container we just created so what it prints out here is the world view as the container sees it.
# docker exec -it ts-mealie tailscale status
100.71.14.42    mealie               mealie.velociraptor-noodlefish.ts.net linux   -
100.96.138.32   docker-host          atailandscales@ linux   -
100.99.182.58   opnsense-101         atailandscales@ freebsd -
Recap
And voila! We have our self-hosted recipes app running natively on our tailnet with a valid HTTPS certificate, available both internally to other tailnet devices and externally if you are using Funnel.
This approach scales to multiple containers, operating systems, network architectures, and more. And with things like being able to now choose your own IP you should have more than enough flexibility to meet any of your needs in the containerization space.
If you're already a regular user of Tailscale and Docker we'd love to hear from you on how you're using it so that we can make it even better in the future. We have big plans but need your help finalizing what's most important. Let us know! Thanks for reading.
 Alex Kretzschmar


