
Benefits and Drawbacks of Using a Jumpbox to Access a Remote Server
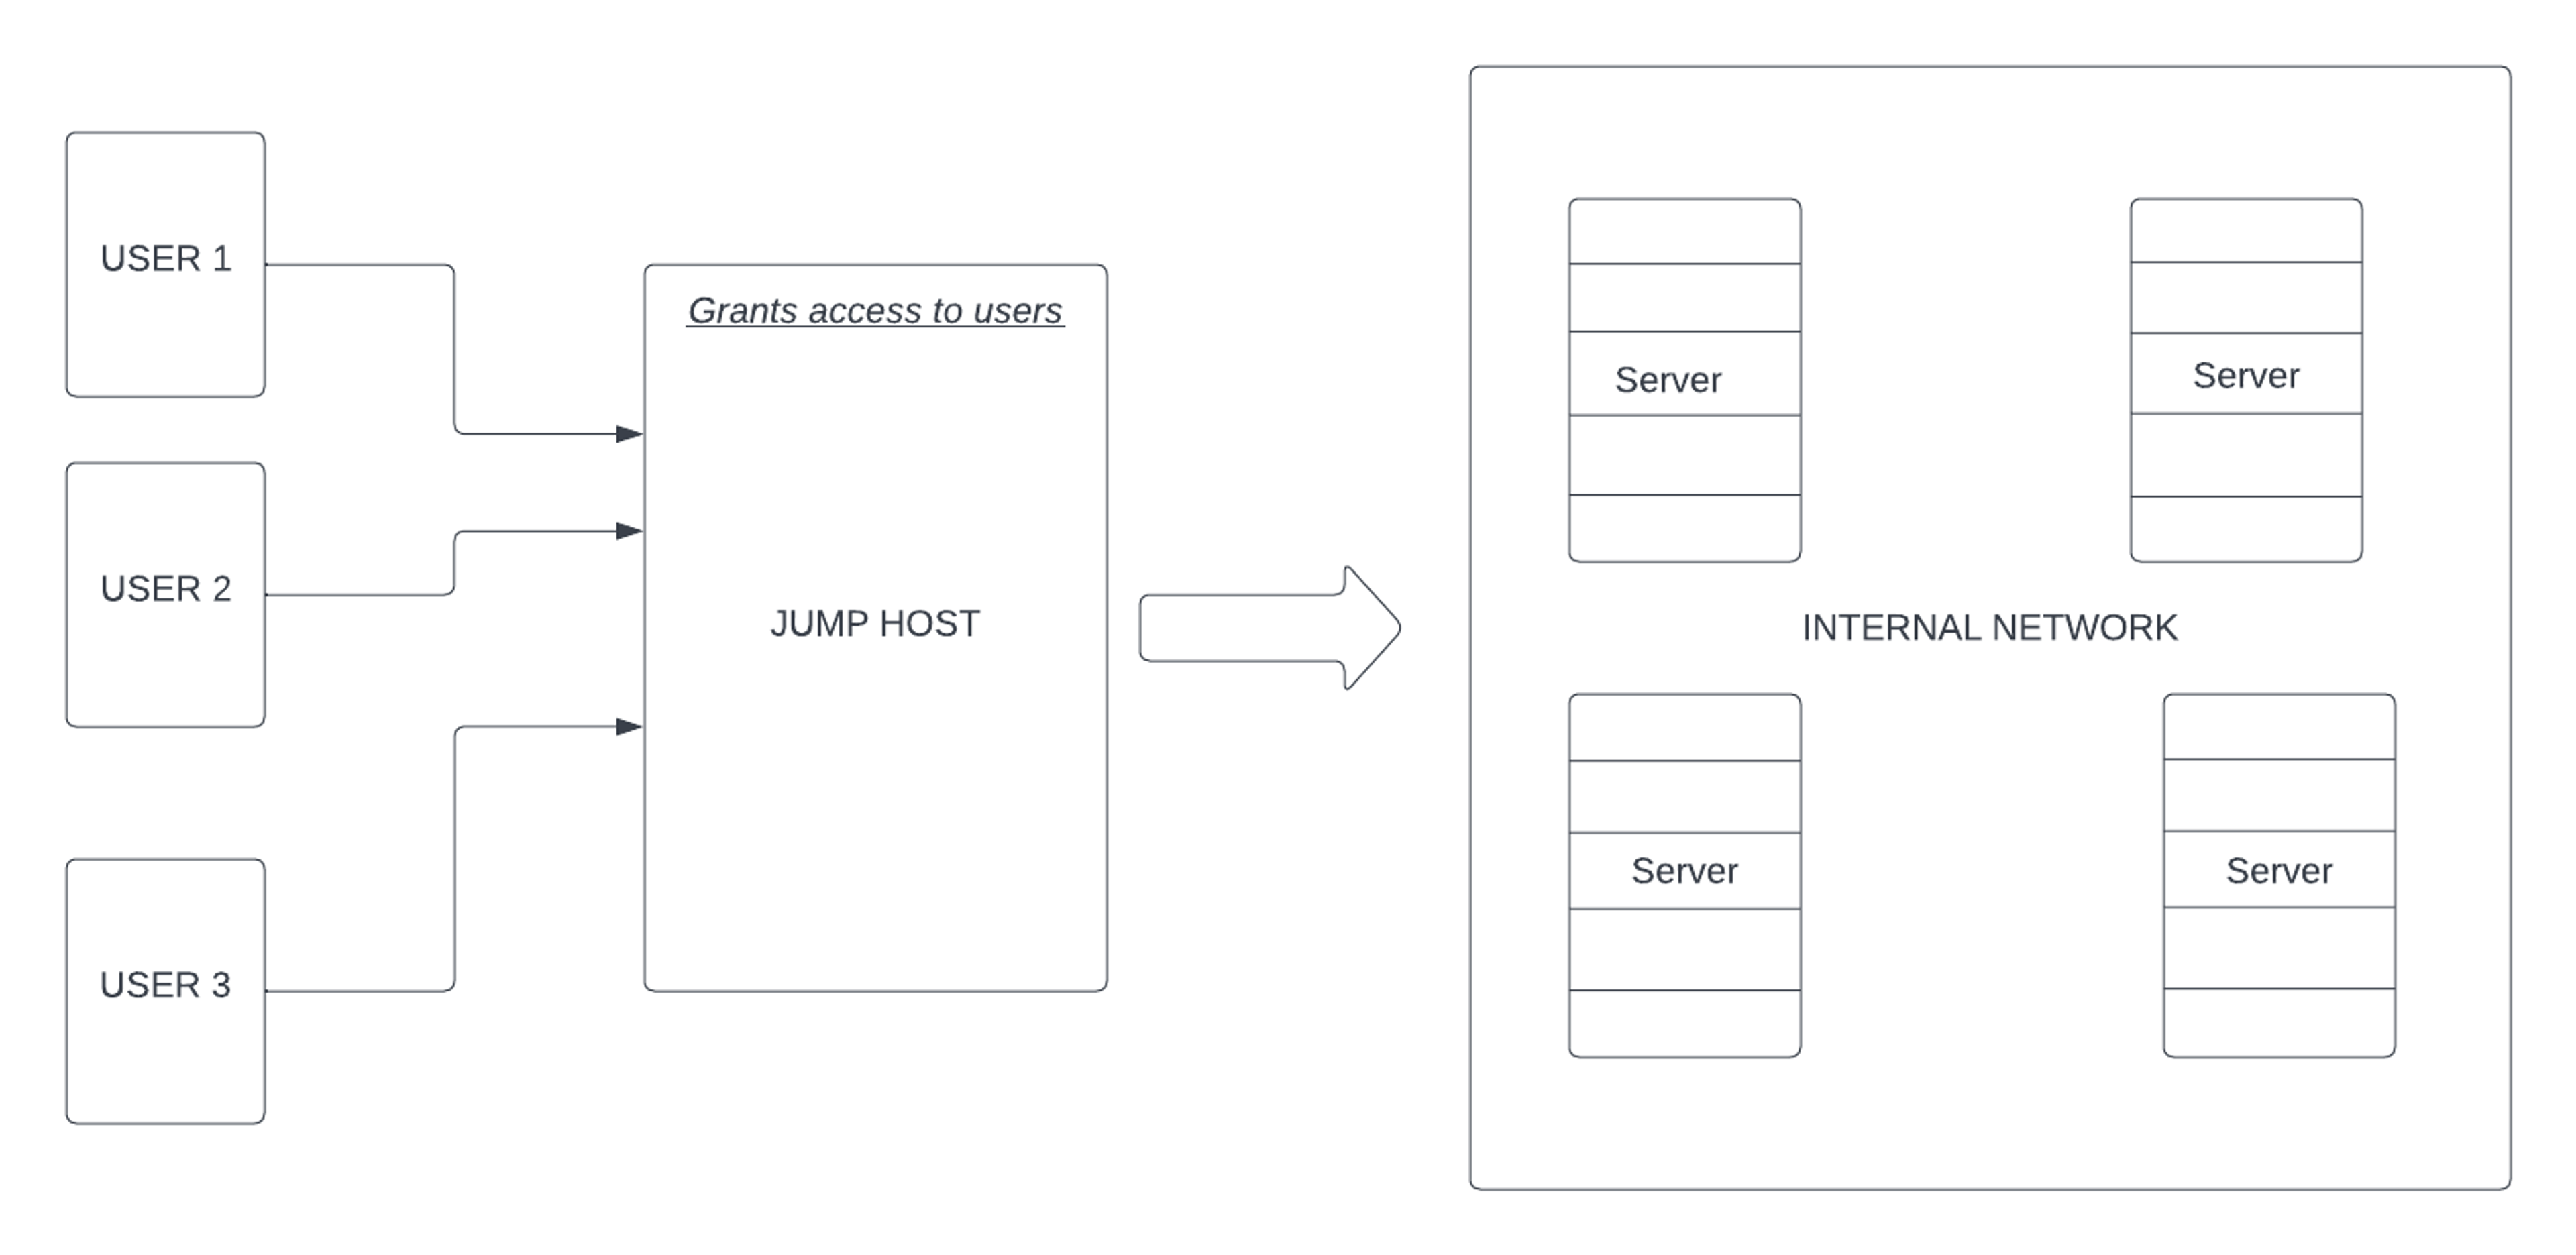
A jump host, also known as a jumpbox or jump server, grants authorized users access to a remote network, allowing them to troubleshoot and manage devices within the LAN.
What is a Jumpbox?
A jump host, also known as a jumpbox or jump server, is a network device or virtual machine that acts as an intermediary to a remote network. It grants authorized users access to a remote network, allowing them to troubleshoot and manage devices within the LAN without needing to send a technician on-site.
In this article, you’ll learn what a jumpbox is and what it's used for as well as how to implement remote access to another server through the Secure Shell protocol (SSH), Remote Desktop Protocol (RDP), and Tailscale. You’ll also learn about the pros and cons of each implementation of remote access to a server.
A jumpbox acts like a gate between two trusted networks: You can access a destination server, but only after the jump host has allowed access.
Jumpbox are security-hardened machines that act as an entry point to more-secured servers to allow for access from a less-secure zone. These jumpboxes facilitate authorized user access between different security zones, providing enhanced control and visibility.
The user can then move from the secure jump zone to more-secured servers in an application’s internal network. For example, an employee might log in to company servers from their work laptop, but they must verify their identity on a different server (the jumpbox) before being granted access to the private network.
Note: If you’re using a jumpbox, make sure that you’re not allowing access to your applications based solely on authentication and authorization at the jumpbox. That is a traditional network perimeter model, where all applications are made accessible to those on the network without additional application-specific controls.
If you’re progressing toward a zero trust architecture, using a jumpbox alone for application access can be a stepping stone, but that shouldn’t be the final state of your network perimeter. You should be using the identity of the user instead of just the IP address of the user.
Security Benefits When Using a Jumpbox
As a single point of entry to your private network, a jumpbox reduces the size of any potential attack surface.
Another benefit is that it makes it easier to have an aggregated audit log of all entry connections to a network. The jump host can provide improved security and accountability by consolidating user activities through a single entry point.
Securely Implementing Remote Access
There are several ways to securely set up remote server access. This section will look at how to implement remote access using SSH, RDP, and Tailscale.
SSH
The Secure Shell protocol (SSH) is a network protocol that allows two computers to communicate securely over an unsecured network. The most commonly implemented software stack for the SSH protocol is OpenSSH, which comes bundled with most Linux distributions. SSH is widely used by system administrators to manage applications remotely, send files, and log in to another computer over a network. A jump host can be used to enable remote SSH access to internal servers.
Tailscale offers its own native SSH server support with Tailscale SSH. You can use this and Tailscale Access Control Lists (ACLs) to create jump hosts and more with minimal administrative effort.
There are many ways to secure SSH connections. At the most basic level, usernames and passwords can be used, but a more common and secure option is to use SSH keys to authenticate the client with the server. SSH keys need to be generated and distributed between the clients, servers, and jump hosts that will use them. To learn more, see guides such as this one.
Here are a few options for setting up SSH remote server access through a jump host.
Set up SSH keys
SSH key-based authentication lets users authenticate to SSH servers without needing to use a password. It uses a cryptographic key pair to authenticate with the remote server. To set this up, start by generating an SSH key pair on your laptop with the ssh-keygen command:
ssh-keygen -t ed25519Press Enter to use the default path, then enter in a passphrase for your SSH key. This should be a little bit longer than a password. Store this passphrase in your password manager. Enter it in again.
Once you have generated your key, you start an SSH agent to keep your key in memory. You can use an SSH agent to avoid having to type your SSH key passphrase every time you want to use that key. To start an SSH agent, run this command:
eval $(ssh-agent -s)Next, add your key to the agent with this command:
ssh-add ~/.ssh/id_ed25519Then, copy your SSH key to the target hosts. You can use commands such as ssh-copy-id to do this, but realistically you should use configuration management to propagate this across your cluster.
Manual logins
Another way to set up SSH remote service access through a jump host is to manually log in to each host to make sure it’s reachable. Suppose the jump host is located at jump_gateway, and the destination server is located at destination. You would first use SSH to access the jump host, and from the jump host, use SSH to access the destination server:
user@host:~$ ssh -A user@jump_gateway
user@jump_gateway:~$ ssh user@destination
user@destination:~$
The -J option
In this example, the jump server and destination server are specified in a single command using the -J option. The -J option connects to the jump host, user@jump_gateway, by making an SSH connection, then forwards a connection to the destination server, user@destination:
user@host:~$ ssh -A -J user@jump_gateway user@destination
user@destination:~$
You can also use the -J option to make jumps over multiple jump servers before landing on the destination server, as seen in the code below:
ssh -J user@jump_host1,user@jump_host2:port user@destinationConfig files
To avoid typing the -J option all the time, you can update the SSH configuration on your originating machine to use the ProxyJump option. Create the .ssh directory if it does not exist, and create a file called config in the .ssh directory by running:
mkdir -p ~/.ssh && chmod 700 ~/.ssh
touch ~/.ssh/config
chmod 600 ~/.ssh/config
Next, you’ll need to add the following code, or something similar, to .ssh/config:
Host host_dest
        User susan
        Hostname 192.168.1.32
        ProxyJump susan@jump_gateway
        ForwardAgent yes
In the code above, the ProxyJump section inlines the -J option that was previously manually specified. Save and close the file.
To jump from the originating client to the destination IP through a jump IP, issue the command ssh host_dest. This will establish a connection to jump_gateway, which will then forward it to the destination host, host_dest.
To tighten security on the jump server, it’s a good idea to edit the server configuration to disable interactive SSH sessions on the jump servers for non-administrators. This can be done by updating sshd.config in /etc/ssh/sshd_config:
PermitTTY no
X11Forwarding no
PermitTunnel no
GatewayPorts no
ForceCommand /sbin/nologin
Additionally, remove (or comment out) any lines that begin with Subsystem to disable features such as scp and sftp.
Minimizing security concerns
To limit potential security issues when using a jump host for remote SSH access, there are some best practices to follow:
- When dealing with remote access to a jump server, it’s best to have a dedicated jump server — one that doesn’t host any other publicly accessible software.
- Don’t allow users to log in to a jump server directly. This could allow them to change the configuration of the jump server, use the host for other tasks, or make copies of keys used to access the destination servers, compromising security of all the destination servers.
- Change the default TCP port on the SSH jump server from
22to something else, because automated exploits by attackers usually target the default port when they are scanning for SSH servers to get into. - Rotate SSH keys.
- Prohibit SSH log in, and ban hosts that cause multiple authentication errors.
- Add port knocking as a way to prevent port scanners from detecting services on your box.
Things to keep in mind
The benefit of using an SSH jump host is that it’s fast and easy to set up, but it has some substantial drawbacks. SSH best practices such as rotating user keys quickly become difficult to manage, especially while dealing with multiple machines. Additionally, SSH doesn’t force users to rotate keys, which can make your network vulnerable if SSH keys are stolen or compromised — which is a major concern, because SSH private keys are often stored as normal files, making them easy to copy. There are also latency issues, especially if the jump host is in a different location than the destination server.
Remote Desktop Protocol
To follow this tutorial, you’ll need access to a computer running Windows Server and an SSL certificate. The SSL certificate could be self-signed or purchased.
The Remote Desktop Protocol (RDP) is a protocol developed by Microsoft for connecting to another computer over a network connection. The user uses the RDP graphical user interface client for the connection. However, the destination computer must run an RDP server. You need to allow RDP connections on the destination computer and connect to it using an RDP client. Generally speaking, if you lease a remote Windows server, the provider gives you the password for an RDP connection, so you don’t need to take any additional actions to use RDP.
In the context of implementing access to servers using an RDP jump host, the Remote Desktop Gateway (RD Gateway) can be used to set up secure remote access to a server using RDP. The Remote Desktop Gateway is a server that filters RDP connections from external resources. It uses RDP to allow access to network resources by boosting security through encrypted HTTPS connections, effectively acting as a jump host.
Use Remote Desktop Gateway to implement remote server access with RDP with the following steps.
Install RD Gateway
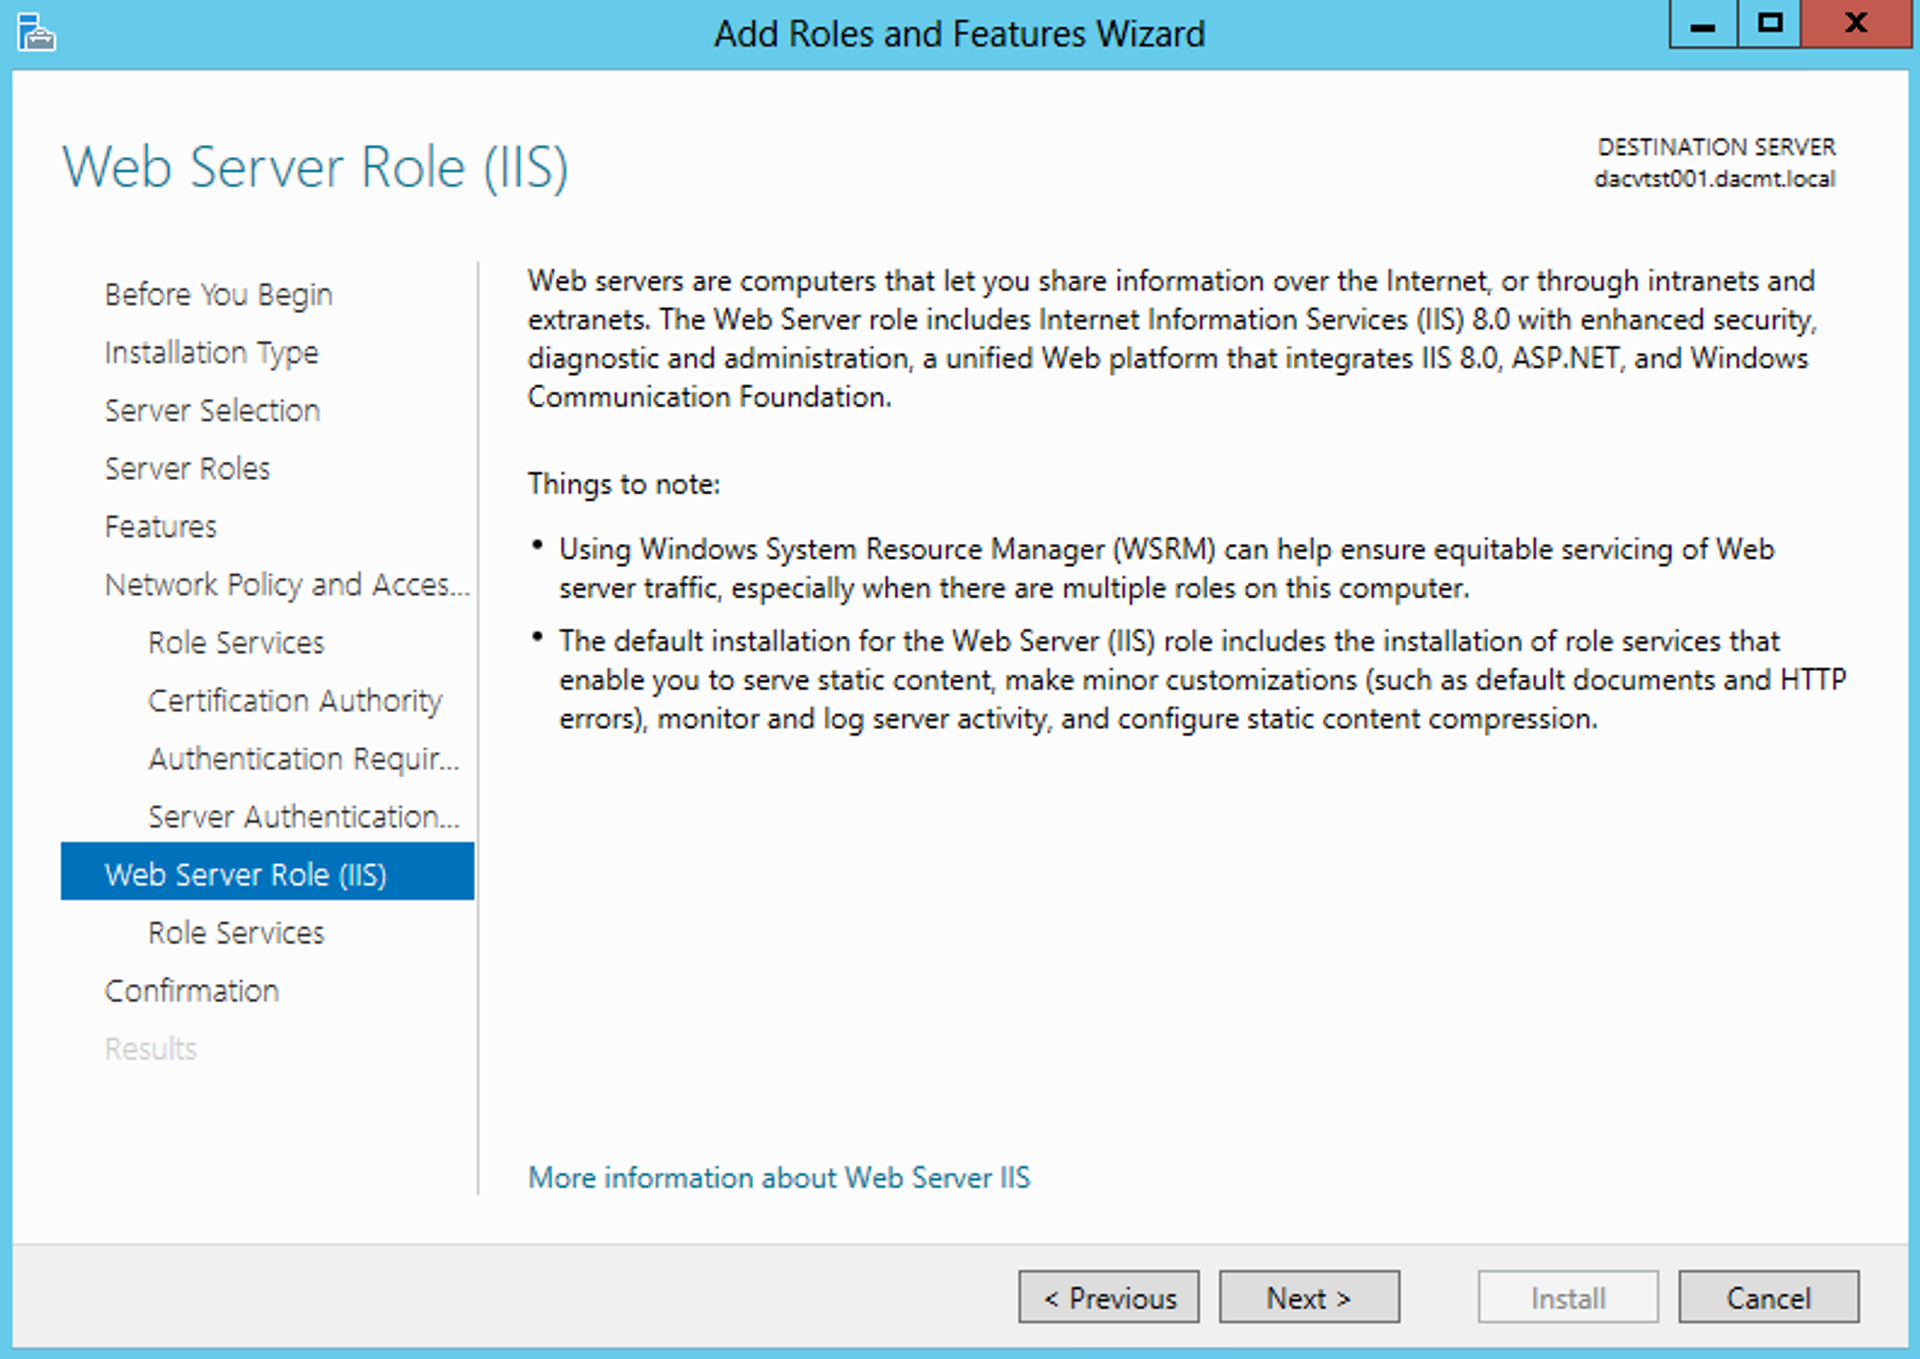
On Windows Server Manager, head to the Remote Desktop Services section, then navigate to Add Roles and Features Wizard, then click Next. Choose Role-based or feature-based installation, then Next again. On the next screen, select a server from the server list, then go to the next screen, select Remote Desktop Services, and click Next. Use the wizard to install the Remote Desktop Gateway Role service by selecting Remote Desktop Gateway, then clicking Next.

The next screen asks if you want to add features that are required for Remote Desktop. Click the Add Features button. Continue selecting Next to install Network Policy and Access Services and Web Server Role (IIS), accepting the default settings for all pages. Finally, click Install.

Create the CAP and RAP policy
Navigate to the Remote Server Manager, go to Tools > Remote Desktop Services and select Remote Desktop Gateway Manager. In the left sidebar, click the server and navigate to Policies > Connection Authorization Policies. From the Actions pane on the right, click Create New Policy. Select Create a RD CAP and RAP policy, then click Next.
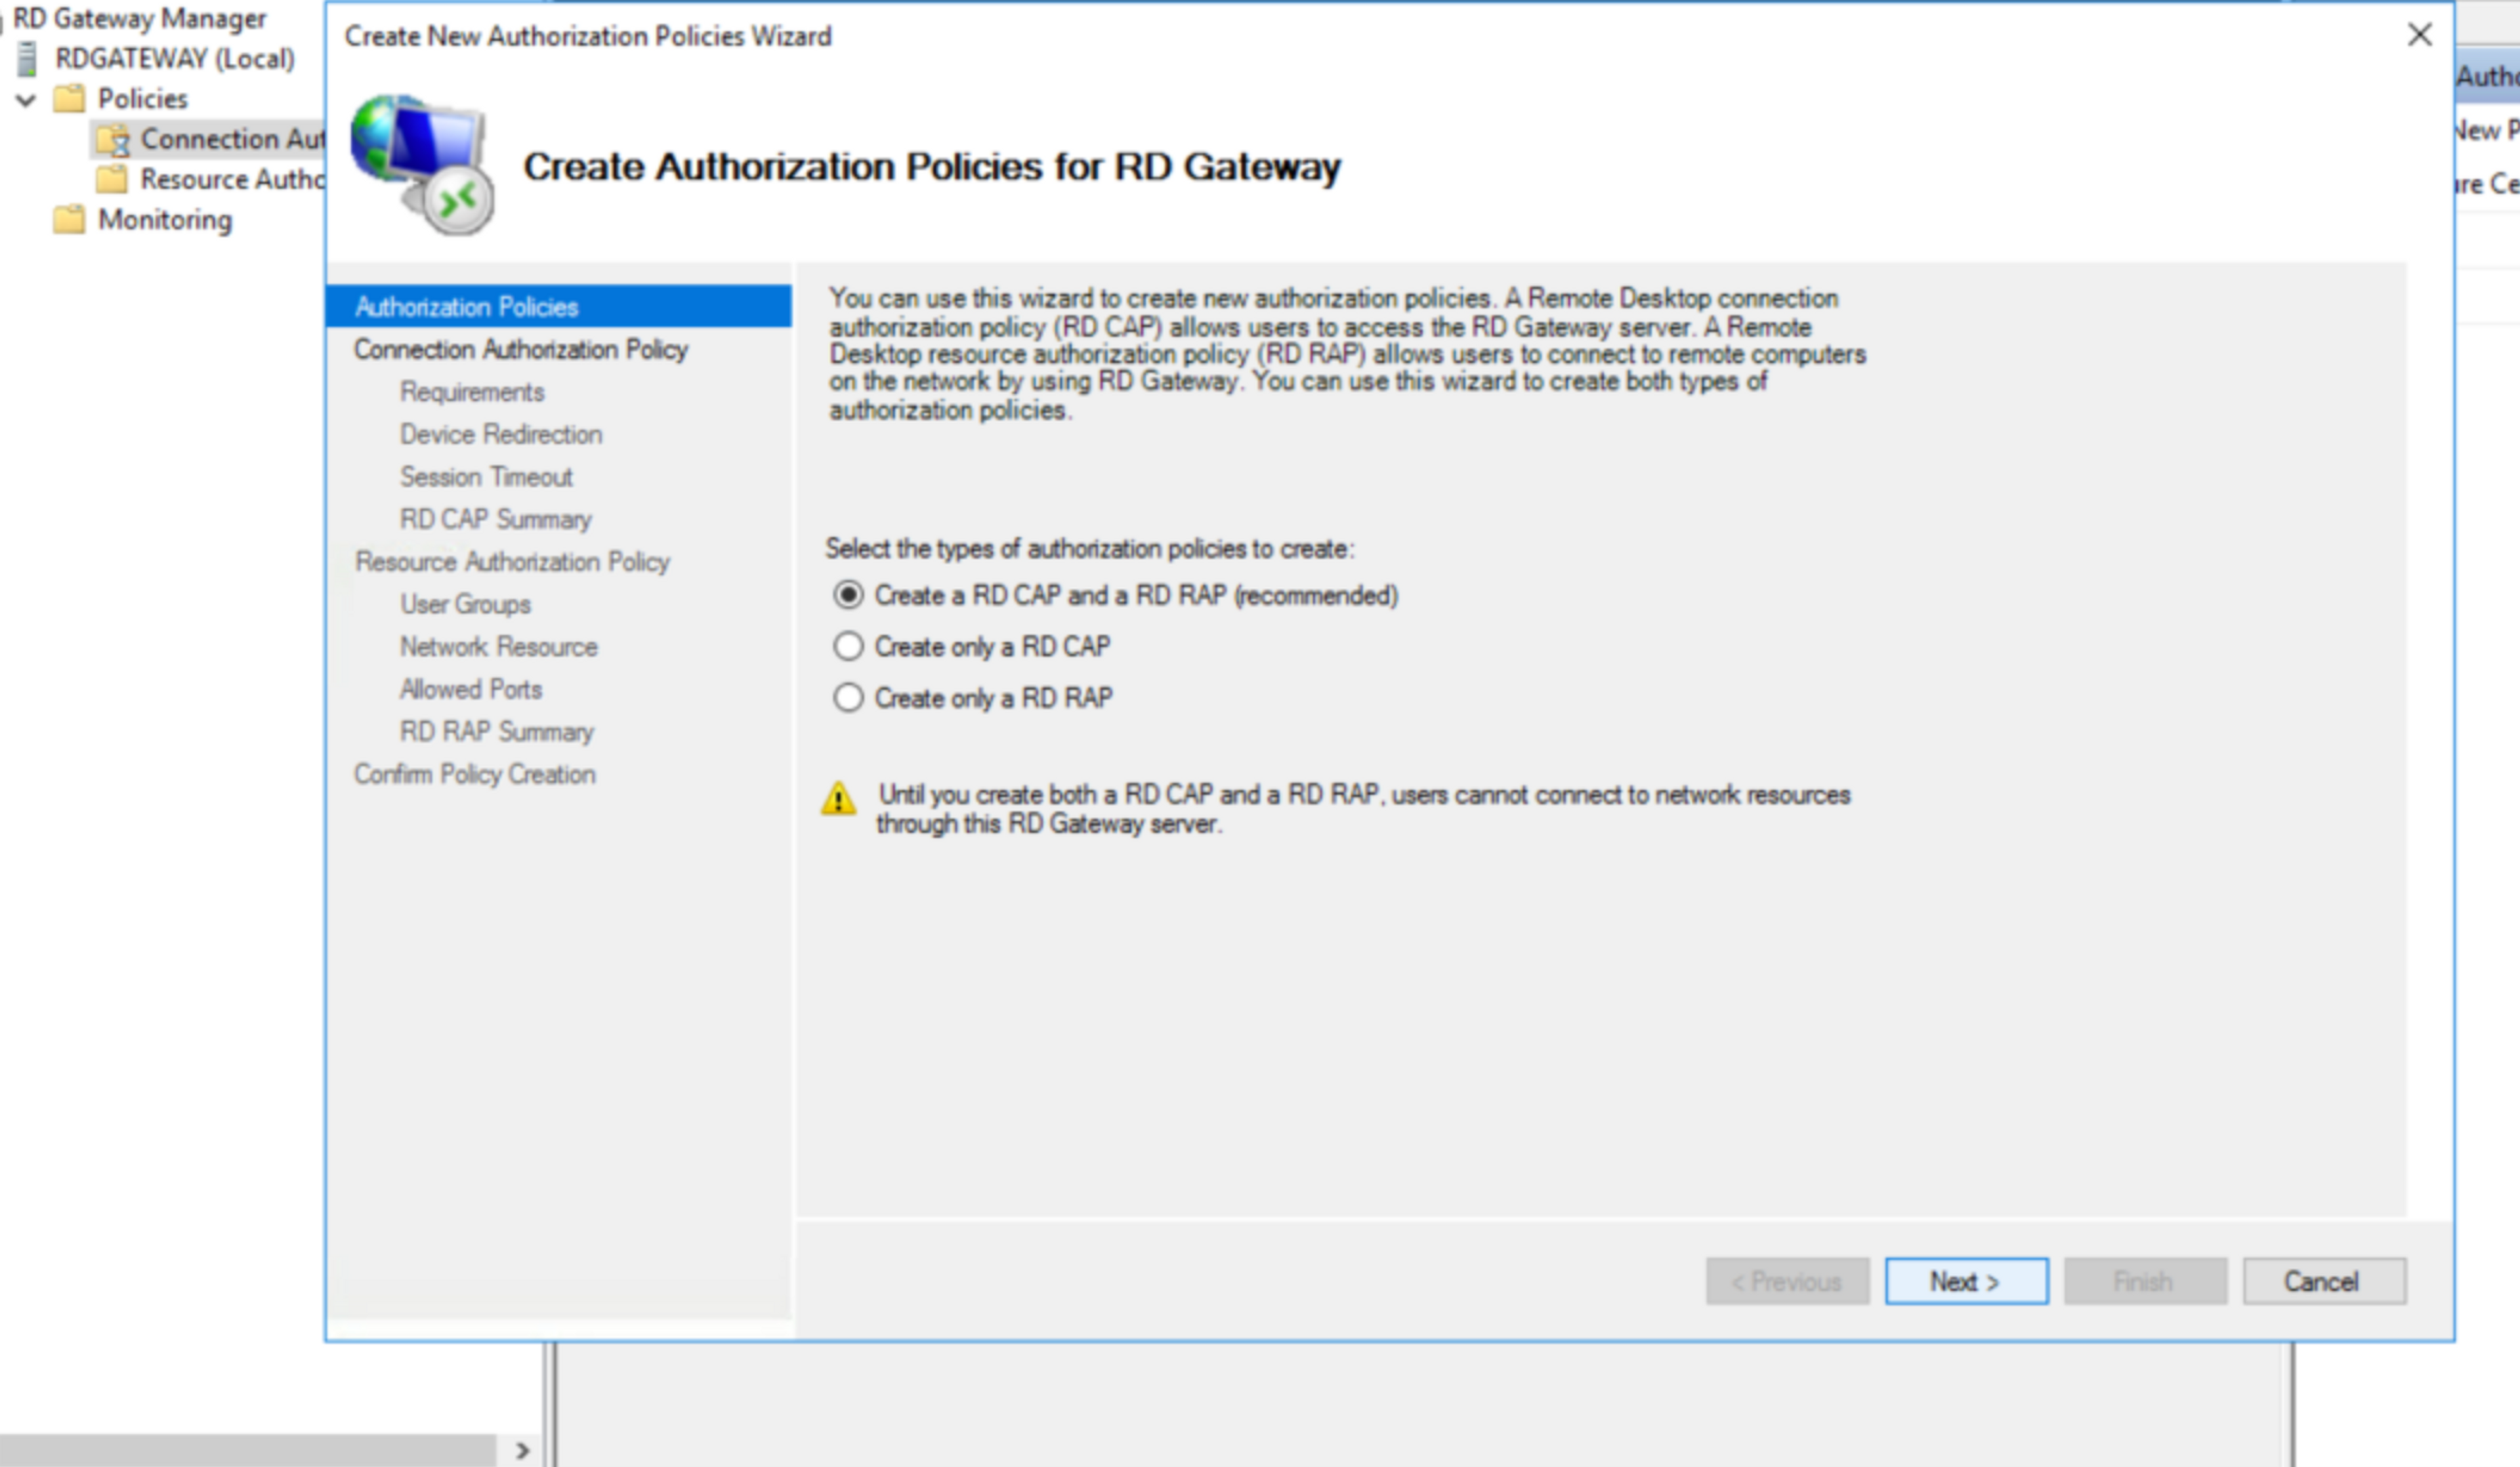
Add a name for the connections authorization policy (CAP). Click Add Group, and select the user group you want to give access to RD Gateway. Next, select Resource Authorization Policy (RAP) on the sidebar. Add a policy name, and select the user groups that are allowed to access servers on the network remotely.
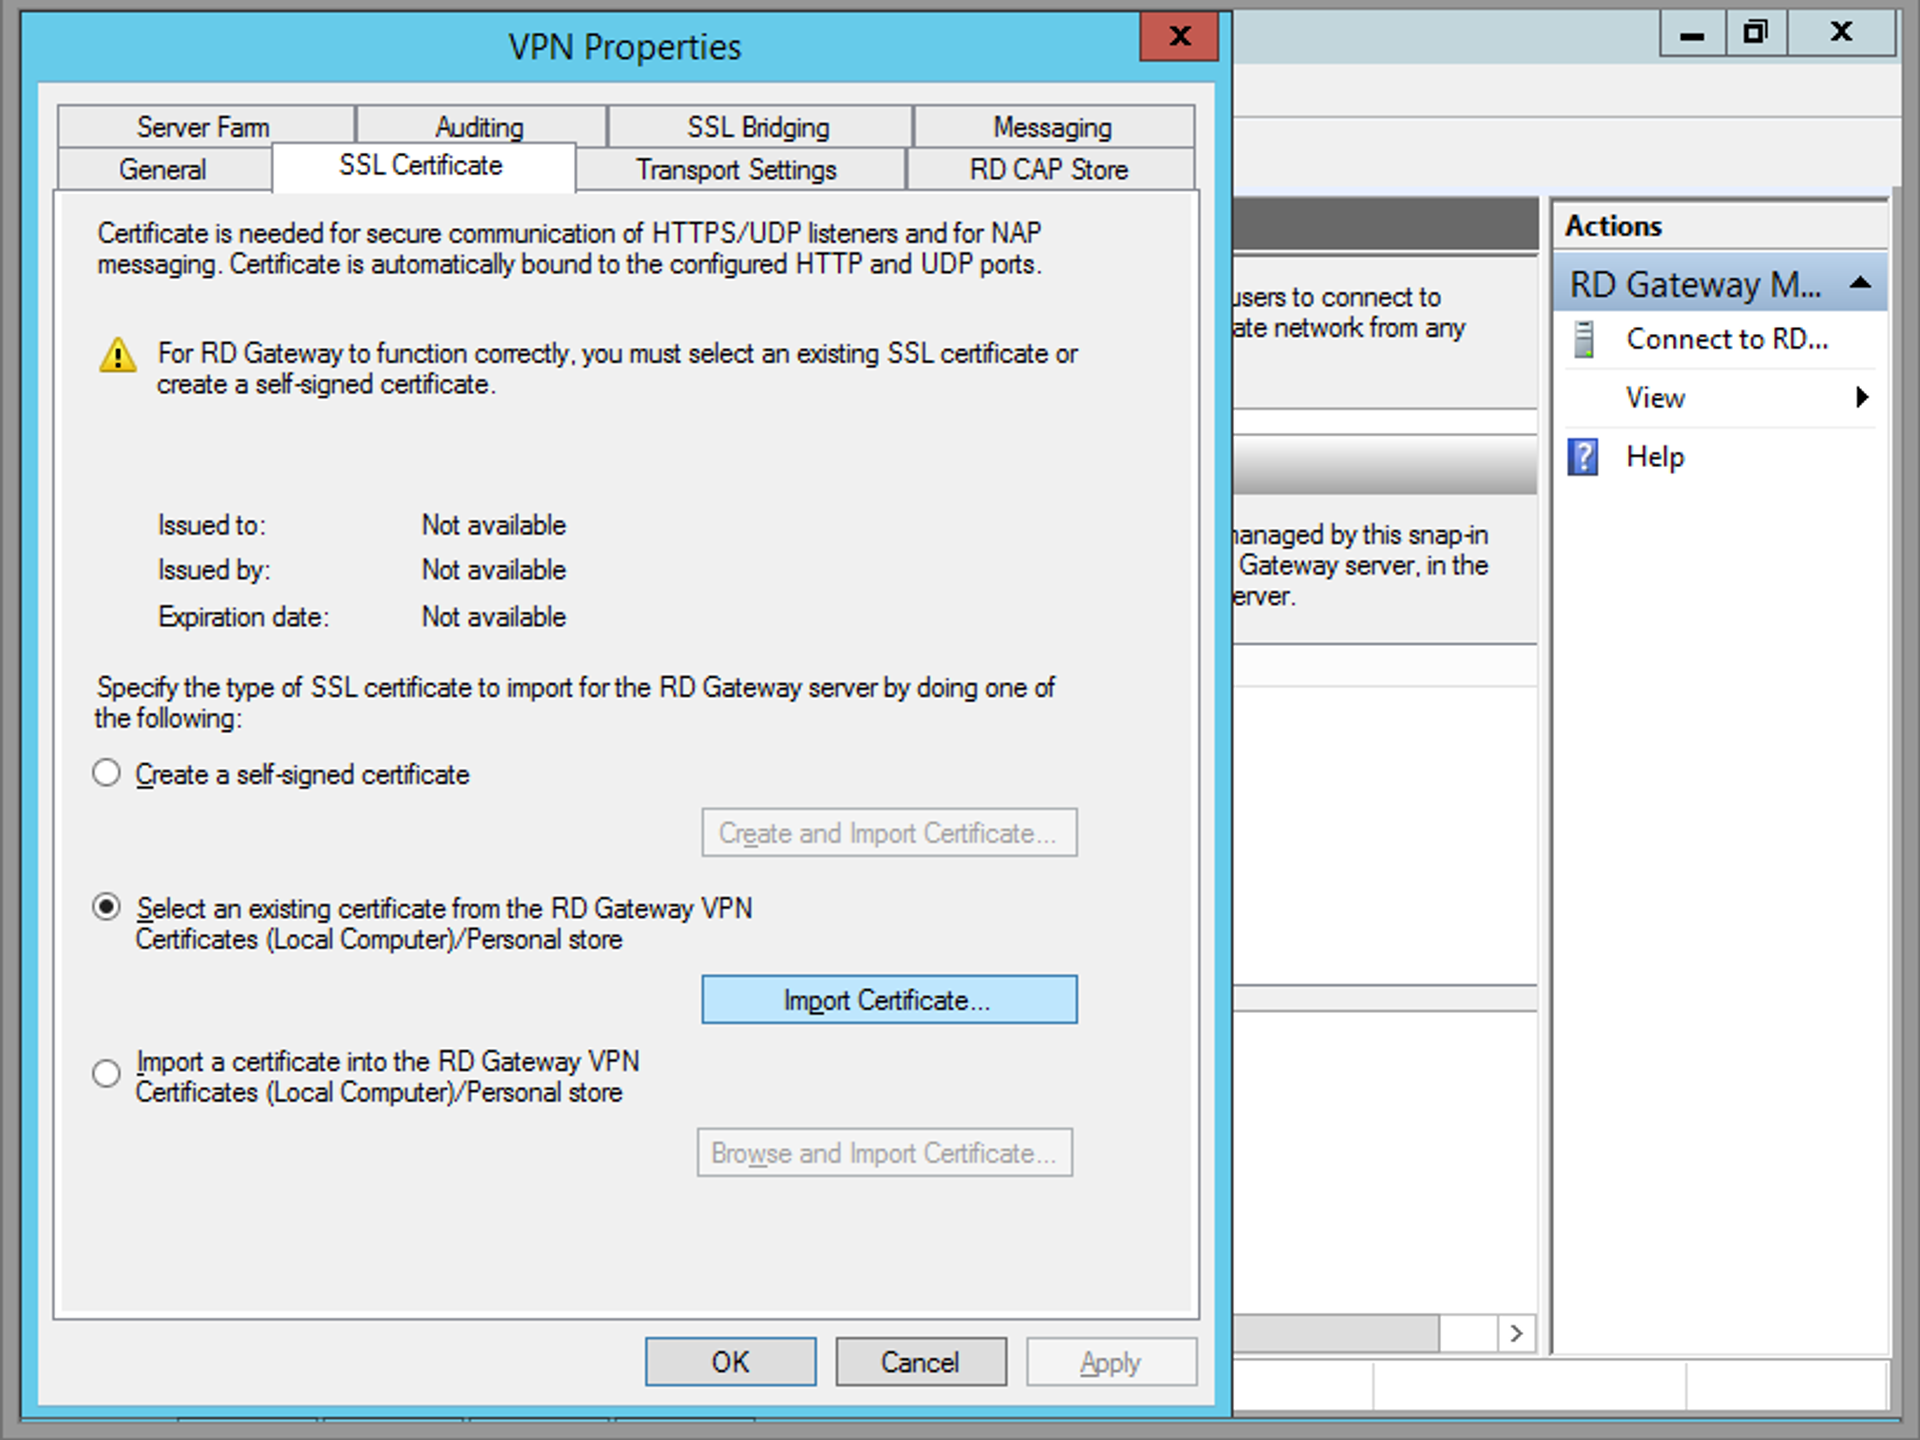
SSL certificate
RD Gateway needs to have a trusted SSL certificate installed. While testing locally, you can use a self-signed certificate or a purchased one, but you should use a trusted SSL certificate in production. Once you have a certificate for the Gateway’s domain name, copy it to the server. Install it by clicking on the server name in the left pane of the Gateway console, then selecting the SSL Certificate tab. Choose Import a Certificate into the RD Gateway, and select the certificate you copied to the server.
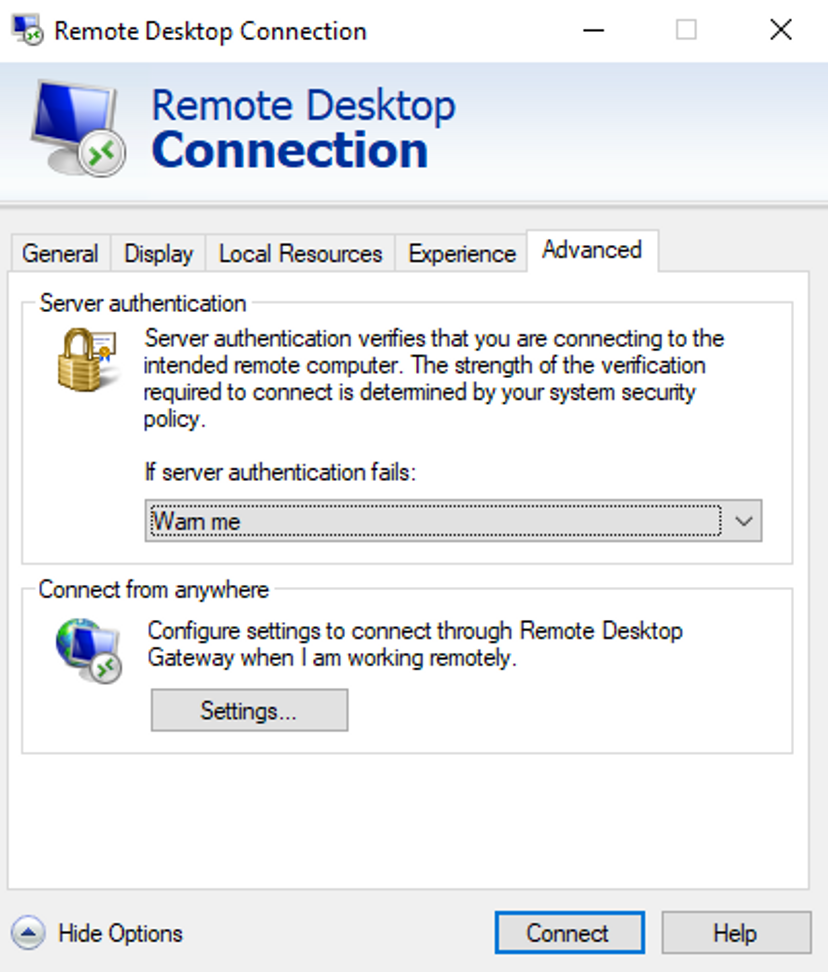
Test connectivity
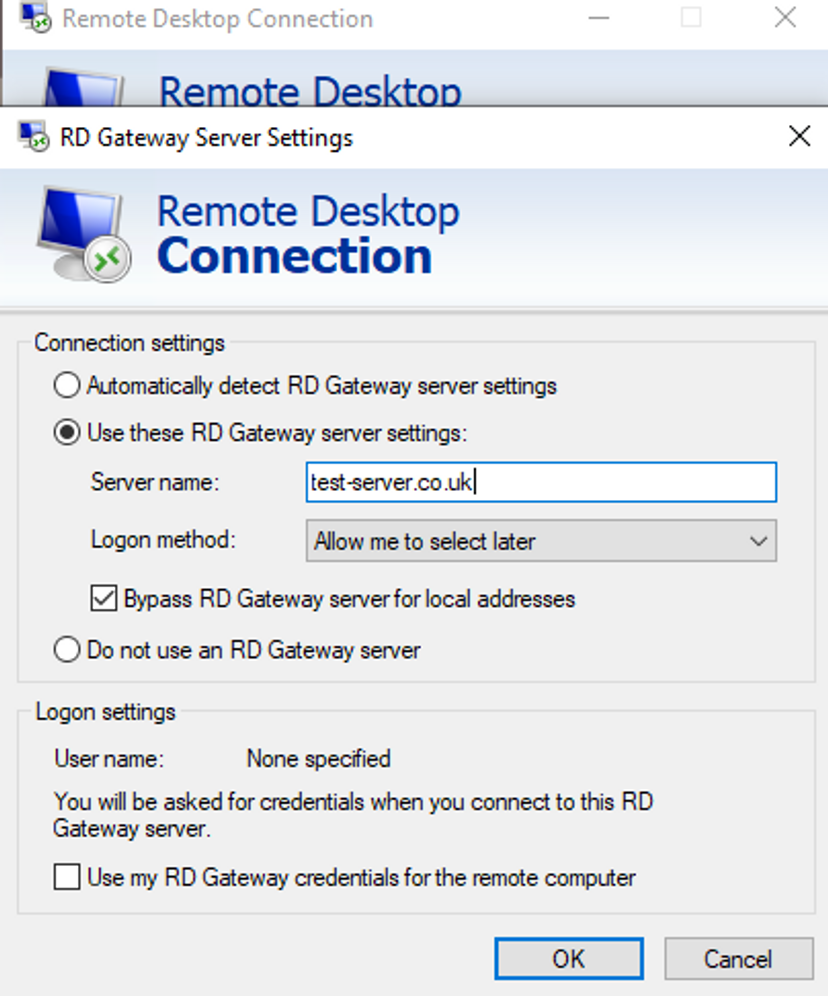
To test connectivity, open the Remote Desktop Connection app and go to the Advanced tab, then, under “Connect from anywhere”, click Settings to configure.
Select Use these RD Gateway server settings and input the server name or IP address. Click OK, then click the Connect button.
RDP pros and cons
RDP Gateway makes connections secure through the use of SSL certificates, which ensures that connections are encrypted. For Windows users, RDP Gateway does not require the installation of any additional services, and it is presented in the familiar Windows interface.
On the other hand, one of the drawbacks of using the Remote Desktop Protocol method is that it is among the most commonly exploited targets for ransomware and other attackers. While RDP comes pre-installed on Windows operating systems, it doesn’t come pre-installed on other OSes. RDP also has potential latency issues for users with a slow internet connection.
RDP best practices
There are some best practices to follow when working with RDP. Users should be required to use strong passwords and multifactor authentication, and idle sessions should be disconnected. The RDP server is best placed behind a VPN to reduce malicious login attempts, and the default listening port, 3389, should be changed to something else to evade hackers scanning the network for computers on the default port.
For more information about setting up an RDP jump server using Remote Desktop Gateway, look at AWS RD Gateway Quick Start and RD Gateway on Windows Server 2016.
Tailscale
It’s also worth noting that the entire jump host problem can be avoided by using something like Tailscale to facilitate access to sensitive networks. Tailscale authenticates you with your identity provider and then gives your devices cryptographic keys so they can independently validate that traffic came from the right machine. With Tailscale, your SSH access story can go from “make everyone configure SSH to go through these single points of failure” to “just SSH into the darn machine.” Tailscale makes everything connect as directly as possible, which means that there is no more need for firewall rules or complicated internal network topographies. You can simplify your access to production servers without jump hosts by doing this:
- Install Tailscale on the SSH server with this guide.
- Look up the SSH server’s Tailscale IP address by running
tailscale ipon it. Assuming your account name isusername, and the SSH server’s IP is100.110.320.103, connect to the SSH server’s Tailscale IP with your account name by running:
ssh username@100.110.320.103By restricting access to the SSH server to users who have logged in to Tailscale, the need for a jump host is removed. Additionally, Tailscale allows you to force two-factor authentication, which is a stronger protection than traditional SSH keys.
Another reason to use Tailscale instead of a jump host is that using a jump host creates added latency, especially when the jump host is not near the destination server. The speed of light is only so fast. Jump hosts centralize traffic, which increases latency because all traffic has to pass through the host. If your laptop is in San Francisco, your jump host is in Toronto, and your server is in Seattle, your traffic is bouncing across the continent up to four times for a single packet. Imagine how that adds up. With Tailscale, centralization is avoided by allowing users to connect to each other directly, significantly reducing latency. This lets your laptop in San Francisco connect directly to your server in Seattle, which is way faster.
Conclusion
In this article, you learned what jump hosts are as well as the benefits and pitfalls of using them. You also learned how to use a jump host to access a remote server using SSH and Remote Desktop Protocol, as well as the advantages and disadvantages of each of these methods. Finally, you saw how Tailscale can offer you a more secure way to access a remote server.
Tailscale is a VPN service built on top of a secure network fabric that makes your devices accessible from anywhere in the world in a fast, simple, and secure way.
FAQs
What kind of security should my jump host have?
A jump host needs to be set up on a security-hardened machine. It also needs strong authentication, which could include requiring stronger passwords; the use of multifactor authentication; aggressive monitoring and alerting; drastic restrictions of which programs that can run on the jump server; and using access control lists to restrict role access to the bare minimum needed for people to do their jobs.
What is a jump host used for?
A jump host is a server used as an intermediary between a client machine and a network of machines the client would like to connect to. It is used to manage access between the two, which helps create a layer of security between the user and the destination machine.
Can I access multiple servers with one jump host?
Can I access multiple servers with one jump host?
You can access multiple servers with one jump box, as long as the jump box has been configured to connect to the respective servers.
What's the difference between a jump host and a bastion host?
A bastion host is a computer that is part of a network, but that has been specifically designed to host a single application or process. It is usually a security-hardened computer. A jump host is a type of bastion host that functions as the point of entry that allows users to reach a private network instance. Other types of bastion hosts include FTP servers, DNS servers, proxy servers, and email servers.


