

Tailscale lets you manage access permissions within a tailnet, including which users are allowed to connect to which machines, using powerful Access Control Lists (ACLs). ACLs are controlled by a HuJSON tailnet policy file that you can edit directly in the admin console. This makes managing permissions simple, but unlike other controls defined in code, there is no way to require approval or review before accepting changes made to ACLs directly in Tailscale’s admin console. In the industry, there’s a pattern called GitOps that suggests you should maintain anything that defines your infrastructure, like this policy file, in a Git repository and use CI to validate, test, and automatically deploy changes.
In this post, I’m going to cover how you can set up a GitOps workflow for your tailnet policy file with GitHub Actions so you can maintain ACLs in a central repository, apply the same controls for changes to your configuration file as you do for code (“config as code”)— such as requiring review, and how to automatically apply these configuration changes to your network.
To make this easier, we’ve released a Sync Tailscale ACLs GitHub Action you can use for automatically updating your tailnet policy file from GitHub. If you’re using this action, or another GitOps workflow you’ve built yourself, you can surface it in the Access Controls page of the admin console to prevent colleagues from accidentally making unapproved changes.

When using GitOps, a warning is shown in the admin console.
Set up an automated workflow with GitHub Actions
To get started, you’ll need to create a new GitHub repository for your tailnet policy file. This should be a private repository, as you are going to have personally identifiable information such as users’ email addresses in it. I’ve created the policy file for my personal tailnet in cetacean/tailscale-acls if you need an example of what this repository should look like.
policy-file setting in the GitHub Action.In your repo, create a file named policy.hujson and copy your ACL from the admin console into it. Once you’ve copied that in, commit the policy file and push it to GitHub.
policy-file argument to the with blocks in your GitHub Actions config. Otherwise, it will default to policy.hujson.$ git add .
$ git commit -sm "policy: import from admin console"
$ git push -u origin main
Next, create two GitHub Actions secrets in that repository’s settings:
TS_API_KEY—put your Tailscale API key hereTS_TAILNET—put your organization here ([example.com](https://example.com/),myemail@example.com,example.github, orexample.org.github). You can find your organization in the Settings page of the admin console.
These will act as the configuration for the action. Next, create your own GitHub Actions workflow in .github/workflows/tailscale.yml and have it use the Sync Tailscale ACLs action in GitHub Actions marketplace. Copy the following YAML to your Action:
name: Sync Tailscale ACLs
on:
  push:
    branches: [ "main" ]
  pull_request:
    branches: [ "main" ]
jobs:
  acls:
    runs-on: ubuntu-latest
    steps:
      - uses: actions/checkout@v3
      - name: Fetch old version info
        id: fetch-old-version
        uses: actions/cache@v3
        with:
          path: .
          key: version-cache.json
      - name: Deploy ACL
        if: github.event_name == 'push'
        id: deploy-acl
        uses: tailscale/gitops-acl-action@v1
        with:
          api-key: ${{ secrets.TS_API_KEY }}
          tailnet: ${{ secrets.TS_TAILNET }}
          action: apply
      - name: Test ACL
        if: github.event_name == 'pull_request'
        id: test-acl
        uses: tailscale/gitops-acl-action@v1
        with:
          api-key: ${{ secrets.TS_API_KEY }}
          tailnet: ${{ secrets.TS_TAILNET }}
          action: test
gitops-pusher, set the correct environment variables and flags, then run it. See the GitHub Action configuration for what you need to do.This workflow will push the tailnet policy file to Tailscale on commits to the main branch, and it ensures that all ACLs are valid (and all ACL tests pass) when running on pull requests that target the main branch. If you don’t use the name main for your default branch, change it here as appropriate. When you apply this workflow, gitops-pusher will automatically run ACL tests for pull requests and apply ACL changes on commits that are merged to the default branch.
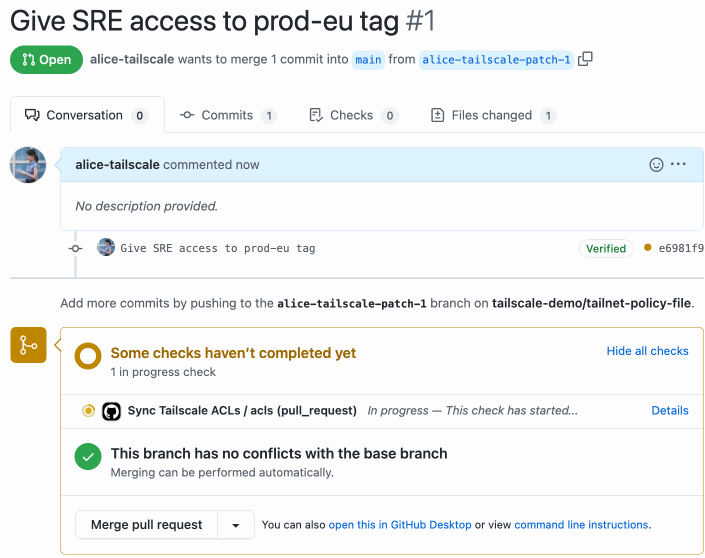
Use the Sync Tailscale ACLs GitHub Action to run ACL tests as part of a pull request before merging changes to your tailnet policy file.
See the documentation to set up this workflow.
Warn users in the admin console that you’re using a GitOps workflow
If you’re using a GitOps workflow, then you want to have a single source of truth for your ACLs — in this case, the tailnet policy file you’re keeping in Git.
To prevent users from accidentally overwriting your ACLs or from making unauthorized changes, you can include a specific comment in your tailnet policy file to indicate that you’re using a GitOps workflow:
// This tailnet’s ACLs are maintained in https://github.com/cetacean/tailscale-acls
Tailscale’s admin console will display a warning to users, pointing them to where your ACLs are managed. This comment also applies to any other workflow you’re using to manage your tailnet policy file — not just Tailscale’s GitHub Action. However, we understand that there may be a need for emergency changes, so users can still edit ACLs if necessary. (If your users are able to edit ACLs, but they shouldn’t be, consider changing user roles, e.g., to IT admin or Auditor.)
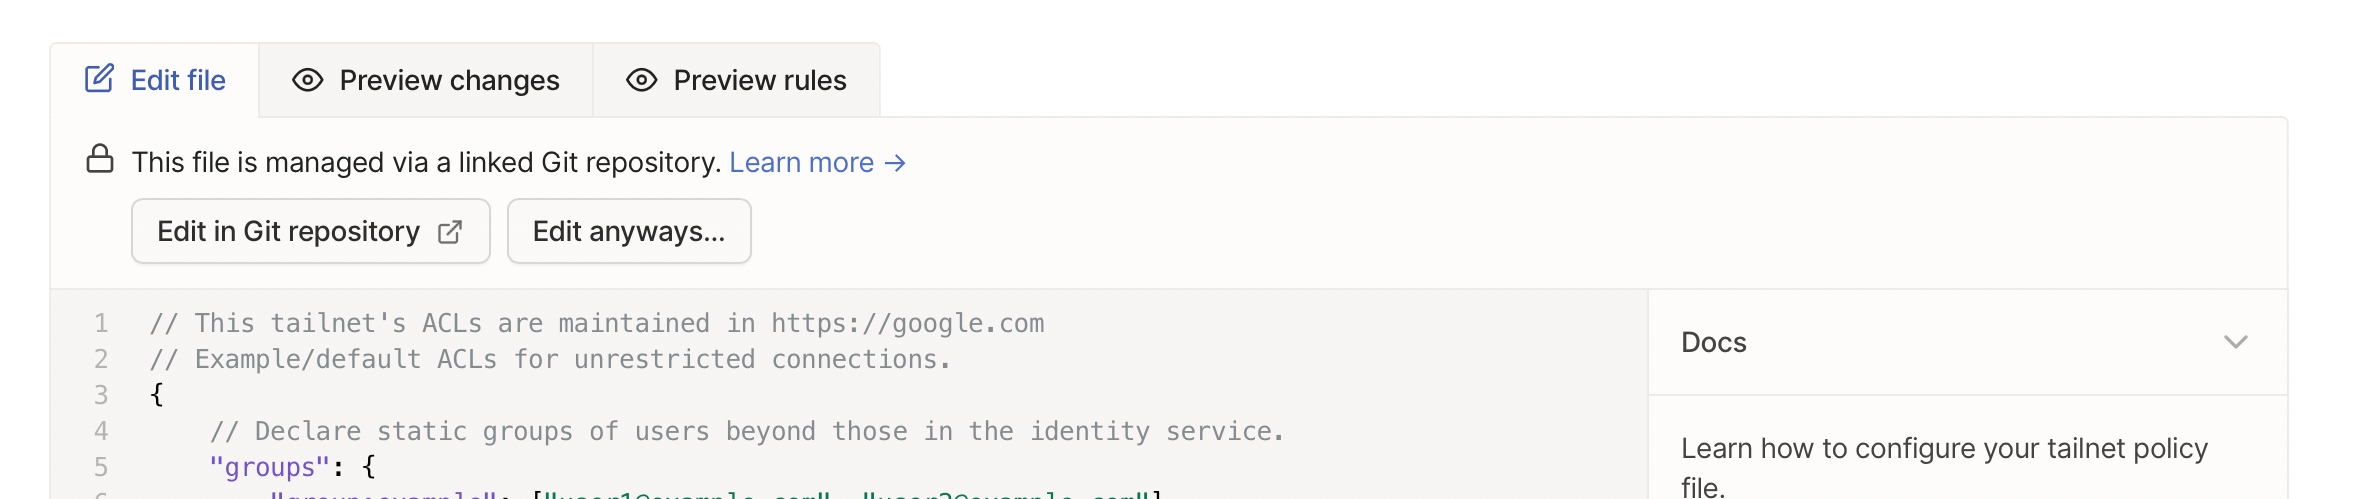
When using GitOps, a warning in the admin console prevent you from accidentally editing your tailnet policy file. You can still edit the file, such as in an emergency.
With this setup, you can create a GitOps workflow for your Tailscale ACLs. As implemented, there’s one clear shortcoming: Tailscale API keys expire every 90 days, and there is currently no mechanism to have them renew automatically. We’re working on this, but it’s not ready yet. For now, you will need to have an admin create a new API key regularly, and update the GitHub secret accordingly.
If you run into any trouble setting this up, please get in touch! If you haven’t had any trouble setting this up, also please get in touch! Ping us on Twitter @Tailscale or let us know on the forum. We’re happy to make things that make your life easier.
 Xe Iaso


